

5 Ways the M1 MacBook Makes Ministers More Productive and 1 Way It Doesn’t
The new Apple M1 MacBook Pro boosted my productivity in the weeks I've used it. It's not perfect and won't save you hours of time, but will help make you a little more efficient. Find out how with these 5 productivity boosters.

I bought the new M1 MacBook Pro and over the last week, it made me more productive. Here are 5 ways that this new M1 MacBook Pro can help make ministers more productive in ministry and at the end, I'll offer one reason that it's not all perfect.

In case you didn’t know, Apple released a significant update to its MacBook Air and MacBook Pro line. They replaced the Intel processors with Apple Silicon, which streamlined interconnection between the brain of the computer (processor) with the memory and graphics processor to make the computer faster and more efficient. It runs a lot of things faster and the battery lasts longer, up to 20 hours long depending on how the user sets their preferences and what software they’re using. That's Apple's figure not mine.

How does a computer make someone more productive? I’ve got 5 ways the M1 MacBook Pro makes me more productive. This applies to the M1 MacBook Air and M1 Mac mini too, since the internal hardware of the new Apple M1 MacBook Air and Pro perform similarly.
M1 MacBook Battery Lasts a Long Time
When I first opened and set up my new Apple M1 MacBook Pro, I plugged it in because that's the popular wisdom - charge your tech to 100% right away. After doing that I didn't plug it in for a couple of days of heavy use. I didn't time it so I don't know how long it lasted. But it lasts a long time.

My friend who also got an M1 MacBook Pro took his computer to a coffee shop. He worked with it untethered to power all day long and reported in the early evening that it still had 63% battery life left at 4:07 in the afternoon. That's stellar battery life.
I typically use mine for about 3-5 hours per day on battery power and I don't charge it for two or three days at a time. Even then, I only do it to be safe. I could probably go 4-5 days easily.
This kind of battery life makes you more efficient because you don't have to worry about finding your charger. Leave the charger at your desk, nightstand, or wherever you top off the battery. It may not save hours a day, but every five-minute saving helps. You’re not worried about battery life so you can work anywhere instead of seeking out a table or booth at the coffee shop near the power outlet.
M1 MacBook Keyboard Enters Text More Accurately
Apple customers have a checkered history with Apple's recent keyboards. Until a few years ago, they made the best mobile keyboards around. My first Mac was a 2nd generation MacBook Air and I loved that computer because of the keyboard, the trackpad, and the operating system.
Apple kept the stellar trackpad but wanted to make their computers thinner so the designers at Apple crippled their amazing keyboards making them nearly unusable. Fortunately, this changed with the newest MacBooks released in 2019 and 2020. The new M1 MacBooks also sport the new keyboards that actually work great, feel great and type accurately if you're a quick touch typist.

Not everyone agrees that the newer keyboards work better, but most do. I hated the previous versions and feel like these latest keyboards work more like that first MacBook Air I received nearly 10 years ago.
M1 MacBook Screen's Brighter and Easier to Read
Do you know what 400 or 500 nits mean? Neither do I. Practically, it means a bright monitor that you can keep at about 50% most of the time. A nit is a measurement of brightness. The word comes from the Latin term nitere meaning to shine.
A bright screen saves battery life and stays crisp and bright enough to see text, view video, and enjoy using your MacBook. I can read my M1 MacBook Pro screen easily while out and about keeping it at 50%. Most computers I've used or tested had to be set at about 70-80% in most bright rooms for me to view them comfortably.
The M1 MacBook Air is 20% darker than the M1 MacBook Pro officially. The Air offers 400 nits of brightness while the Pro has 500 nits. When my son and I placed our two M1 MacBooks together, we didn't notice as much a difference as I expected. See that in our unboxing of his new M1 MacBook Air in which we put my M1 MacBook Pro next to his Air to compare the two.

M1 MacBook Always Stays On So No Waiting to Boot
My old MacBook started up pretty quickly. It took a few seconds from sleep mode and less than 20 seconds from off. However, opening the lid on the new M1 MacBook Pro turns on the screen and the computer snaps to attention instantly ready for your input.
Instant-on displays won't save you hours a day or a week, but it does make you more efficient.
Consider this scenario. You have an idea, so you pop open the computer and start typing within a few seconds. With older MacBooks or a PC, you open the screen and often you have to wait for the computer to boot up or wake from sleep. It takes 5-30 seconds or some Macs and longer on old systems, maybe 5 minutes.
You wanted to quickly get an idea written in your sermon notes or the Bible study notes, but the slower computer means you're waiting. In the interim, you get interrupted by someone and you forget to write down that idea. That perfect ending to your sermon or the excellent illustration of your third point is gone into the recesses of your aging mind. I hate when that happens. It's less likely to with an instant on display that pops up the moment you lift the lid. How often does this happen? Not very! But one time makes this a nice added benefit of a faster computer.
Bonus Benefit: iOS Apps on Your M1 MacBook
Did I say five benefits? Well, here's a bonus sixth benefit of the new M1 MacBook Pro and Air - iOS Apps on your Mac. You read that right. You can install some of the apps you love using on your iPad or iPhone on your Mac.
It's too simplistic to say that the new M1 MacBook is just a glorified iPads, but they do run Apple Silicon just like an iPad or iPhone. For that reason, Apple designed the new macOS 11 Big Sur with the ability to install iOS apps, if the developer makes that option available.
Not all developers flipped the switch to turn on iOS app installation on the Mac. For example, I edit my sermon podcast on the Ferrite iPad app. It's quick and easy to use and I'd love to edit my sermon podcast with Ferrite my new M1 MacBook Pro too. Ferrite won't let me do that right now. But they'd be insane not to offer a version. This would give them a large number of potential customers. I'm guessing they will make it available in the Mac App Store, but they'll charge an added fee. Ferrite's so good I'll pay extra if it's not too expensive.
A few Bible app developers flipped that switch already. You can install a few great Bible apps for iPad on your Mac.
M1 MacBook Performs Some Tasks Faster
The video above exported from Final Cut Pro, a video editor from Apple that Apple updated to take advantage of the power of the new processors. It exported in under three minutes. On my old MacBook from 2017 that would take about 15-20 minutes depending on how complicated I made the edit with tracks and transitions.
If you use Apple's iWork apps like Pages, Keynote, or Numbers you'll seem excellent responsiveness. iMovie or GarageBand run quickly too.
Any application made to run natively on the M1 Apple Silicon Processors will run more efficiently than the previous generations of those programs. Here's one example. I created a twelve-minute video about how Bible software runs on my new MacBook. See it below. Microsoft released new versions of their Office apps with M1 Mac optimization support.
1 Way an M1 MacBook Doesn’t Boost Minister Productivity
Notice the previous section heading says "some". Not all macOS software runs screaming fast. Traditional software that developers failed to update to an M1 optimized system require something Apple calls Rosetta 2. Rosetta 2 takes the software coded to run on the old Intel-based systems and helps them work on the new Apple Silicon processors. Think of it like a translator who listens to you speaking English and translates your message to Sign Language for a hearing impaired person.
All Bible software that I'm familiar with requires Rosetta 2 to run on an M1 MacBook at this point. The previous video shows you how well most of the Bible software runs, but it's not perfect. I experienced some slow performance in both Logos and Accordance. It's minor, but worth mentioning. You can use these programs, but you will not see an increase in productivity till Faithlife and Accordance or the other developers update their programs. I'm told Logos is looking at 6 months to 18 months depending on how they attempt the update. Accordance isn't saying anything publicly, but I hope it will be sometime in the next year.

M1 MacBook Pro and Bible Study Apps
How well do the top five Mac Bible study apps run on the new M1 MacBook Pro? We ran five of the best programs and share our results.
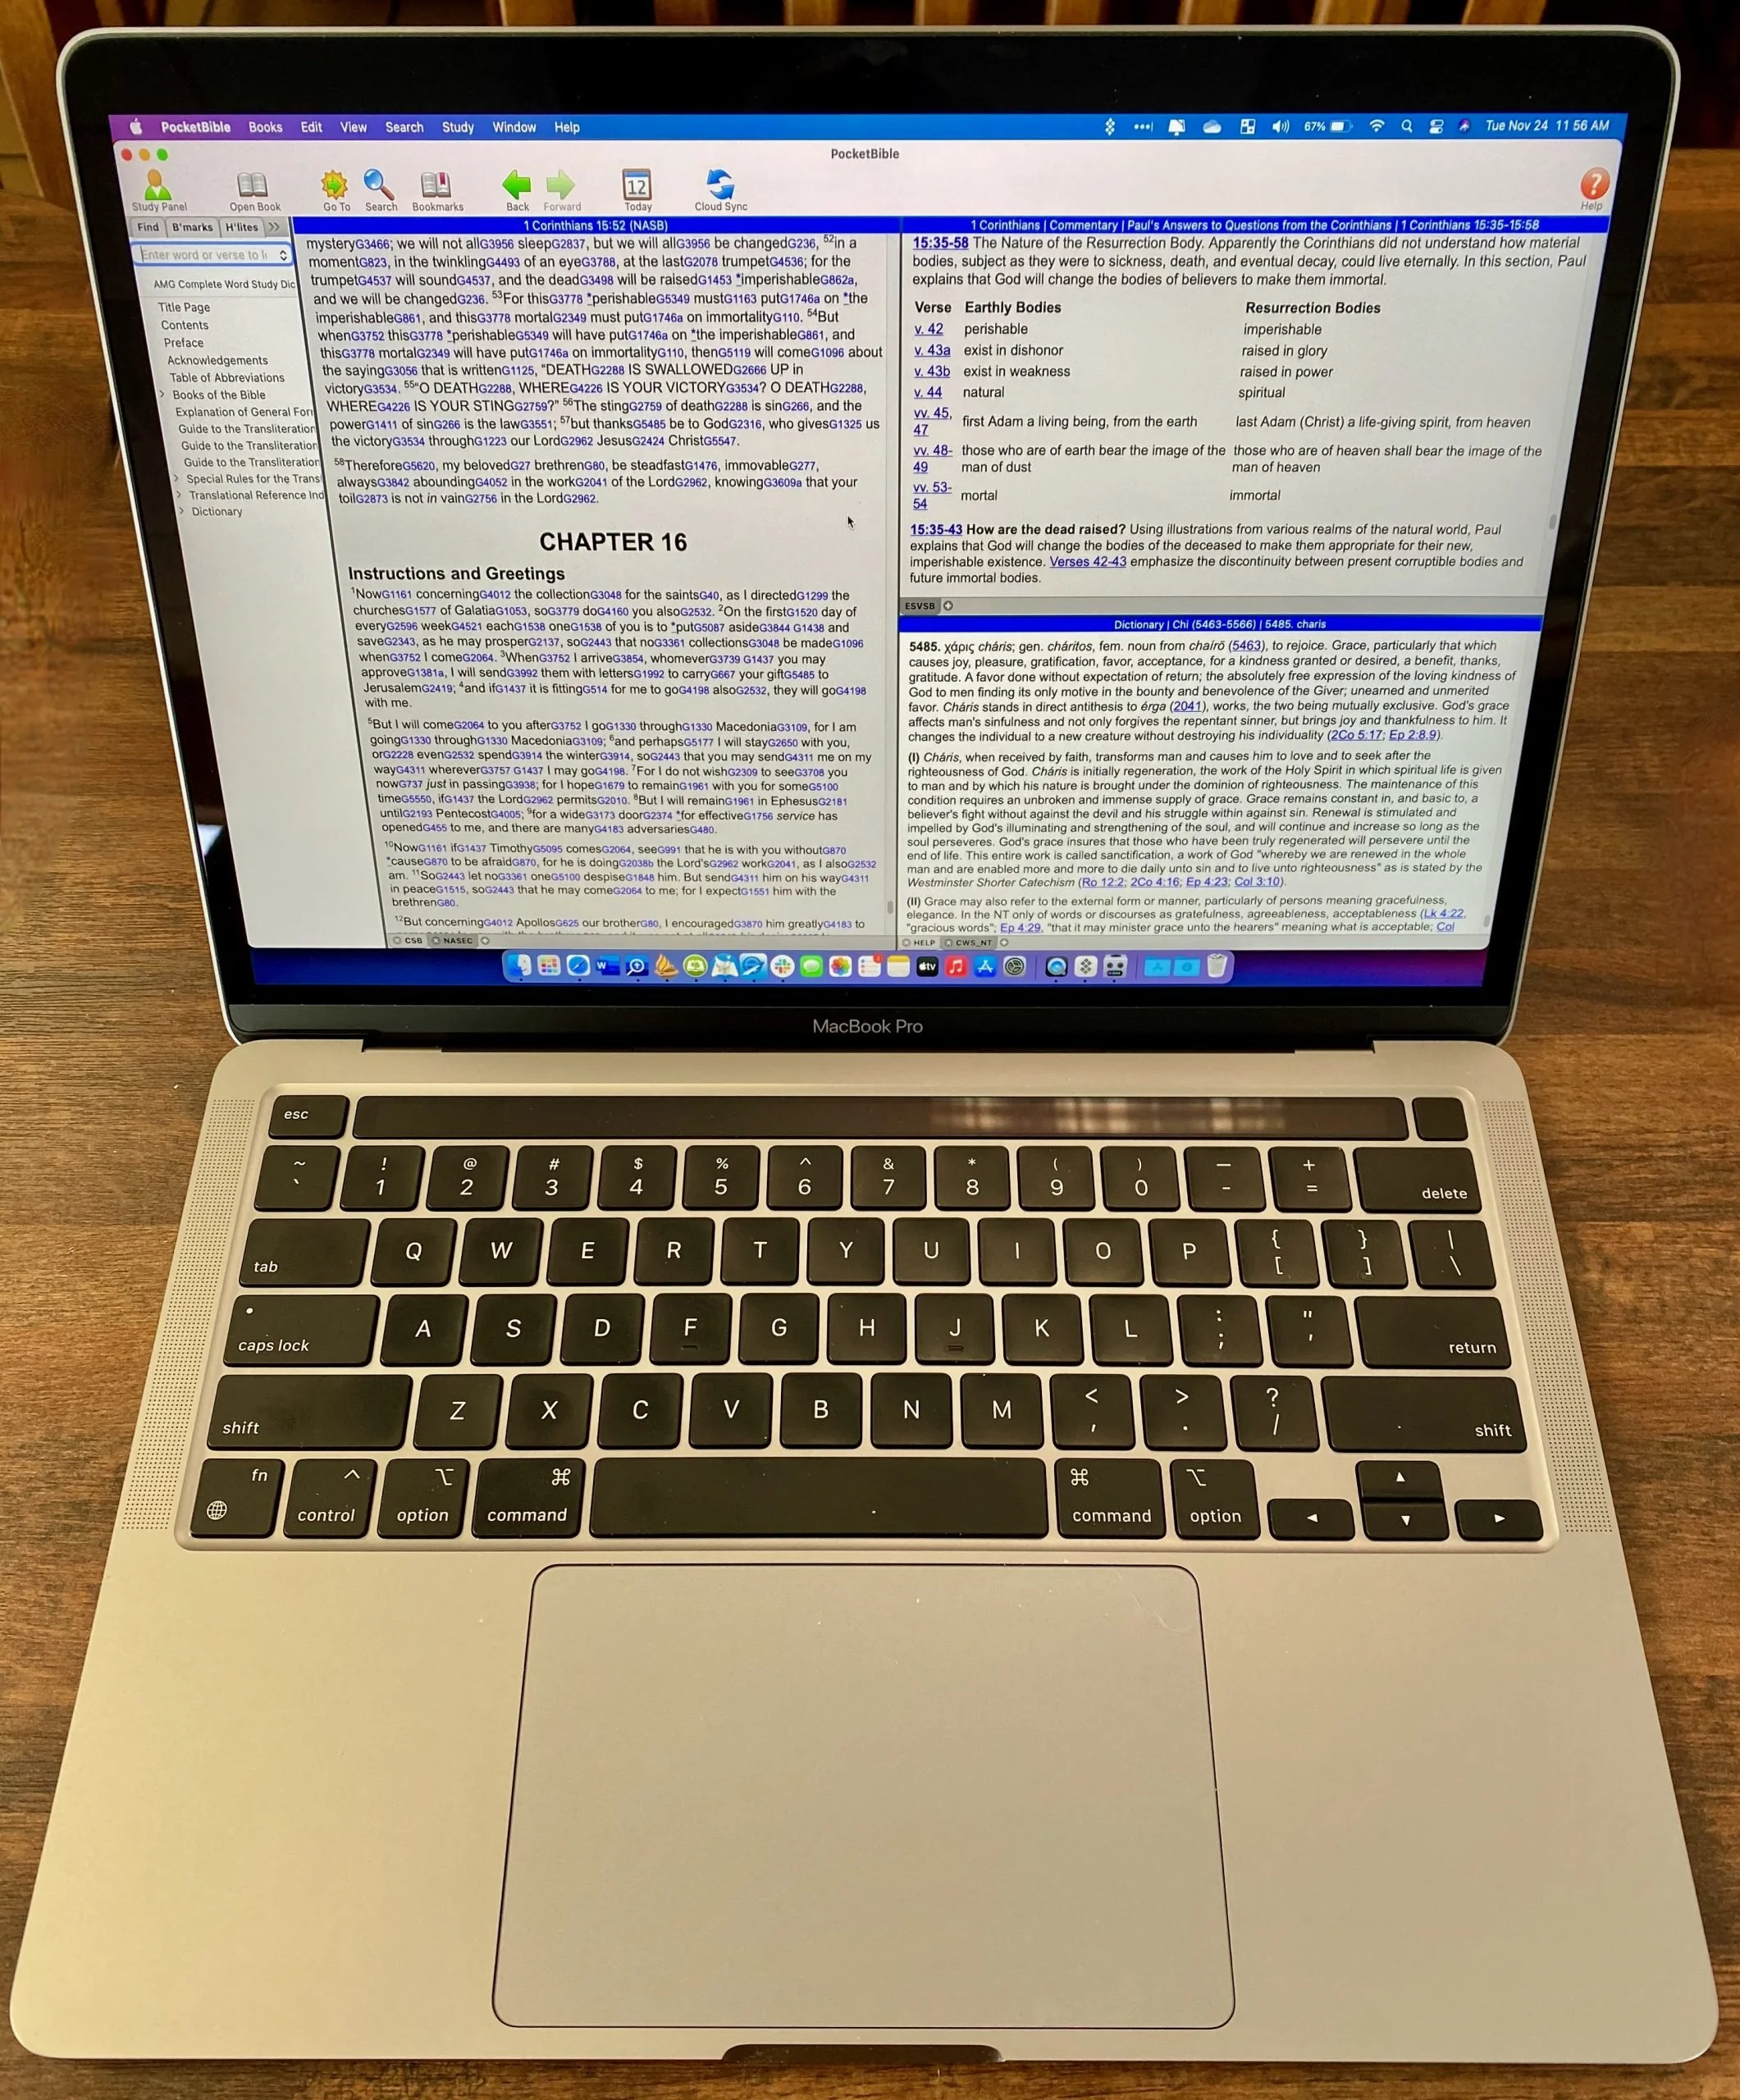
Are you curious how the new M1 MacBook Pro handles Bible study apps and programs? I was too and couldn't wait to test this out. You can find the results as I tested Logos 9, Accordance 13, Olive Tree, Laridian Pocket Bible, and e-Sword X on the new M1 MacBook Pro.
UPDATE: Added a video under the Logos 9 on M1 MacBook Pro section below.
Why I Bought the M1 MacBook Pro
For the past year, I actually transitioned to a Windows-centric computer experience by giving my 2018 MacBook Pro to my son, a videographer and photographer who really wanted to go Mac. I bought an excellent HP Spectre x360 13 2-in-1, but then reluctantly decided to go back to Apple after my office PC failed and I got a Mac mini from a friend.
I bought the 2020 MacBook Pro that Apple released earlier this year based on Intel's processor. That was in late October and then Apple released the new M1 MacBook Air, M1 MacBook Pro, and M1 Mac mini. Fortunately, I got mine at Best Buy and I could return so I did and picked the M1 MacBook Pro with 8GB of RAM and 500. It's not the highest-end M1 MacBook, but it's what could get in exchange without paying too much more.

Best Buy shocked me and told me I could get the new computer the next day, but that was wrong. It showed up the Monday before Thanksgiving instead of one week before Thanksgiving. That's not bad considering Apple shows a date in mid-December before you can get one directly from them.
Installing Bible Programs on the M1 MacBook Pro
The new M1 MacBook Pro showed up and I unboxed it and starting setting things up. Soon I was installing my Bible study programs. I use three Bible apps but for this test, I installed five of the best Mac Bible study programs you can buy today.
- Accordance 13
- e-Sword X
- Laridian Pocket Bible
- Logos 9
- Olive Tree Bible Study
For the most part, these apps installed without much concern. It's interesting that the first time you install a program that's not optimized for the M1 chip, macOS 11 Big Sur will ask you if you want to install something called Rosetta 2. It didn't take long to download and install, but it stops you from launching your app. I had to launch Logos 9 again after Rosetta 2 finished installing.
The other apps installed quickly. Accordance takes a little while to download your books if you have a large library. Olive Tree Bible Reader, Laridian PocketBible and e-Sword X don't take as long. In fact PocketBible has the best installation process of the group. It takes little time at all.
Logos 9 on M1 MacBook Pro
Let's first talk about Logos 9 because it's the most demanding of the five programs. It Typically, I start the installation, plug in my laptop, and leave for hours. When I come overnight or after a full day away, it finishes and we're ready to study the Bible.
As you can see from the video above showing the installation and indexing process, it took 3 hours and 47 minutes to install, download my 27GB library, and index the library. The download seemed faster than normal. Then indexing went quickly.
My friend LaRosa compared the indexing process to taking a long trip on an Interstate. It takes a little while to get on the road, but once you do and get up to speed, it runs quickly. Then, the off-ramp time slows down. That's how things went with the M1 MacBook Pro. It starts slow, speeds up, and then finishes slowly.
Normally, when Logos 9 indexes the library it takes up a lot of resources and you can't really use your computer much. You can, but it's infuriating because Logos takes up all the memory and processor. However, with the M1 MacBook Pro, Logos 9 ran slowly, but the rest of the system ran smoothly. For example, I hit the Home button in Logos 9 and scrolled through the Home page. It stuttered running haltingly. It's not smooth at all.
In spite of how slowly Logos 9 itself performs, the rest of the system runs smoothly during the indexing. That's abnormal with Intel or AMD based computers. They usually don't run smoothly.
Battery Life for Running Bible Study Apps on M1 MacBook Pro

The battery life stood out on my new M1 MacBook Pro. The process of installing Logos 9 on laptops usually kills a battery. On my previous HP x360 13 and my older 2018 MacBook Pro, I would never attempt to install Logos without plugging in. I didn't have to on this computer.
Add the wonderfully bright screen and crisp text, you get a fantastic experience writing and reading. I put the screen at 50 percent and it looks like other computers I'm used to using when they are set to 75-80 percent.
After I killed the battery installing Logos I used it for a couple hours and went to bed with it at 40 percent. This morning, after running on battery at 50% for about 4 hours, my battery reads 76% left. That's fantastic. My 2020 12.9-inch iPad Pro doesn't last as long in real-world use.
Hard to Tell Difference on M1 MacBook Pro

What's the final takeaway for running Bible study apps on the M1 MacBook Pro? For four out of our five apps, there's little to no different. I couldn't tell the difference between running Accordance, e-Sword X, Olive Tree Bible, or PocketBible on this computer.
Logos 9 is a little different. Installation was a slightly better experience. You can set it to download and index your library and get some other work done while it happens in the background. That's a huge improvement compared to running the program's installation on other computers.
Once you install Logos 9, it runs well. There's one issue that's more a Big Sur problem than an M1 MacBook Pro problem. Over in the Logos 9 forum, there's a post listing one issue as follows:
The Logos Desktop Team has tested Logos 9 and Logos 8 on macOS 11 "Big Sur." So far we discovered some minor styling issues (see below), but have not encountered any major issues.
Known Issue: Table of Contents arrows are duplicated.From Logos 9 forum
The above issue with arrows is an extremely minor issue. You may find others, but right now that's all.
In another Logos forum post, Phil Gons from Faithlife said the company has no definite plans to make Logos 9 run as an M1 Mac application. That's not saying they won't do it, but they are not announcing anything publicly. I'd expect this to take a long time since the current version of the software works so well. I look forward to the time when these five all run as a native app.
There's one thing that you can say about running Bible study applications on the new M1 MacBook Pro. Launching these apps takes a lot less time than they used to. Of our five, Laridian PocketBible and e-Sword X jump onto the screen instantly. Olive Tree Bible Reader loads in a couple of seconds and Accordance launches in a few seconds. Sadly, Logos 9 still takes longer than the others. But it loads faster than it did on Intel Macs. Running the programs speeds up on these new M1 chips too.

How to Add an SSD to a Mac Without Opening the Computer
We'll show you how to add an SSD to a Mac without opening the computer. This uses an external drive to boot and run the OS.
Apple charges ridiculous amounts for larger capacity solid state drives as an upgrade to a Mac. Here's how to keep from paying hundreds. We'll show you how to add an SSD to a Mac without opening up the case. The external SSD runs faster than an internal spinning hard drive. Today, Apple computer owners can't upgrade their internal drive. If you can, it 8takes some real skill to crack open the case and replace the internal drive.

Why Add an SSD to a Mac?
Let's say you bought a computer with a 128GB drive. Now that you've installed your large Bible study library all of your movies and the 10 years of digital photos you shot, the computer says it won't even let you install that tiny app from the Mac App store or download a new commentary series to your Bible software. The computer's running out of space.
The solve the problem of a full hard drive you have to add storage or replace the hard drive. In the old days we took off the bottom of the MacBook, unplugged the old drive and put in a new one. Replacing the drive in a Mac mini or iMac got a little more complicated, but the owner could still do it or take it to any computer shop. Today, you'll have to run through a complicated set of steps if you can even do the upgrade. A lot of Macs won't let users upgrade their storage without replacing the whole motherboard. Apple likes that because they want you to buy a new $2,000 computer or pay stupidly high prices at the time of purchase.

At the time of purchase, the upgrade to a 1 TB SSD on a Mac mini or MacBook Pro will cost $800. They charge $700 on an iMac. Compare that to buying an internal SSD from Amazon, which costs as low as $125-$175 for a base level 1TB internal SSD. You can get a really great high-end drive like a Samsung EVO drive for about $300. Add an enclosure for $20-$50 and you're saving a lot of money.
Can I use an external drive as my main startup drive to run macOS and all my programs? Yes. I did this on a Mac mini for years before I learned how to crack the thing open to upgrade the drive with an internal SSD. The process of using an external SSD worked great.
An external SSD won't run as fast as an internal SSD from Apple. That's not the comparison that matters. Look at the speed of the slow internal traditional spinning hard drives Apple uses and you'll notice a big speed increase by booting from an external SSD connected to the computer's mini-DVI port or a USB-C Thunderbolt port.
What You Need to Add an SSD to a Mac
Here's what you'll need to add an external SSD to your Mac, copy the internal drive over to the external and then tell the computer to boot from the external drive instead of the internal drive.
- An SSD (internal or external)
- A 2.5-inch hard drive enclosure, unless you choose an external solid state drive (more on that below)
- Software to copy the contents of your old internal hard drive to the new external drive
- A way to attach the new external drive to your laptop
Choose Your SSD
You have to decide if you want to save some money by getting an internal SSD and a hard drive enclosure or do you want to get a simpler external solid state drive that usually costs more.
Consider the SanDisk 1TB Extreme Portable External SSD. It connects via USB-C and costs under $200 on Amazon. Or you could get the Crucial MX500 1TB 3D NAND SATA 2.5 Inch Internal SSD for about $135 also on Amazon.

If you go with the second option, you'll need to put it in an enclosure. That's a little box that you install the drive in. It comes with the cable to hook it up to your USB-C port on your Mac. Take a look at the $15 enclosure from Aukey (see above). Some older Macs don't have USB-C so get an enclosure that plugs into a USB 3.0 port, which won't run as fast, but will still run faster than an internal spinning hard drive. You'll find a bunch of them on Amazon.
If you go with the internal SSD and drive enclosure, then install the new drive in the enclosure. Follow the instructions that came with the enclosure.
Copy the Old Drive to the New External Drive
To copy the old internal drive contents to the new external drive, plug the external drive into the USB C or USB 3.0 port. Make sure it's ready and working. You may want to open Disk Utility on your Mac. It's in the Utilities folder of your Applications folder. You can also use the keyboard shortcut COMMAND+Space Bar to open Spotlight Search. Type Disk Utility and make sure it's selected and hit enter or click on it with your mouse or trackpad.
The video above from the folks iFixit at shows exactly how to format the drive and then use the utility below to clone your Mac hard drive to the new SSD.

Select the drive in the list on the right. Be careful to select the external drive and not your internal drive. Then click on Erase on the toolbar.

Give the new drive a title, choose Mac OS Extended (Journaled) in the Format: section and GUID Partition Map in the Scheme: section. Click on the Erase button in the lower right corner of the dialog box that pops up. Let it finish erasing the drive.
Next, head over to the SuperDuper! website and get the file by clicking Download in the upper right corner o the webpage (as of January 2019 - location of the link may change). The downloads a DMG image file.
Install SuperDuper! on your computer. You'll have to give it special permission since a box pops up that says:
macOS will not allow SuperDuper! to copy your drive until you authorize us to do so.
This is done by adding the SuperDuper! application to the "Full Disk Access" section of the Security & Privacy preference pane in System Preferences.
Quit SuperDuper! and we'll open the proper preference pane for you. Once you've added us, re-open SuperDuper! and you should be good to go.

Follow those instructions to make SuperDuper! work. This happens by hitting Quit and it opens the Security Settings screen. Click the little Lock icon in the lower left (see above image) and enter your computer password. Then under the list box click the plus icon and choose SuperDuper! from your list of Applications.
Now you can run SuperDuper! to copy the internal drive to the external drive. The first time you run the utility it will open a comprehensive help file in the Preview program or whatever you use to read PDF files by default.

In the first Copy drop down box (upper left) choose the Macintosh HD. In the second drop down box choose the new drive you just erased. Look for the name you gave it in Disk Utility. I didn't enter one so mine says Untitled. You don't need to change an Options. You can schedule the operation for a later date if you prefer. If not, just hit Copy Now and let it copy. Don't do anything because you might add files while it's copying and that could mess things up.
Boot with New External Drive
It's time to test out the new external drive. Close everything and restart the computer by clicking on the Apple icon in the menu bar's left end. Choose Restart. Let the Mac restart. When it begins to start back up hold down the OPTION key on the keyboard. The computer will show the drives available to boot from. If SuperDuper! worked properly, then you'll see at least two drives. Choose the new drive (the internal will sit on the left and the new drive on the right).

After you select the new drive let the computer start. It should work fine and start up like it did before.
If the new drive makes things faster than the internal spinning hard drive, then everything worked properly. If not, something's wrong. Let everything that runs at startup. Give it a minute and start launching programs.
Run this way for a few days to weeks just to make sure it continues to work. Then if you want you can erase the internal drive and use it as a second drive to store things like media (videos, music, photos) and documents.
Attach the Drive to Your MacBook
You might now want an external drive hanging off your laptop computer. This is the biggest argument against doing what we're suggesting in this how to. However, if you don't mind the external drive the you're done. However, you could attach the drive to your computer so it stays put while carrying the computer around.
Get a case or cover so you're not putting stickers directly on the computer. Find one online that looks the way you prefer. Then find some velcro that you can attach one side to the case and one side to the external drive. Plug in the cables and make sure there's enough cable to let you open the computer's lit while it's plugged in.
People who own a Mac mini or iMac can put the drive on their desk. You don't have to worry about affixing it the computer itself, unless you just want to clear up desk clutter.