


6 Logos Word Study Tools to Explain Your Sermon Ideas
An experienced preacher highlights the importance of 6 Logos Word Study Tools for crafting sermons. These tools prevent the misinterpretation of biblical words by ensuring contextual analysis and multiple translations. The word study culminates in recording findings, reinforcing accurate biblical interpretation and engaging sermons.

In the early days of my preaching, I wish I knew the power of these 6 Logos Word Study Tools. They will captivate your congregation, injecting each sermon with a mixture of fascination, delight, and clarity to simplify the message of the Bible. Embrace these 6 word study tools, and your preaching will surpass my early efforts.
Here's the problem with inexperienced preachers studying key theological words in a text. The preacher often takes the words out of context by looking them up in a concordance. A word used one way in John might not fit the meaning of the context in 1 Corinthians or 2 Peter.
Search the word love in a concordance, and you'll find it everywhere in the Bible. However, the Hebrew and Greek understanding of the word differs. Greek has a few words for love that mean somewhat different things. You can't assume it means the same thing in all the verses that contain the word.
We have to protect against careless word studies, and the Logos word study tools below will help you avoid making mistakes as you use these 6 Word Study tools so you can explain the ideas in your sermon.
See at the end the latest deal from Logos Bible Software which can give you up to 25% off a new package, plus more.
Read and Reread Your Text in Context
As an expository preacher, I usually use one passage for my sermon. Other passages may help me explain, illustrate, or apply the primary text. Occasionally, a quoted verse might introduce proof that argues the point.
If you use one primary text, read that text in context. At the very least, read the entire chapter and probably the chapters before and after. If you're preaching from a narrative covering many chapters, read the entire story.
Next, read the passage again by itself. Note any ways the context affects the understanding of the text. Then, read the passage again in multiple translations. Avoid paraphrases at this point.
1. Rereading a Text Using Logos Text Comparison Tool
The first of the 6 Logos word study tools will present your text in a few to all of your Bible translations in one window. Open the Text Comparison tool and set with your favorite translations or all of your Bibles.

Click the Tools button on in your toolbar at the top or left (depending on your settings). Find the Text Comparison Tool in the Passage section of the Tools menu and click to open it.

You'll see the tab with the verse at the top of the Text Comparison Tool. Right of that notice some blue text underlined with abbreviations for your Bibles. It shows the Bibles displayed in the window. Click the listing of Bible translations to modify the chosen Bible translations.
The menu that pops up includes three sections. The top section shows your displayed texts, which you can check or uncheck to show or hide that Bible in the Text Comparison tool. The second section shows your saved collections of Bible texts. Click one to replace what's showing in the window. The third section lets you choose what to show in the window from different collections of books. To show all of your Bibles, click the Bibles Collection.

Shown in column formation instead of interlinear.
Customizing the Text Comparison Tool in Logos Word Study Tools
Logos offers three other customizations as follows:
-
- Show or Hide Differences between the Bible Translations.
-
- Show or Hide the Base Text in the text of the other Bible Translations with a strikethrough line through the base text.

Logos also lets users show the verses in interlinear mode. You can still see the differences between the words in strikethrough format and without.

2. Comparing Multiple Texts Using the Logos Passage Analysis Tool

Open the Passage Analysis Tool from the Tools menu. This includes a few visual Logos word study tools. You'll find it under the Passage section. In it you'll see the differences between various translations. This doesn't help you read a passage repeatedly, but it shows you how they differ so you can pay careful attention to those differences.
At the bottom of the window you find buttons showing the differences in various visual formats. Click each to try it out.
Take Note of Key Theological Terms and Look Them Up 4 Key Logos Word Study Tools - Concordance, Bible Dictionary, and Lexicon.
By now, you've read through the passage multiple times and know it pretty well. You might even have memorized it. Next, take note of the key terms in a verse. For example, let's look at Matthew 28:18 in the NKJV.
And Jesus came and spoke to them, saying, “All authority has been given to Me in heaven and on earth.
Matthew 28:18, NKJV
The words that stand out to me include...
-
- came
-
- spoke
-
- saying
-
- authority
-
- given
-
- heaven
-
- earth
Looking at the list, the words authority and given carry the primary meaning, while the others might offer less interpretive importance. It doesn't matter. Still, look them up the 4 Logos word study tools listed below, just in case.
A good word study includes looking them up in three different tools and possibly more.
-
- Concordance - search a concordance for an important term and see how the author of this book you're reading used it and how others used it. Be careful about jumping between the Old and New Testament.
-
- Lexicons - without using Bible software, you'll need some language skill to look up words in a lexicon. You'll need a Hebrew Old Testament and/or a Greek New Testament. Find the word in a Hebrew or Greek Lexicon. We'll show you how to do this in Logos below under number three.
-
- Bible Dictionary - look up the English term in a Bible dictionary and note what might apply to your verse.
-
- Atlas - geographical terms should show up in a good Bible atlas.
Remember that not all you find in the reference tools above will apply to your passage. English speakers use the word cool in a number of different ways. The Fonz was cool, but so is today's temperature, and a pitcher in the baseball game who doesn't get rattled. You wouldn't make a point about how The Fonz was cool so he wore a jacket to keep warm. Be careful about doing the same thing with Bible reference books.
3. Bible Word Studies in Logos Word Study Tools: Letting Logos Look Things Up
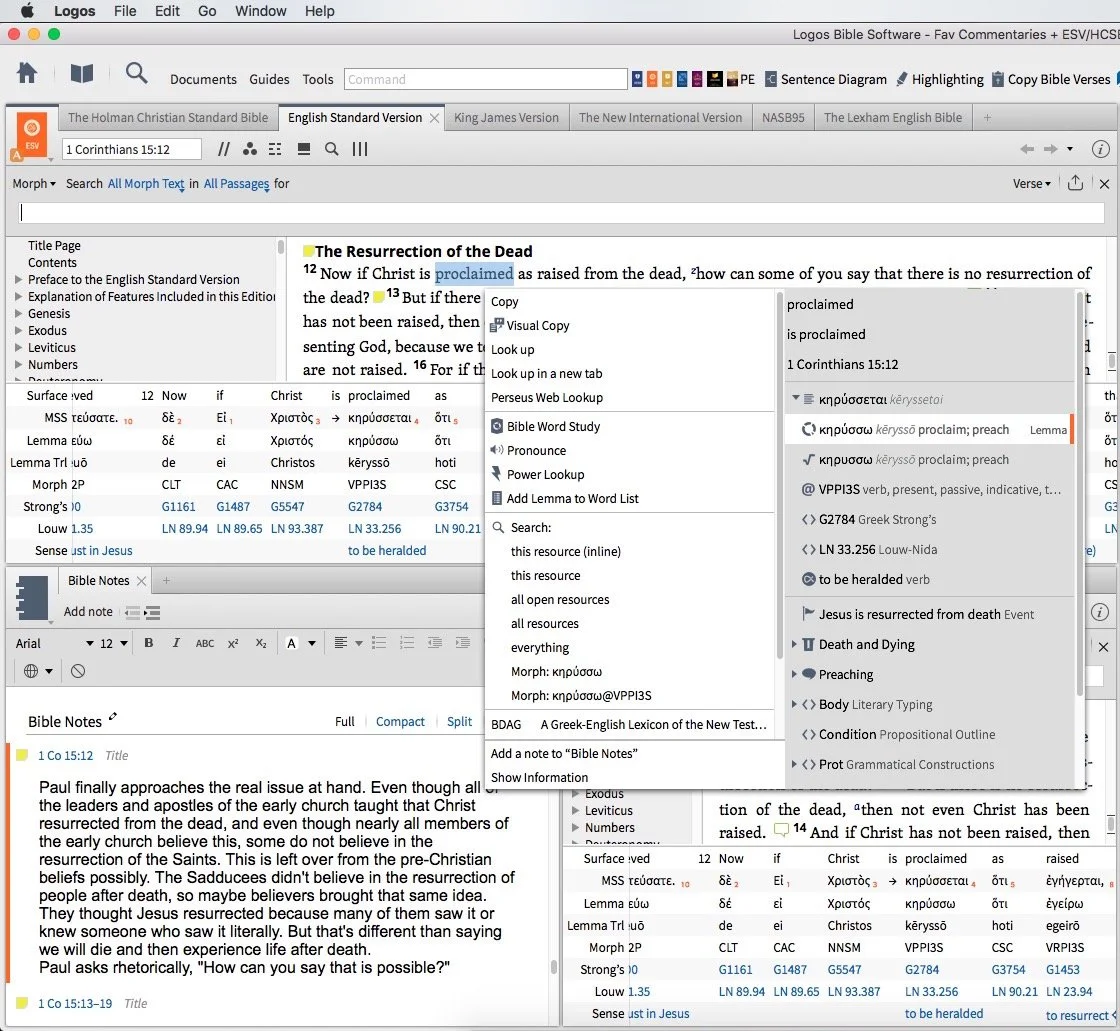
The Exegetical Guide in Logos runs a specialized search for hits in books in your library for content related to words in Greek or Hebrew. Open your Bible to your passage and select a verse. Right-click it and select Reference on the left of the pop up list. Then scroll down to the Exegetical Guide in the list onto the right of the pop up menu and click it.

The Exegetical Guide on your text shows a list of language tools including the WORD BY WORD section. Open it and you'll see your favorite translation name. Click it to open the Bible to the verse. Next, you'll see the verse in Greek or Hebrew on the left near the top. The English verse shows up on the right next to it. Then, each main word shows up below with some important information, including...
-
- The word in the original language and an English transliteration.
-
- The word in the verse's context is on the same line as the word in Hebrew/Greek and Transliterated.
-
- A circle that you can click to run a Bible Word Study on that word.
-
- The Greek or Hebrew word again with an audio icon which you can click to hear the word pronounced.
-
- A simple English translation of the word.
-
- The morphological information which you can click to open a definition of that info or hover over it to see a pop up.
-
- List of your top lexicons and the option to see more by clicking More.
-
- You can add notes to each word too.

Any text in blue is a hyperlink that you an click to open or hover over. Read about words, tenses, etc. Open these to read more and learn about the various words in your passage. Keep records in the notes you can add to each word or the current Guide. However, I prefer to add a note to the verse itself instead of the Guides. You can easily find this study info each time you open that verse.
Other Logos Word Study Tools in the Exegetical Guide

You can find other tools in the default Exegetical Guide as follows:
-
- Your Content - shows things like notebooks you've created about this passage.
-
- Textual Variants - shows info from your library related to textual criticism.
-
- Word By Word - described above.
-
- Grammatical Constructions - shows grammar items that affect this passage's meaning
-
- Important Word - lists keywords from your text and shows links to run a Bible Word Study.
-
- Lemma in Passage - like the Important Word list, but shows the lemma instead of the exact word in the text.
-
- Important Passages - runs a report of cross-references related to your passage.
-
- Ancient Literature - shows entries about the passage in ancient literature, like Church Fathers, the Works of Josephus, Apocrypha, and more.
-
- Commentaries - show your passage in all of your commentaries.
-
- Journals - shows your passage in all of your Journals.
-
- Grammars - shows morphology in grammar books for words in your passage to help you understand things like tenses, moods, and more.
-
- Visualizations - shows links to your passage in different Visualizations like Diagrams or Outlines.
4. Find Words in the Factbook
The Factbook finds your keywords and searches for key information to help you understand the definition, sense, and meaning of English, Greek, and Hebrew words.

To find the word in your Factbook, open the Factbook and type in the word. Find it more easily through the right-click menu. Right-click on a word, and you'll see the menu with two columns. Along the left, click on the word in Greek or Hebrew. You can click the word as it appears in the text or the lemma. Look down to find the English word with Factbook icons next to it. Click on that word as seen in the screenshot above. Then, on the right side of the right-click menu, click on Factbook. Logos opens the Factbook to that word and gives you many search results tagged for the Factbook.
5. Open the Logos Explorer

The Logos Explorer window shows important content based on the passage currently shown in your open Bible. Open Explorer from the Tools menu along the top or left of the Logos windows. You'll find it under the Passage section.

The Bible Explorer window shows you a lot of context based on the text in your Bible window. Turn on the Link Set by clicking on the three vertical dot icon in the upper right corner of the Explorer window. Choose a letter and then do the same in the Bible window's three vertical dot icon. Choose the same letter in the Link Set.
The Explorer includes information from the Factbook, Media, Cross References, and Commentaries. At this point, avoid the commentaries, since those will come with interpretation biases from the author. You want to let the Bible speak for itself as you ask the Holy Spirit to interpret the text through your own reading and research.
6. Add a Verse Note to Record Findings From the Logos Word Study Tools

Here's a great tip for keeping your info for current and future study. Add a note to your passage. I prefer to do this through the right-click menu as well. After you right-click in your passage, you can add a verse by selecting the verse reference in the left column of the menu. Select Add note from the right column. If you prefer you can instead add the note to a specific notebook. You'll see the most recently opened books listed under the Add note section.

Users can also record their findings by adding a new note using the New note button in the Notes window. The button will add a new anchored to the reference that's currently the focus in the main Bible window. If you would prefer to add a note that's not tied to the current verse, then click the down arrow and choose New note, the first item in the drop down list.

The other two items on the list let you add a new note to a reference, which the New note button itself also does, as shown above. You can also add a highlight to the verse.
The Latest Logos Bible Software Deals
First, you can save up to 25% on a new Logos 10 Package. Buy the Logos 10 Diamond, you'll get 25% off.
![]()
Sermon Prep Part 4: Theotek Podcast #068

We talked about using Digital study tools to do word studies. Specifically we looked at Accordance Bible Software, Logos Bible Software and Bible Reader from Olive Tree.https://www.youtube.com/watch?v=W-v8fk3uhhMWe focused on studying the Bible in English using the tools built into Bible software that help users find the Greek or Hebrew words behind our English translations. Good language study tools focused on Greek and Hebrew tagging using Strong's numbers helps users get at the Biblical meaning of each word and words in context. Regardless of which software you use, start with a text that includes Strong's tagging. Usually they will let you right-click or double-click or even triple-click the word you want to study.Start this process by searching for a word and read it in context in the different places it's used in the Bible. Then use your software's built-in word study tools. For example both Accordance and Logos show you how the author uses words with graphs and charts that show how many times a word gets used in each book of the Bible or how many times the original word gets translated one way versus another. The next step, after searching the word, is to look up the word in Greek or Hebrew Lexicons. Most Bible software tools include some in base packages. Users can buy more advanced tools.Finally, if you still need some help, look up the word in an English Bible dictionary. Start with exegetical dictionaries like the Holman Treasury of Key Words or the AMG Complete Word Study Dictionary of the Greek or Hebrew.
Our Favorite Things
 This week in "Our Favorite Things" we got some interesting recommendations. First, Antoine recommended the 29 Watt Apple USB-C charger to charge your iPad Pro. It charges the iPad in about an hour, but costs $49. It also requires a USB-C to Lightning cable which adds $35. He still loves the speed of the charging and wished Apple included this charger with the iPad Pro.
 Rick recommended a similar device, the PowerCore+ 26800 & PowerPort+ 1 charger. It includes QuickCharge technology and with 2.4amp USB ports. It's got 3 ports and can even charge the MacBook or other USB-C devices that need a lot of power. The 26,800mAh battery handles almost anything you can throw at it.I showed off a new feature in the latest Developer Preview version of Windows 10. Microsoft has what they call the fast ring and slow ring for beta testers of their operating system. The fast ring version added a new feature that shows up in the system tray. The icon for this feature looks like a pen with a drawn line. Tap or click on it and a new pen-focused menu pops up with a few options as follows:
- Sticky notes
- Sketchpad - a white board
- Screen sketch - the ability to do a screenshot that opens into an editor with pen/pencil drawing on the screen shot
- Recently used - a few of the most recently opened Windows 10 Universal apps
- Suggested - pen/stylus focused apps from the Windows store
- Connect your pen - a link to the Settings where you can connect your Bluetooth Surface Pen or other stylus
 Microsoft calls this the Windows Ink Workspace.In the "Least Favorite Things" folder, I talked about Vufine. This was originally a Kickstarter project that I mistakenly backed. They call it an HD wearable display that fastens to your glasses and shows a tiny screen inside the little device that sits just off the front of your glasses. It comes with a cheap, flimsy pair of plastic glasses if you don't wear glasses regularly.The problem is the Vufine is to tiny it's nearly useless for anything. Some use it connected to a GoPro to see what the GoPro sees. But using at an actual display is nearly impossible since text is so small.