

3 Awesome Logos Version 50 Updates to Reading Plans and MoreLogos Bible
Logos Bible Software recently updated to Logos Version 50 with 3 awesome improvements that make your Reading Plans and the Study Assistant better. We’ll take a look at the 3 updates and show you how they can help you use Logos in your Bible study and reading.
To update, use the sync button in the lower left corner of Logos. If you put your toolbar on the top, then it will show up in the upper-right corner. It looks like a circular arrow and sits next to the shopping cart icon. The update will download and you can install it. Restart Logos to finish the update.

Subscribe to Logos Premium, Pro, or Max and for an extra 30 days for a total of 60 days free by clicking the image above.
Logos Reading Plans Include Improved Banners
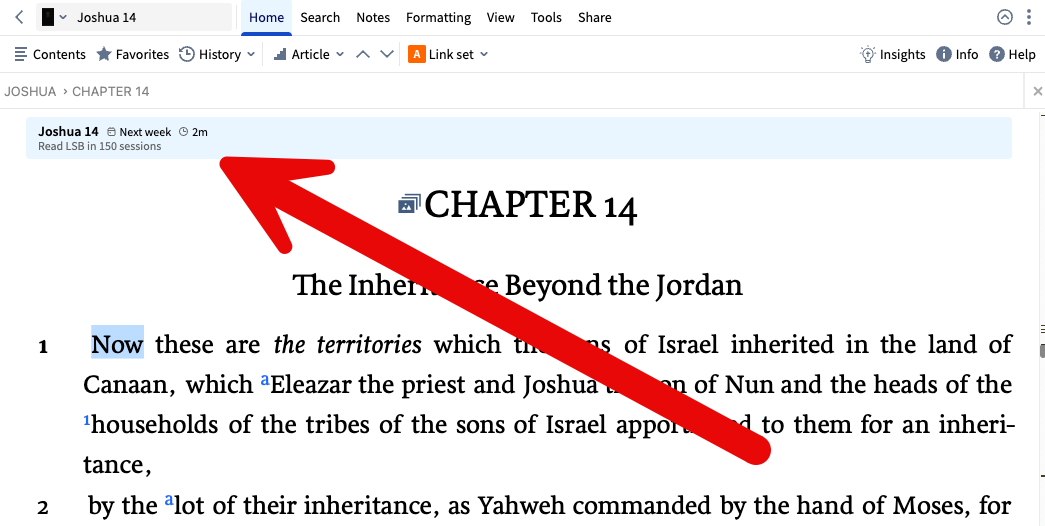
Logos Reading Plans updated the banner at the beginning of each section.
At the beginning of your daily reading, you’ll see a new and improved banner that shows more information about the Logos Reading Plan session. It now includes the following:
Section Title - passage for a Bible Reading Plan or Chapter/Section Title for a Book Reading Plan.
Date for Timed Reading Plans - notice my example above shows that I’m abead so it says “Next week”. This will not show up in the Reading Plans that you choose to read at your own pace.
Time Remaining - an estimate of how long it will take to read the section.
Reading Plan Title - shows the name of the reading plan.
This new banner shows up at the beginning of the Reading Plan. I love that it gives you an estimated time for the session. This will help you decide if you have time to finish that session.
Improved Logos Reading Plans Creation Wizard
To create a new reading plan click on Documents in the toolbar. Select New and then Reading Plan from the drop down list.
To get started, create a new reading plan to see this new Logos Reading Plans wizard. Click on Documents from the toolbar (on the left by default or at the top of the screen if you moved your toolbar). A new window opens up. Select New in the upper left of that window. A list drops down, and you can choose Reading Plans. See the image above.
The new Logos Reading Plans creation tool makes it easier to start new reading plans.
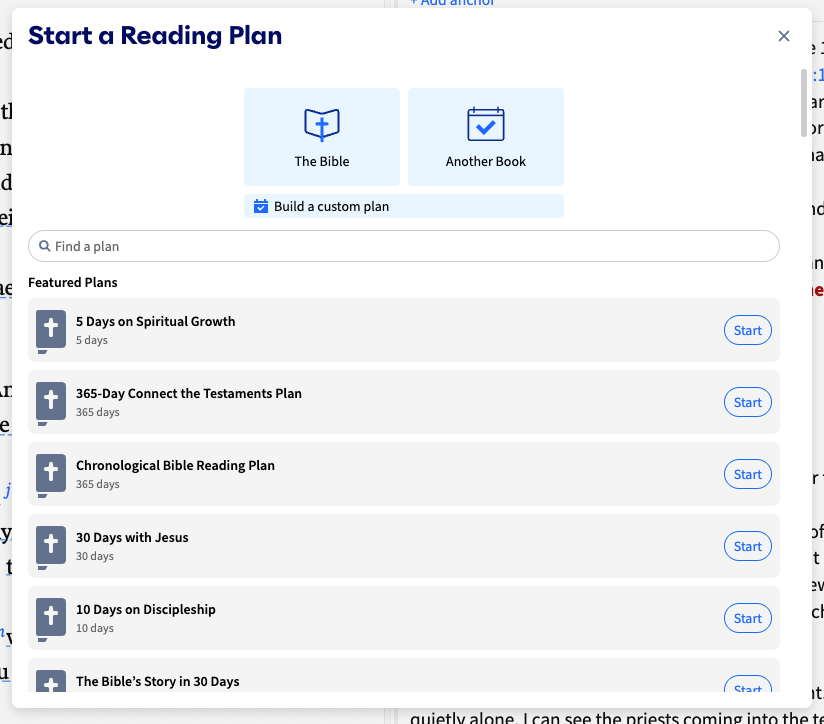
You’ll notice the new design (see image above) for creating a new Logos Reading Plan.
At the top, you’ll see three buttons to create a Reading Plan for The Bible or Another Book. Below the two larger buttons, you’ll see another wider button to Build a custom plan. Below those buttons, there’s a list of Featured Plans that you can choose. Find one by searching in the Find a plan box. When you see a plan you want to read, tap on Start to create a new plan for yourself.
Creating a New Bible Reading Plan
In the new Reading Plan window, choose The Bible. You’ll see a new three-step wizard that starts with customizing what you’ll read.
The first step in the new Bible Reading Plan tool lets you select the portion of scripture you’ll read.
The first step of the new Bible Reading Plan tool lets you choose what you plan to read. Select your translation (step one above). The choose what part of the scripture by clicking the drop down list to customize the portion you’ll read. You can choose things like the Entire bible, the OT, NT, Gospels, etc.
Below the drop down box you’ll see an estimate of how long this reading plan will take to read.
The third option customizes what Specific Passages. You can type exactly what you want to read. This lets you create a Reading Plan with different sections of passage. You might want an OT reading, NT Reading, and Psalms/Proverbs reading. You can also type in a passage like the Sermon the Mount from Matthew 5-7.
Click on Next to go to the next section
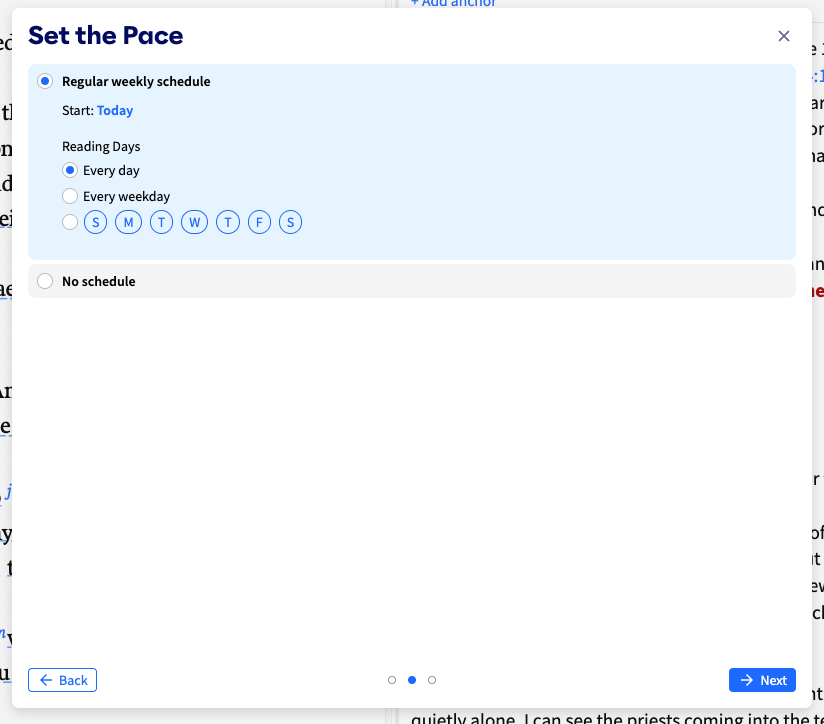
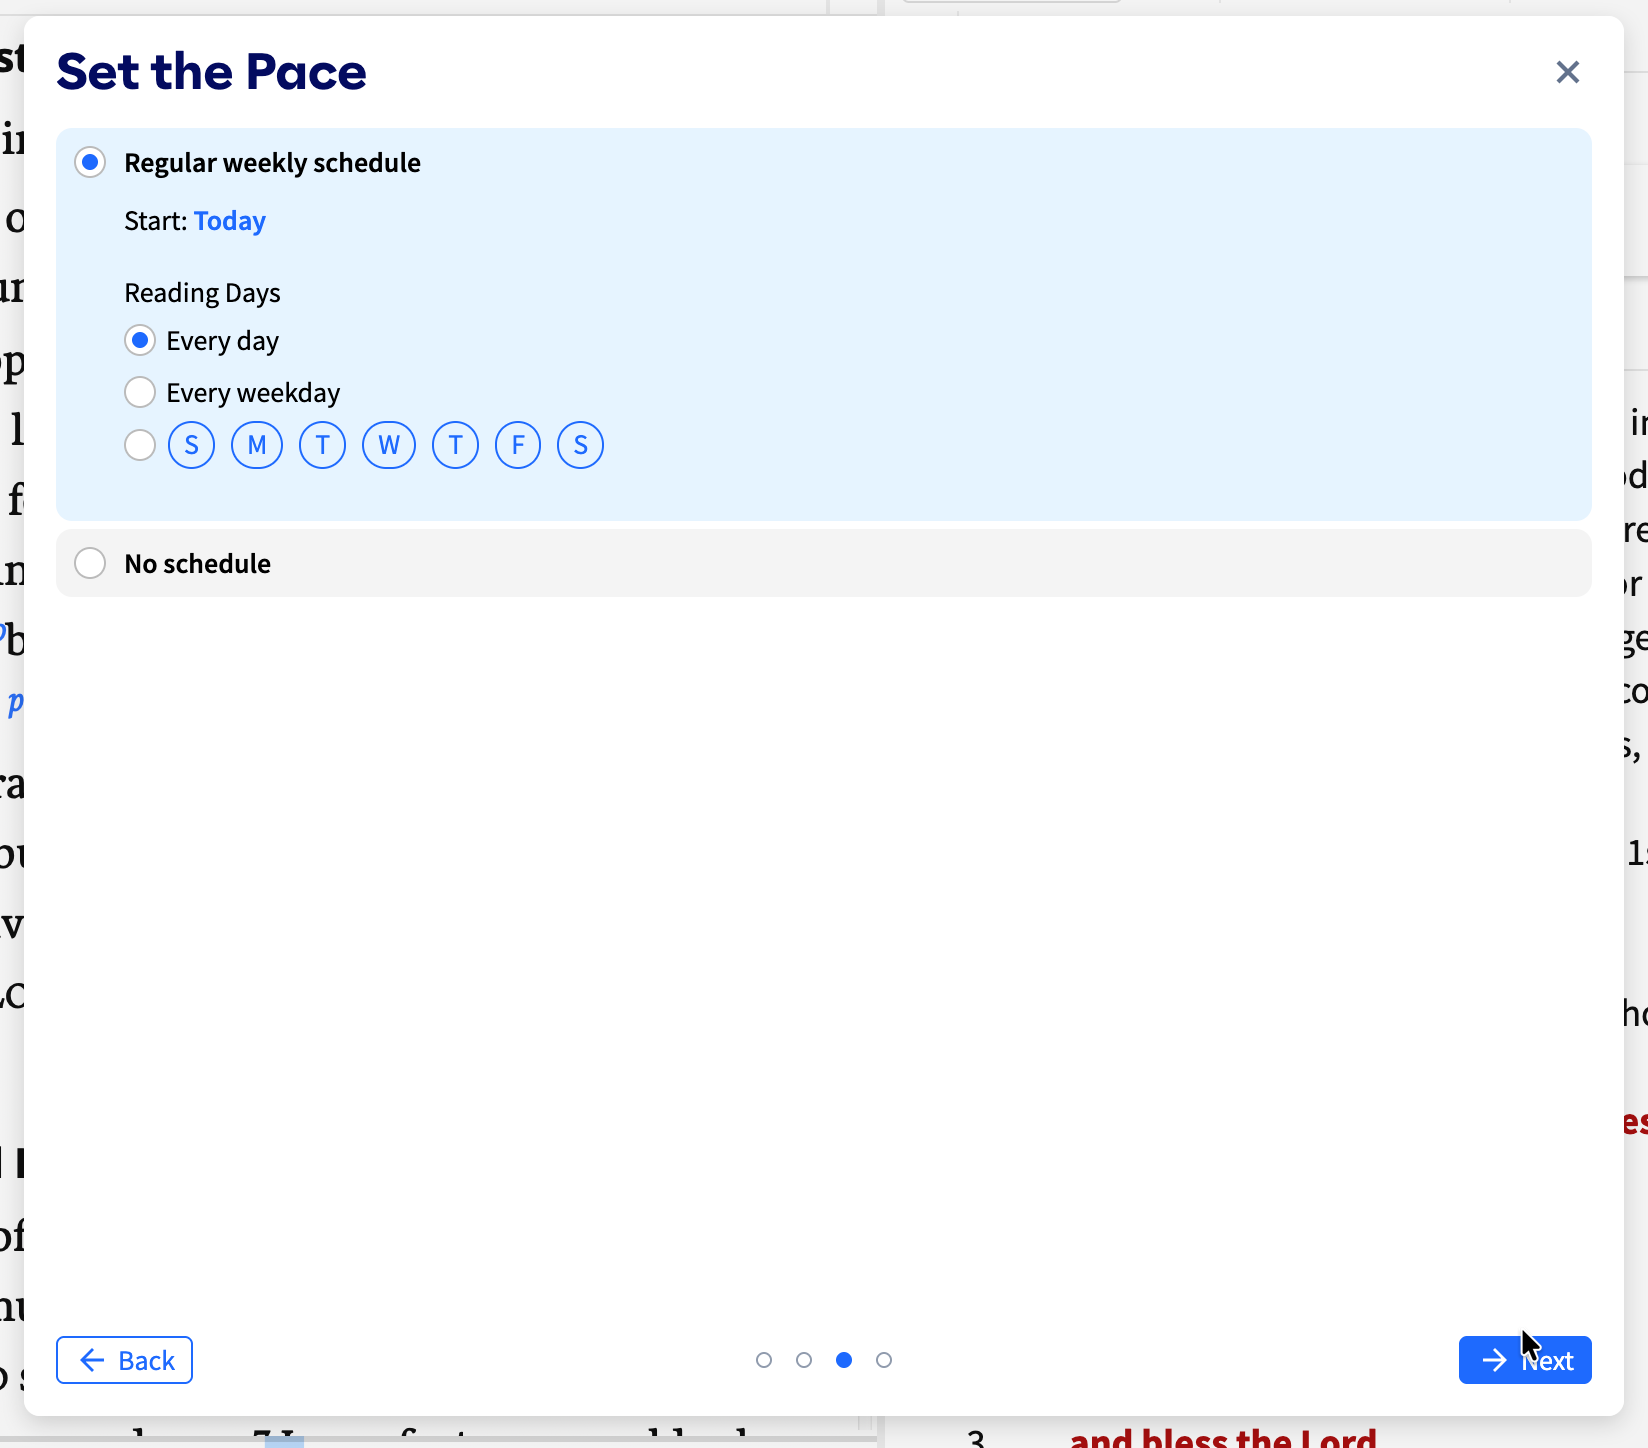
Step two in the wizard lets you Set the Pace of your reading plan.
In the second section of the wizard you can choose Set the Pace. You can follow a Regular Weekly Schedule for every day of the week that starts Today. If you want to start on a different day, click on Today and choose when to start your Reading Plan. If you want to customize which days to read, select between Every day or Every weekday. You can also select specific day. Do this if you only want to read this Reading Plan on certain days, like Mon, Wed, and Fri.
Some people prefer not to assign a Reading Plan to specific dates or days. Choose No schedule to read at your own pace. This lets you pick up where you lift off without getting behind or following a calendar.
Click Next to go to the third part of the wizard.
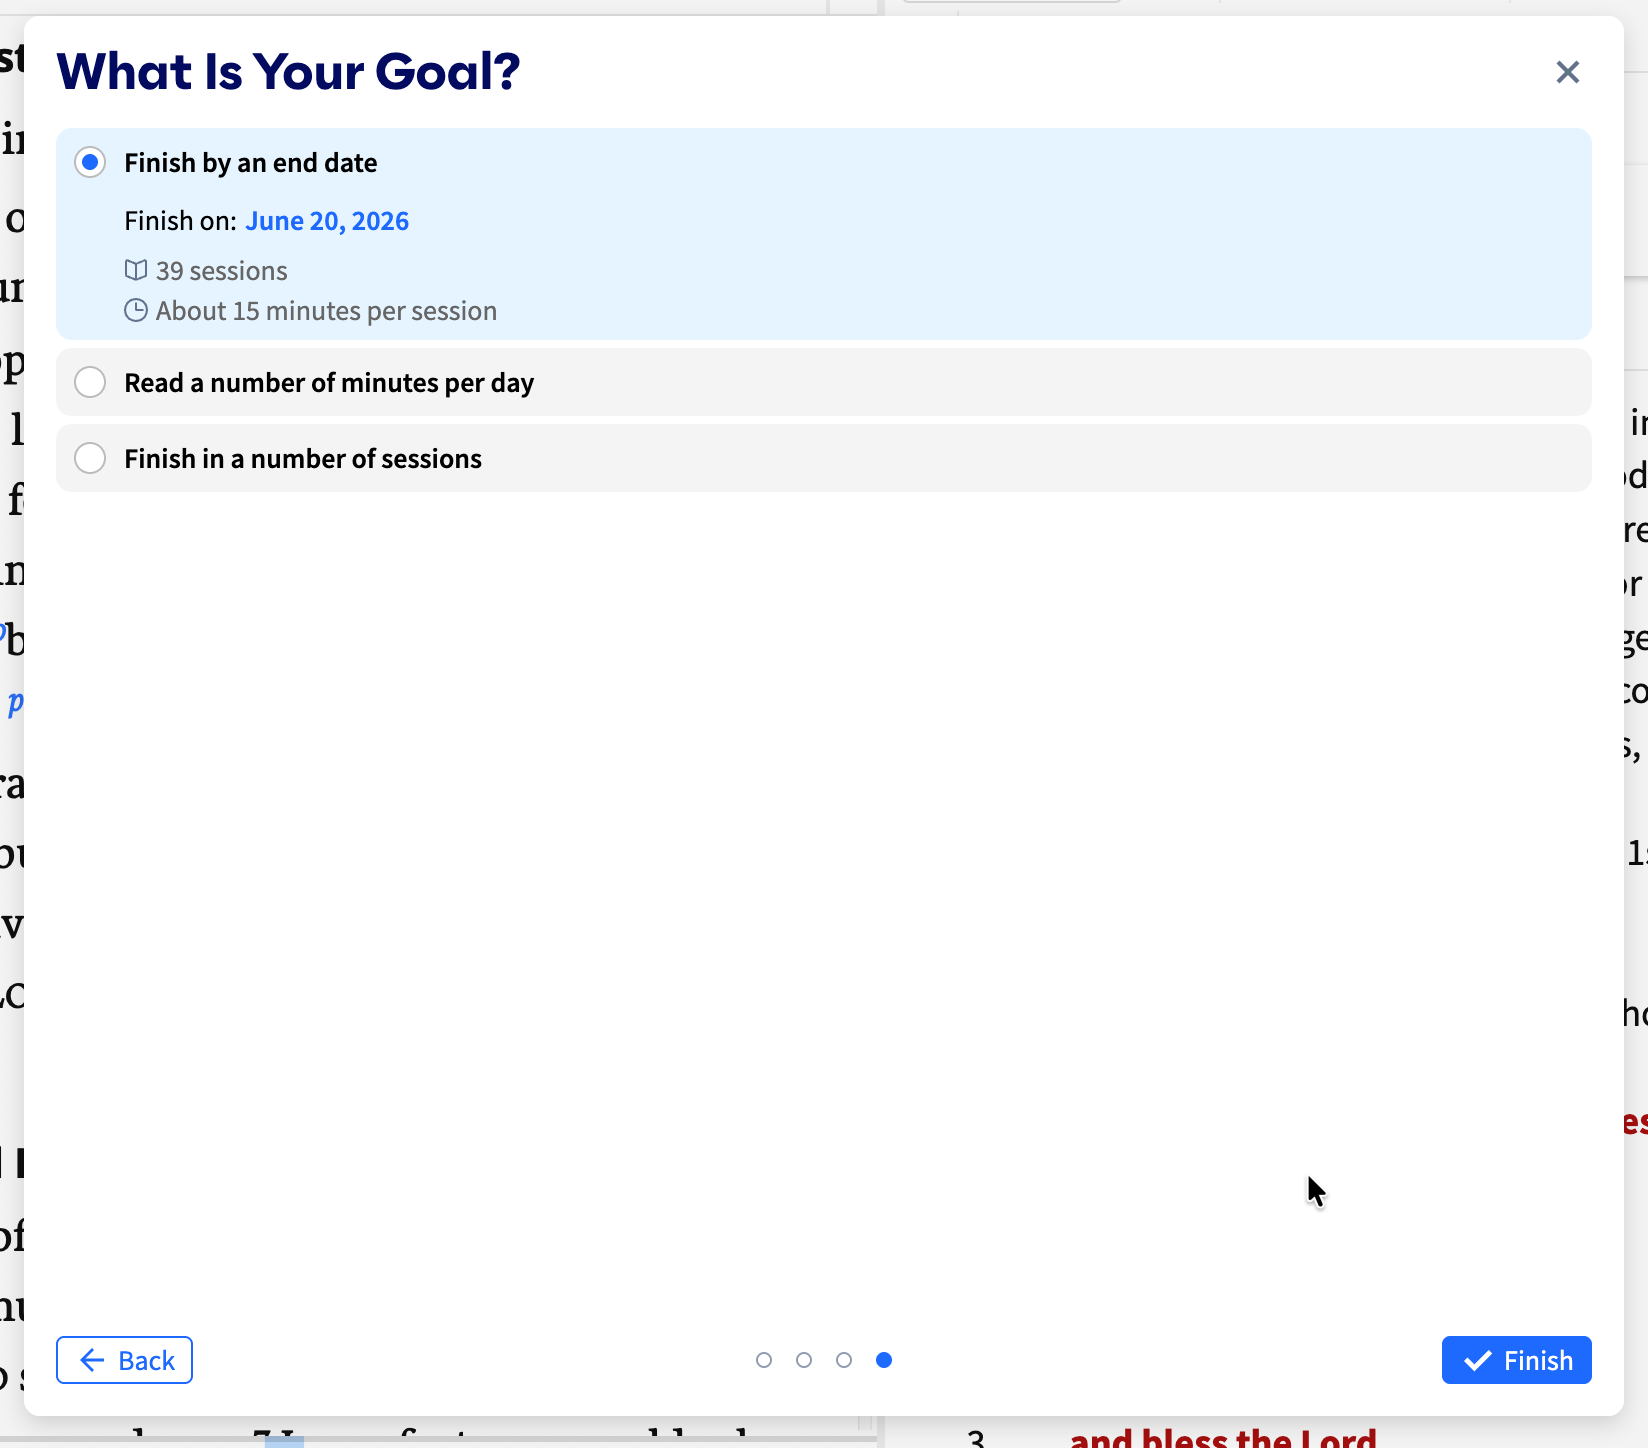
The third part of the new Reading Plan wizard helps you customize your plan in 4 ways.
Finish by an end date - choose this to read until a specific date.
Read a number of minutes per day - choose this if you know you have 10 minutes each morning to read the Bible.
One chapter per session - choose to read only one chapter each day.
Finish in a number of sessions - choose this to read your plan in a certain number of sessions.
To save your new plan, click on Finish.
In the future, you can go to Documents, and then choose Reading Plans under the Type facet. You’ll see a list of all your Reading Plans. Open one by clicking the name.
From your Library, you can also create a Reading Plan by right-clicking the book and choosing Start a reading plan.
Creating a New Reading Plan for Another Book
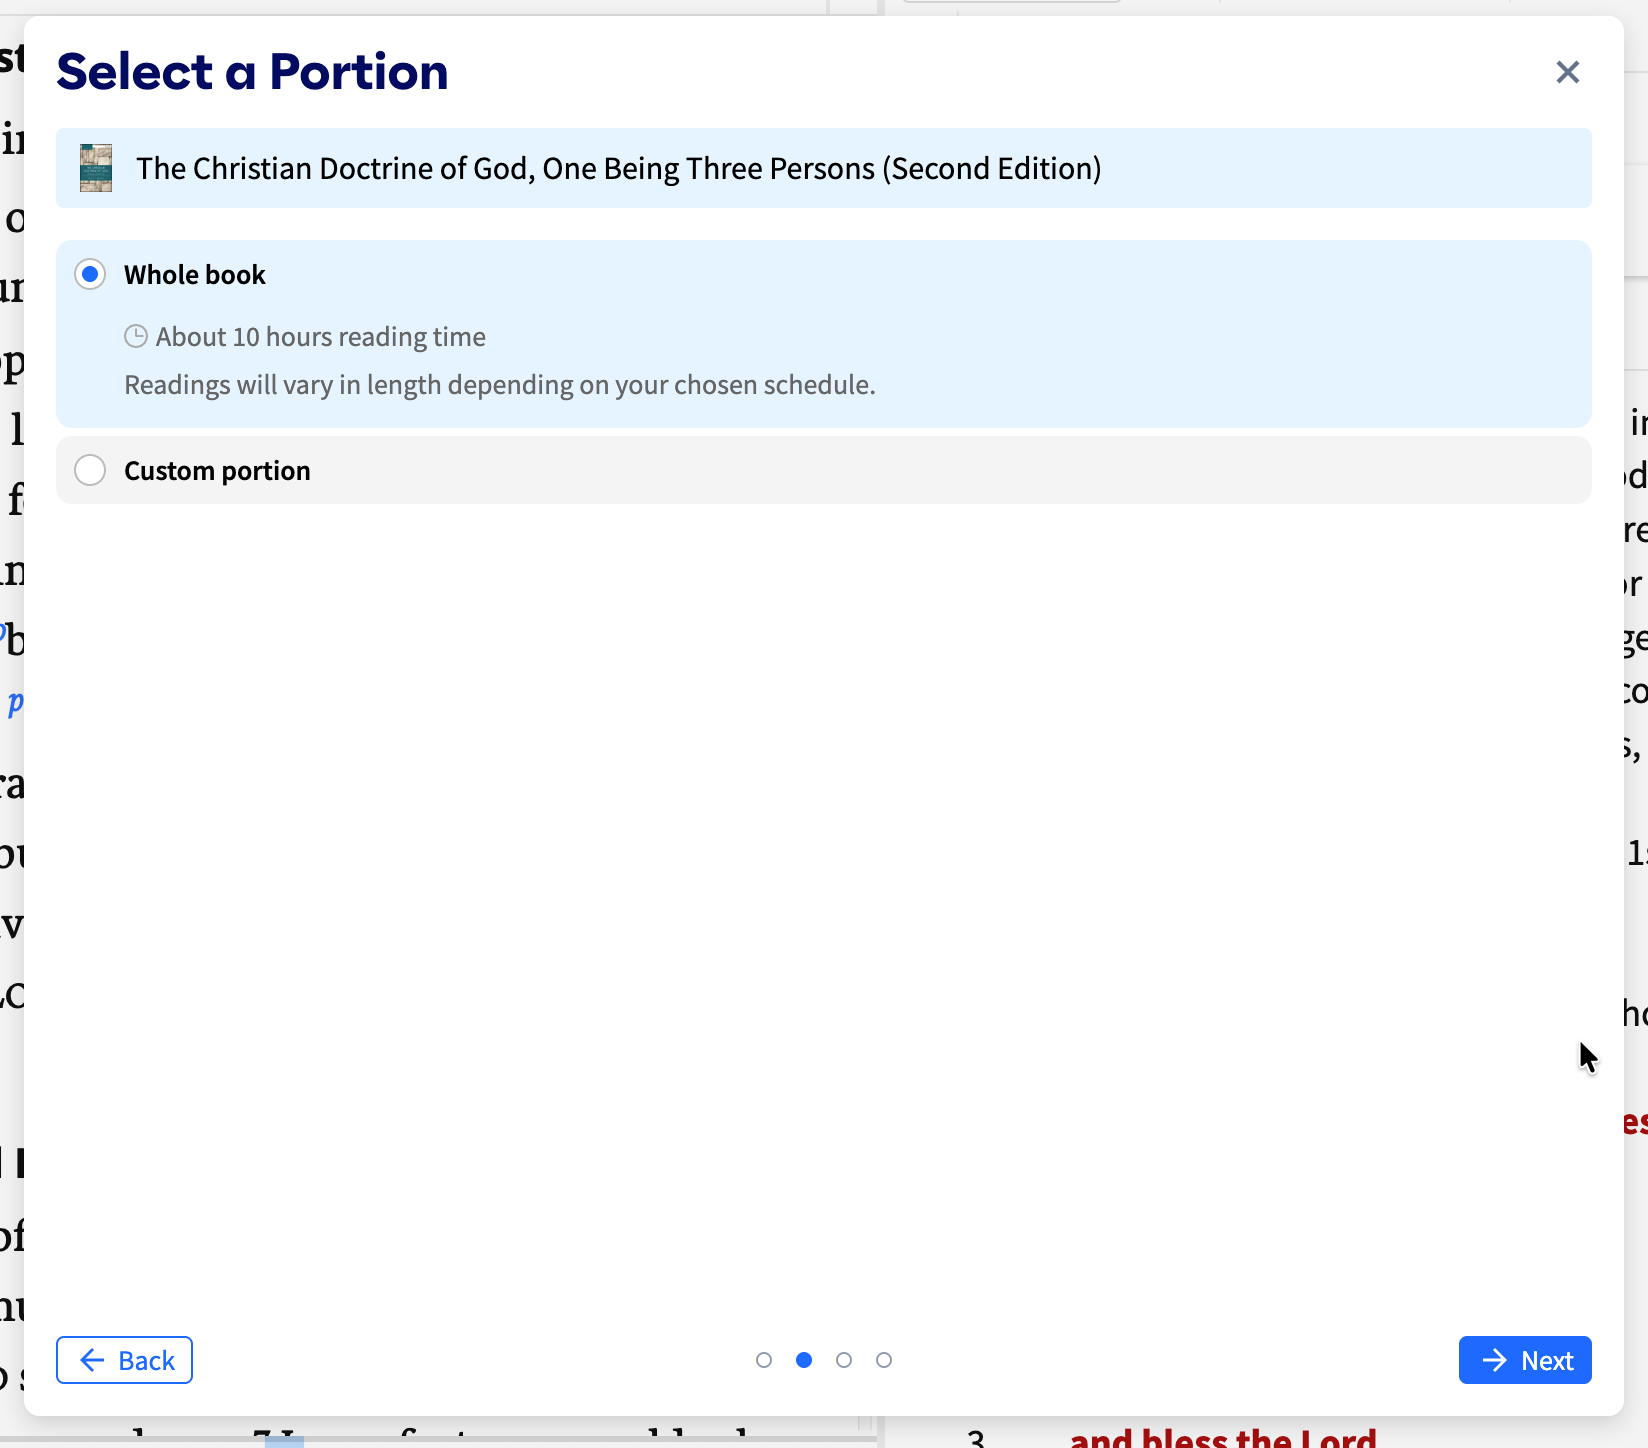
You can also create a new Reading Plan for any of your other books. Click Another Book in the new Reading Plan wizard.
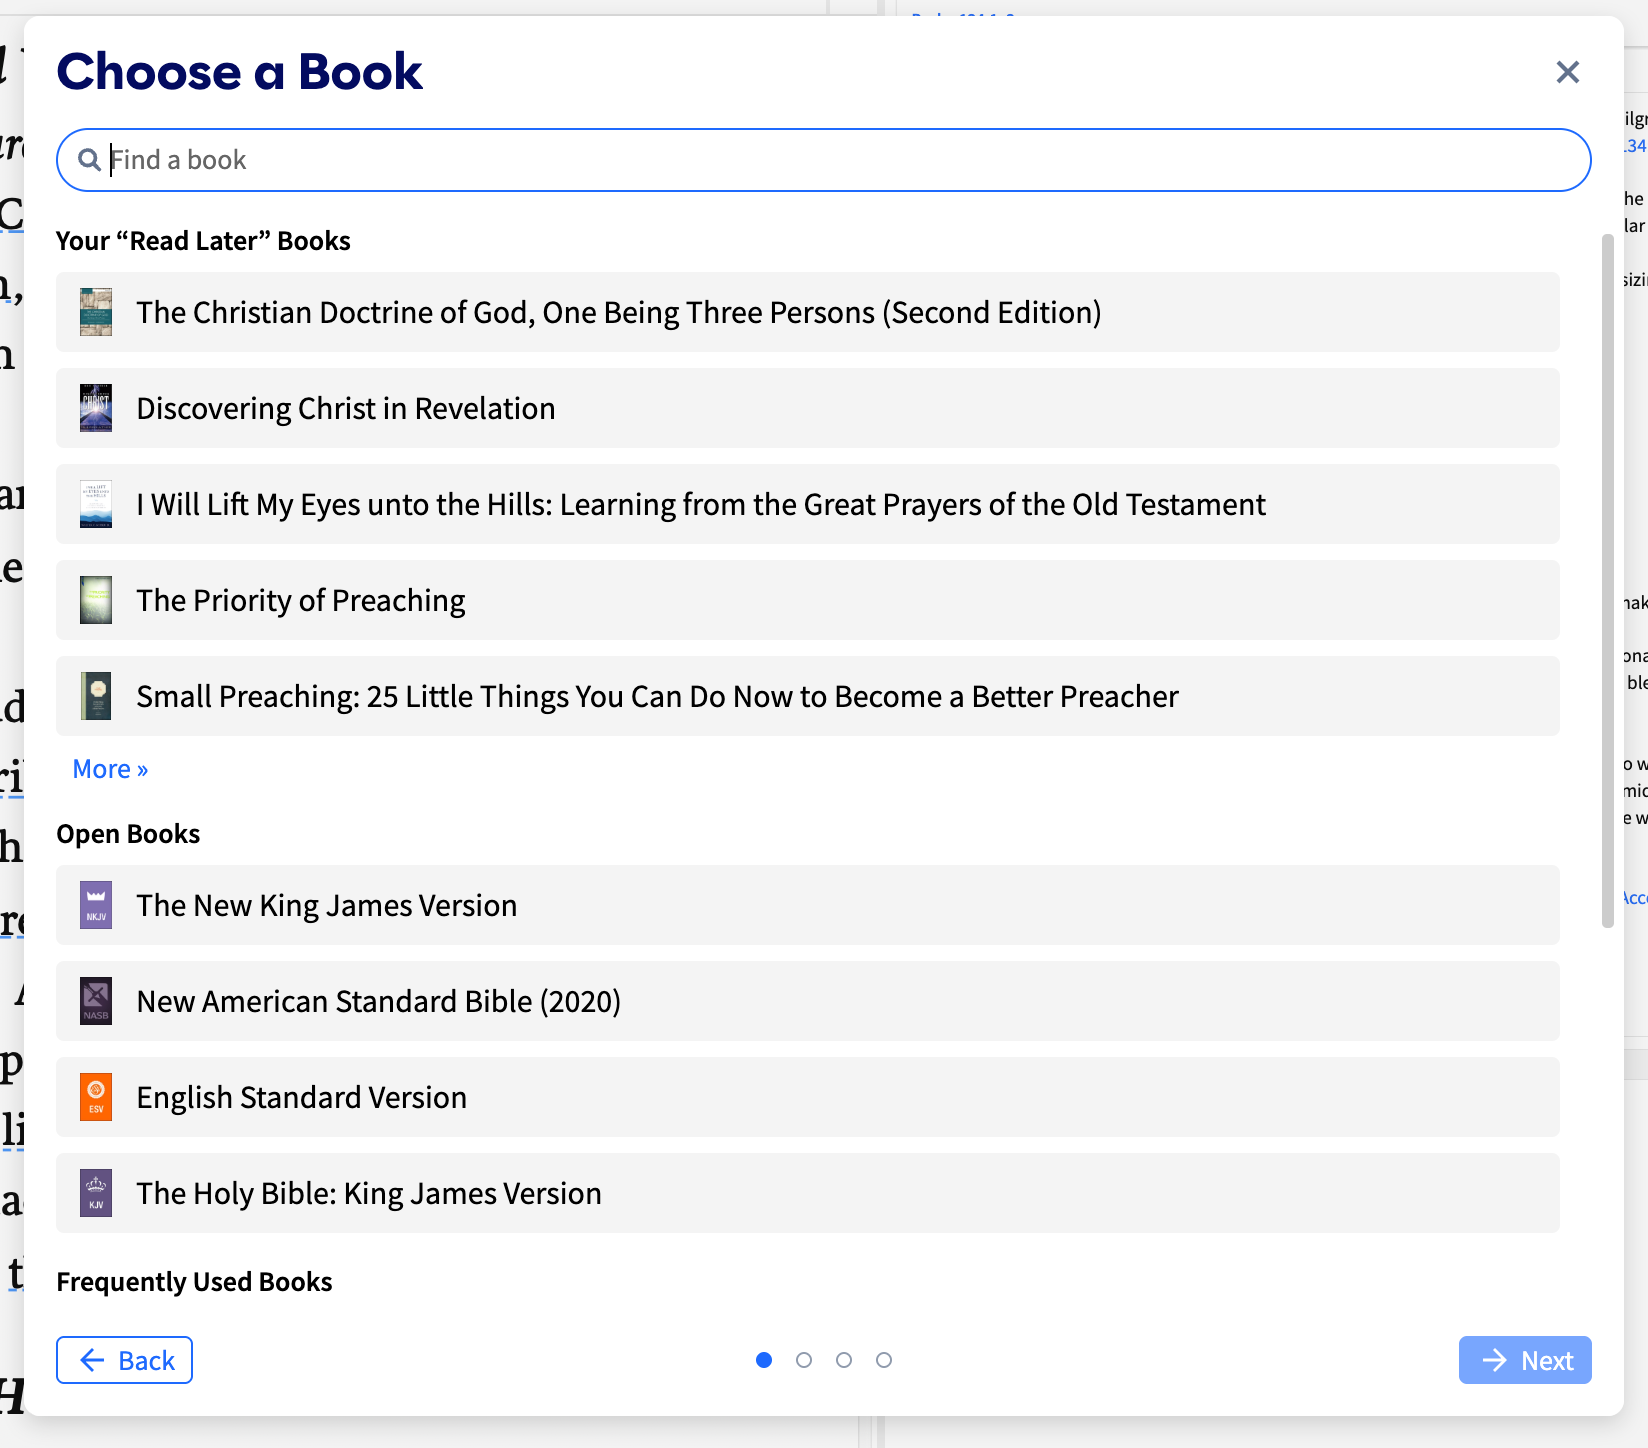
You’ll see the above window. You can pick from three sections.
Search for a book
Your “Read Later” Books
Open Books
Frequently Used Books
Select your book and click Next.
In the second step, you can choose between reading the Whole book or a Custom portion. Under Whole book you’ll see the estimated time it will take to read the book.
Choose Custom portion and type in the pages you wish to read.
Click Next to move the third step.
You can choose how much you plan to read and whether you want to read on a schedule. Also, choose when to start the plan.
If you choose No schedule, then you can read at your own pace instead of reading on specific dates.
On the final screen, you will choose to read based on when you want to finish, how many minutes per day, or how many sessions you want to finish the book.
How to Create Toolbar Buttons for Reading Plans
I created a folder with a couple of my Reading Plans so I can open them from my Toolbar. Here’s how to set that up.
Find your reading plans using the same steps at the end of the previous section. Now, instead of clicking to open the Reading Plan, drag it to the toolbar. If you only want one plan on your toolbar, then you’re done. However, I have a few that I’m reading. I placed my Bible Reading Plan and a couple of other book plans. Drag each plan to the Toolbar, and then right-click on the toolbar button for that Reading Plan.
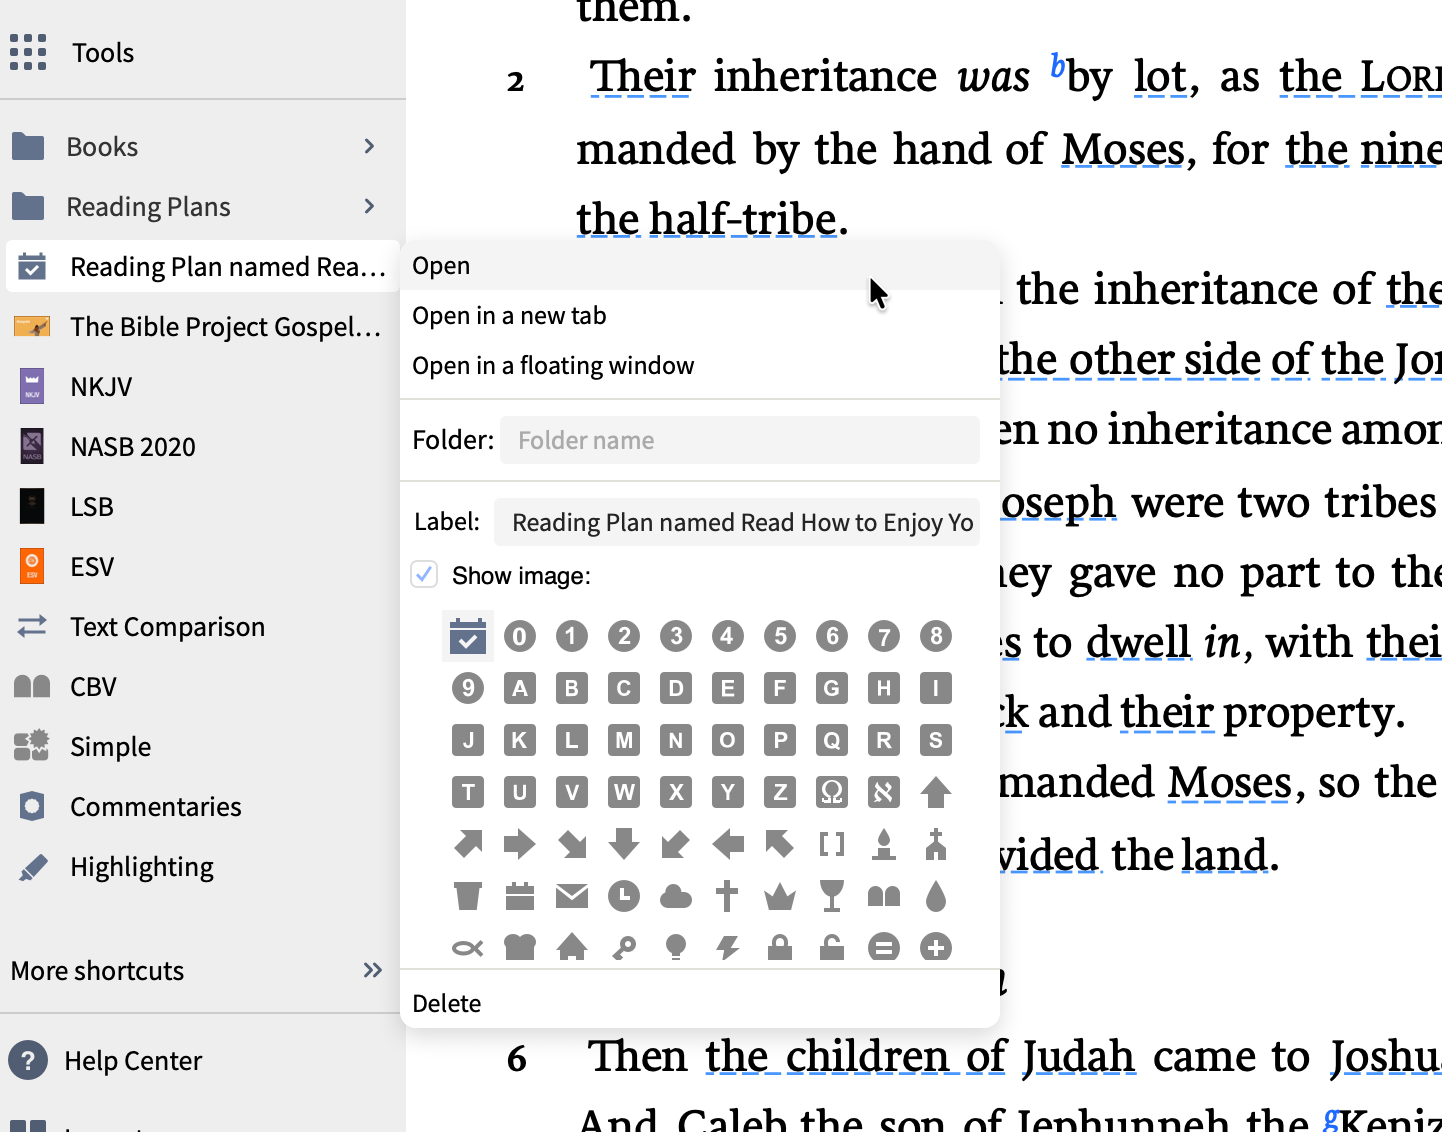
After you drag your Reading Plan to the toolbar, right-click on it. You’ll see the new dialog box as seen above. Click in the Folder: box and enter a name for your folder. I chose Reading Plans. I also changed the Label: of the Reading Plan so it only shows the name of the book or Bible I’m reading. Click outside the dialog box to close it. Your Reading Plan will move to your new folder automatically.
Author Category for Searching in Study Assistant
Logos added one new minor change to the Study Assistant. You can now search for responses only from the
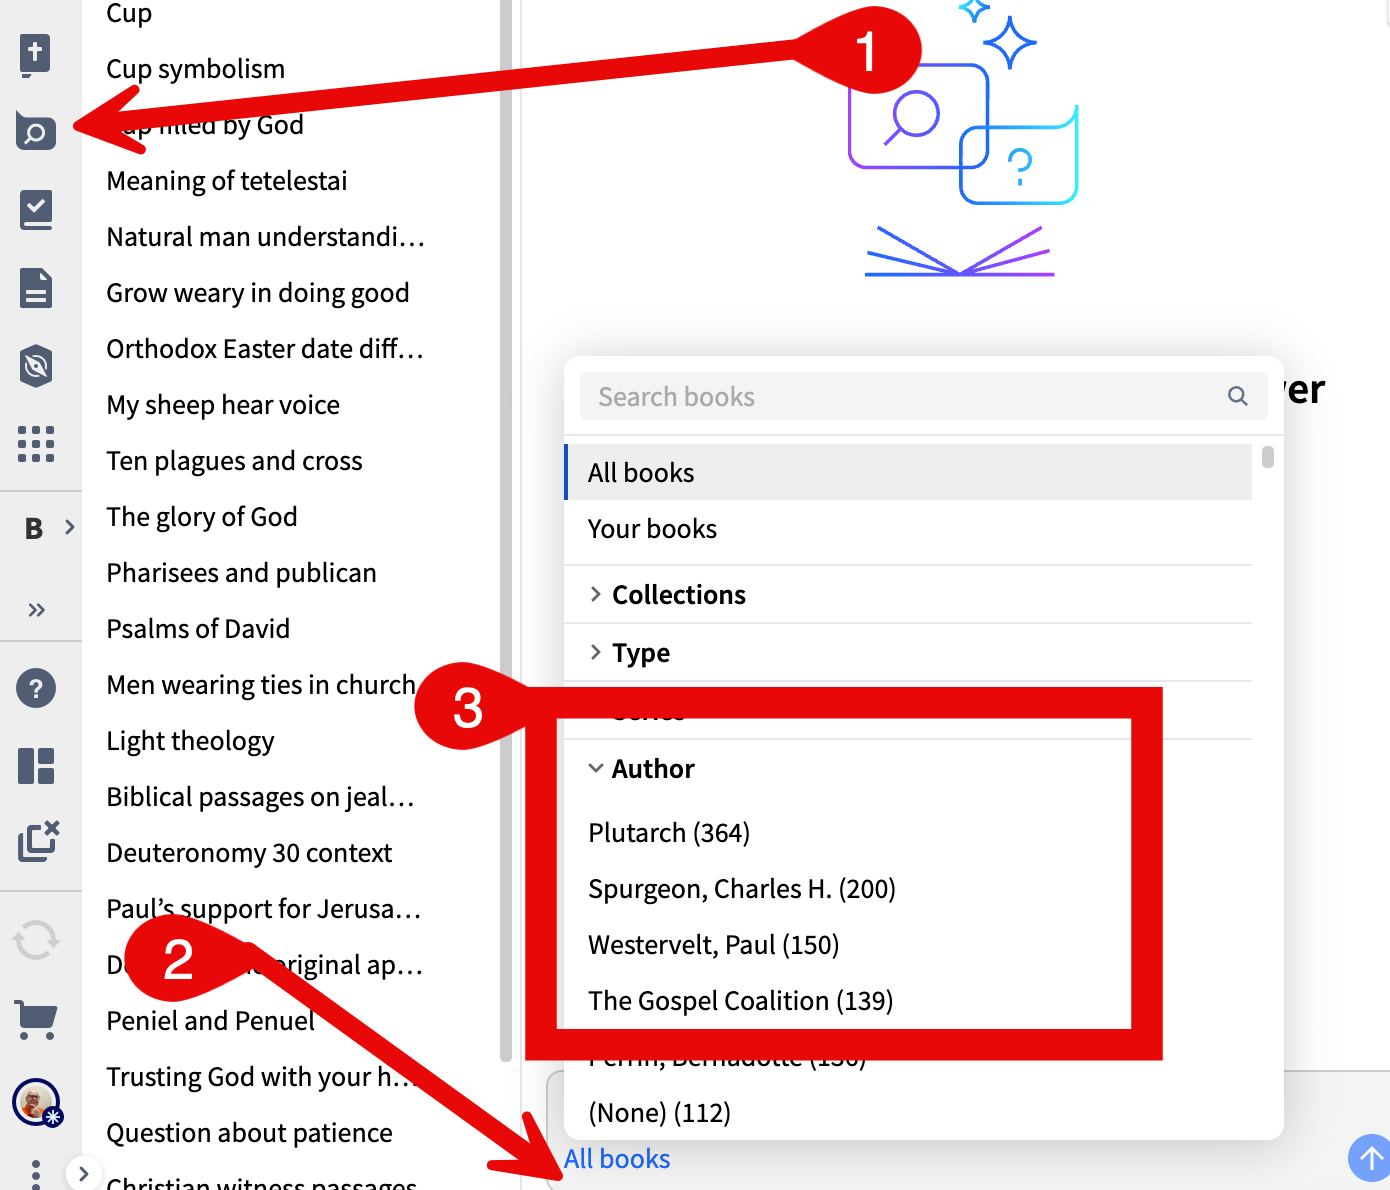
Earlier this year, Logos added the Collections filter to Study Assistant. We can now filter results using the Author category.
Open the Study Assistant (step one in the image above) and then click on the link at the bottom of the right column of the window (step two above). Choose Author (step three) and click on the author you’d like to search for. It’s probably quickest to use the Search box at the top of the window.