


Proving Your Point with Argumentation in Sermon Development - Part 3
In our series on sermon development we come to proving your points using good argumentation. What does that mean and how do you do it. Plus we've got more Logos deals.

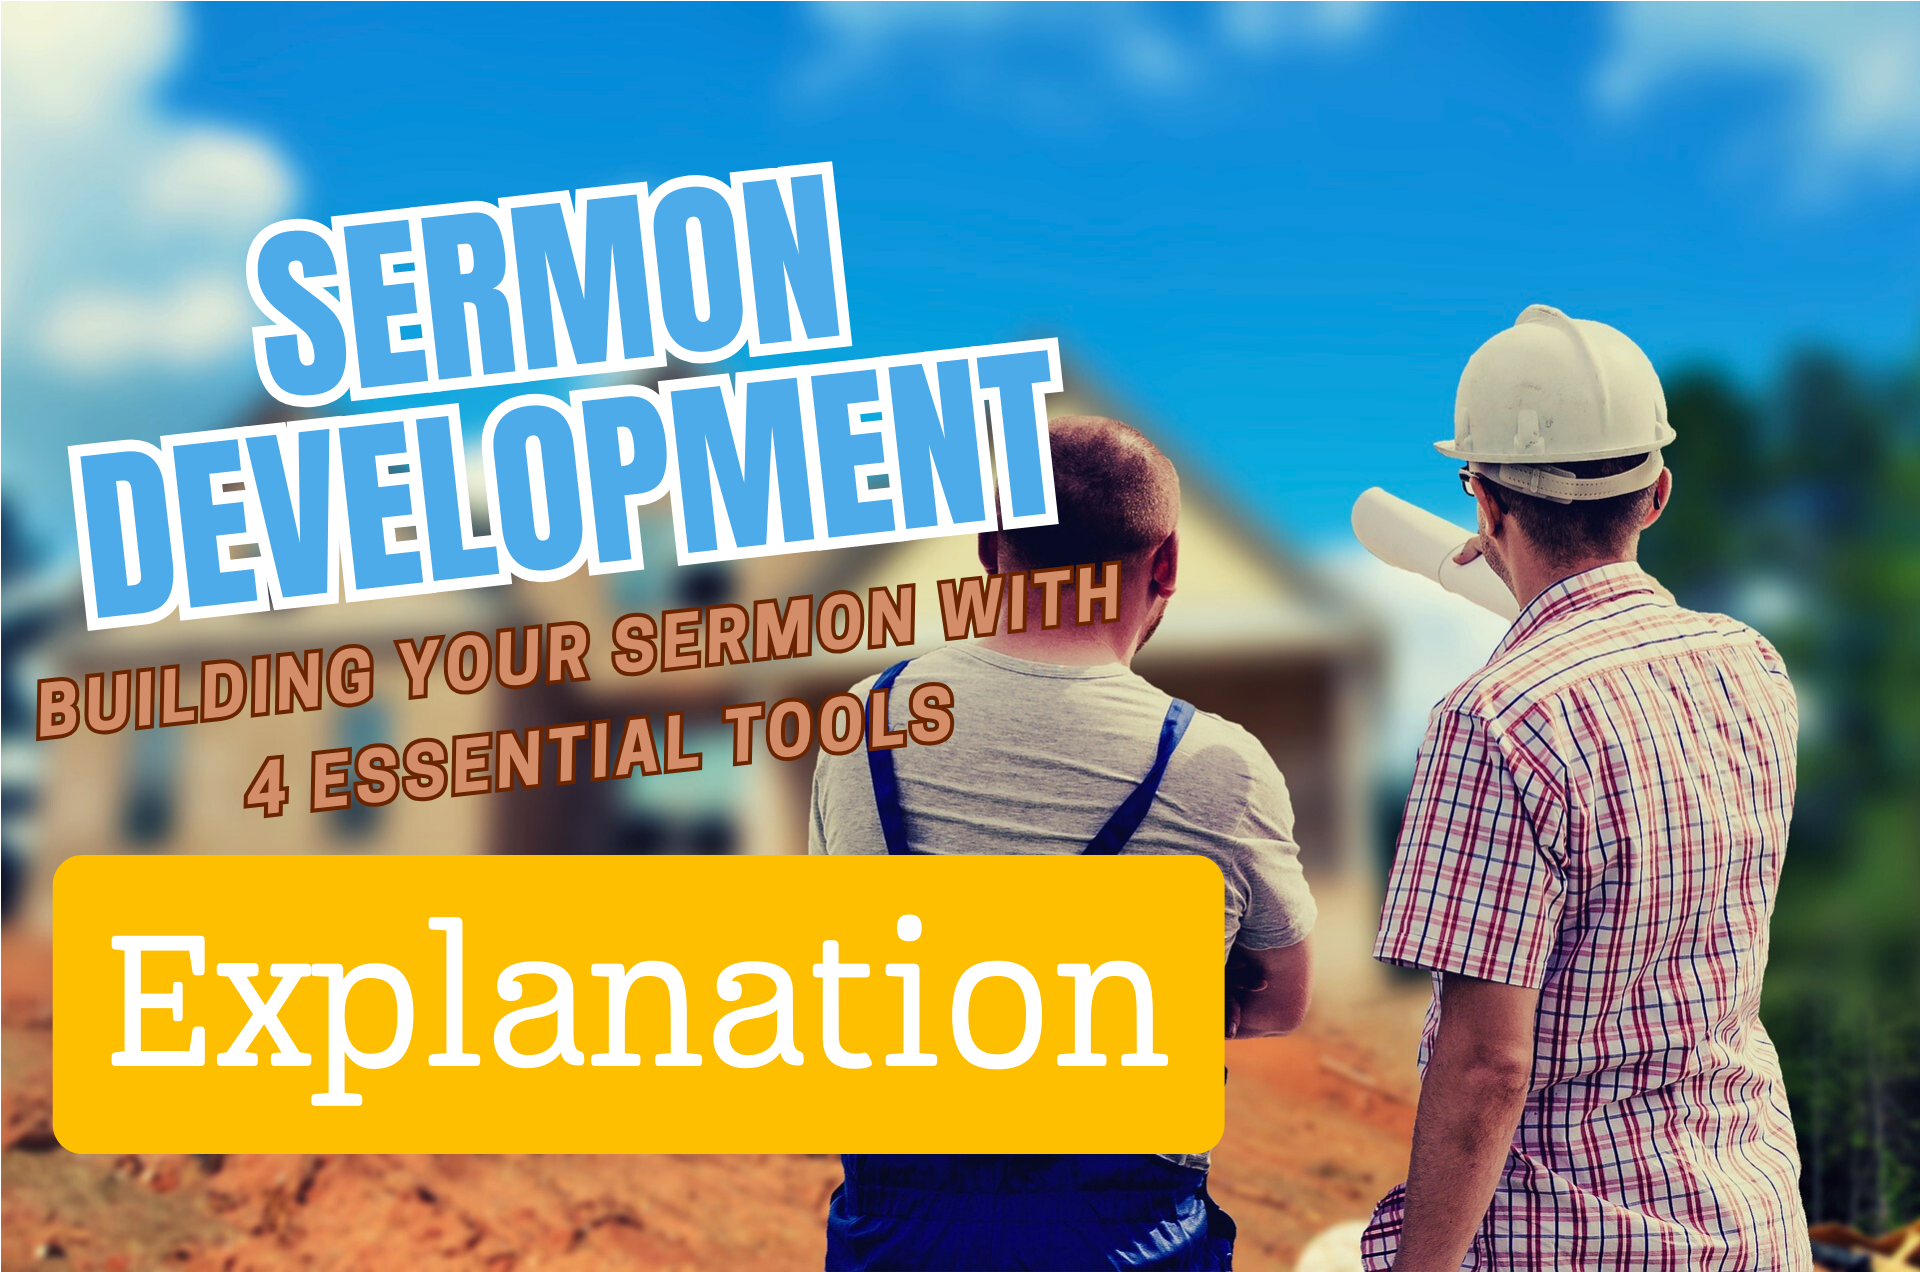
In your sermon development, you should include 4 essential elements: explanation, illustration, application, and a fourth one that too many preachers leave out. We call it either argumentation or proof.
Each kind of sermon development answers a question:
- Explanation: What does that mean?
- Application: Why does it matter to me?
- Argumentation or Proof: Is that true?
- Illustration: What does that look like?
Why Do We Need to Prove a Biblical Truth with Argumentation?
Have you heard this popular statement among Bible-believing Christians? "The Bible says, I believe it, and that settles it." I've also heard people shorten it to, "The Bible says it so that settles it."
The Bible says, I believe it, and that settles it.
Well-known evangelical quote.
Unfortunately, we preach to people who don't believe things just because the Bible says it. Some guests at your church don't believe the Bible is infallible. Even church members might choose only parts of the Bible to believe and apply. A recent Barna study defined a Biblical worldview and found that most Christians disagreed with that definition. So, we must consider these people as we prepare to preach our message.
Many Christians believe something until it forces them to change their assumptions or behavior; then, they willingly give up their Biblical convictions and choose to live like they want. We must prove to them that applying the Bible in their lives brings them into proper obedience and makes it in their best interest to obey.
My seminary preaching professor, Wayne McDill, wrote:
Sermons are designed to persuade. But if you are to be persuasive, you will have to make a case for your ideas. You will have to demonstrate that your point is reasonable and worthy of belief, that what you are saying makes sense. Argument is that part of your support material in which you give reasons for accepting the principles you are presenting.
McDill, Wayne. 12 Essential Skills for Great Preaching.

Click here to get it in Logos Bible Software.
Tying Your Sermon Argumentation to the Context
Advanced preachers use multiple sermon types or outline styles to carry the text's message, and we want to describe where we should place argumentation or proof in our sermon development.
You might call yourself an expository preacher because you work through books of the Bible and take a verse-by-verse approach. It's like a commentary that covers each verse separately. That's a form of preaching, but it's not Expository Preaching.
Truly Expository Preaching follows the Big Idea of the text, as well as the tone and form of the passage. For example, if you preach poetic language and imagery from a Psalm, you won't preach a didactic sermon with few mental images. Use the mental images the Psalmist offers and share them to make your points. Explain the imagery and how it relates to the theological concepts your message presents, following the author's approach in both content and tone. Your sermon development might contain a modern-day version of the psalmist image to explain your idea.
Once you've explained the idea and tied it to the text, you will argue the truth of the concept for your audience. Don't assume they will believe it because David wrote it. This is where we fit proof or argumentation in our sermon development.
An Example of Where Argumentation Fits from Psalm 1
Look at Psalm 1, which includes several metaphors to describe the godly man. We learn that he's like a person taking a walk. He won't walk by ungodly influences and get distracted by them. We get a mental image of someone stopping to look at what the ungodly are doing. Then he sits down with them. The progression of walking by, stopping, and taking a seat is the mental image of being drawn into the sins of the ungodly.
Blessed is the man
Who walks not in the counsel of the ungodly,
Nor stands in the path of sinners,
Nor sits in the seat of the scornful;Psalm 1:1, NKJV (italics mine)

You will first need to show the hearer what you mean by describing the scene or telling a story about a time when you were distracted by something while taking a walk or driving along the road. You've used an illustration or natural analogy to explain what you mean by the concept of distractions from a spiritual relationship with God.
As the Deer Panteth for My Attention

I once drove home at night along Yellow Banks Road near my home in the rural area of Wilkes County, NC. A home along that road has a huge field in front and to the left. There's a row of trees about an acre off the road. We recently moved here and, at dusk, saw some deer. It grabbed my attention, and my wife counted. The number grew while my speed decreased. Finally, I nearly came to a stop to see for myself. We counted more than a dozen deer in that field.
Those deer grabbed my attention to the point where I nearly stopped. Sometimes, as we walk along God's path, we get distracted and slow down to see something. We stop and might take a seat to examine it for a while.
After explaining the concept using an illustration, you must prove it to your modern hearers who don't assume the Bible's truth. This leads us to the next step in proving your point with Biblical argumentation.
Consider Arguments People Might Make Against the Big Idea and Answer Them

You've shown the audience what you mean and explained how it relates to the text. Next, brainstorm possible arguments against the Big Idea. How might someone object to the text and your statement of the idea?
You could write the idea at the top of a page or type it into your sermon notes. Then, use bullet points to list arguments against it.
You're not writing or typing what you believe are valid arguments against the idea; you're brainstorming what a listener might say in response to the Biblical truth. Imagine a teenager or a young mother who might struggle with the issue. Picture people who might sit in the congregation listening.
Using our example above, consider the following possible arguments against the truth. Sinful influences won't easily distract a godly man living for God.
Sinful influences won't easily distract a godly man living for God.
We'll clean up the above statement in a future part of our sermon design to make it pithy and memorable. At this point, it's a good idea to write it out in detail to give you a complete idea of your concept, which will help you brainstorm. List the possible objections. Consider these two.
- I won't get distracted because I've been a strong Christian for many years.
- Didn't Jesus tell us not to neglect lost people?
- I get easily distracted by sins. I can't stop ... (fill in the blank with any sins people might habitually commit).
Answering Arguments Against a Truth
You might think of other arguments against the truth. Let's consider an answer to one of the arguments listed above.
You're at a coffee shop with a friend. You discuss the concept found in verse one of Psalm 1. He looks at you thoughtfully, looks away, and then says, "I get distracted by sin all the time. I find it really hard to resist certain temptations."
We need to convince the person that they can walk with the Lord, and this helps us overcome temptations as we continue in the faith. Where would you find a convincing argument to help your friend trust that they can overcome sin if they do something new?
Is the Bible a Valuable Source for Argumentation?
We're tempted to rush to other passages that will prove our point. I immediately thought of a passage in 2 Peter 1 that says...
5- But also for this very reason, giving all diligence, add to your faith virtue, to virtue knowledge, 6- to knowledge self-control, to self-control perseverance, to perseverance godliness, 7- to godliness brotherly kindness, and to brotherly kindness love. 8- For if these things are yours and abound, you will be neither barren nor unfruitful in the knowledge of our Lord Jesus Christ. 9-For he who lacks these things is shortsighted, even to blindness, and has forgotten that he was cleansed from his old sins.
2 Peter 1:5-9, NKJV
That passage might help someone who trusts God's word. When you first believe God can answer your problems, this kind of faith adds virtue. We progress from virtue to knowledge. You find great self-control when you learn about God's love, grace, and support through His Holy Spirit. That brings perseverance and less failure. The more perseverance you find, the more godliness you gain in your behavior, and you can better resist temptation. That leads to an abundance of fruit-bearing behavior.
However, this alone won't help the skeptic. Scripture is powerful, so use passages like this to support your argument. However, you will usually need more for an unbelieving person and even for Christians who don't yet submit willingly to the Word just because "God said it."
Other Sources for Argumentation in Sermon Development
You can find many sources for proof or argumentation in your sermon development. Statistics, examples, stories that show the truth applied effectively, and quotations from trusted people all help the preacher prove the truth.
For example, I used a Barna Research stat to prove that believers might not trust Scripture alone for proof in a sermon. I could strengthen my argument with an example of someone I knew who claimed to serve Christ but didn't believe some clear Biblical idea.
Returning to Psalm 1:1, we see that our friend at the coffee shop didn't agree that living for God can help them fight off the distractions of temptation. What if we used 1 Peter 1, an example or testimony from our own lives, and a quote from someone the person trusts? Together, with the conviction of the. Holy Spirit, might convince our friend.
Find Argumentation or Proof for Sermon Development in Bible Software

I use Logos Bible Software to study passages and topics found in those passages. You could open Logos Bible Software and run a Topic Guide from the Guides menu. Type the topic in the search box and wait while Logos returns content from your library. Look through the results to find some possible support material.
Logos Sale on Lexham Press Collections

You can now save 40% on the Logos Lexham Press Collections, which include their Master Collection, the NT or OT Collections, and their language suite of tools.
These can get pricey. However, you can also get something free..

Check out the free book of the month. It's Warfare in the Old Testament and John Chrysostom by Boyd Seevers.
These sales are good until the end of May 2024. You can find the latest deals on my affiliate page if you're reading this after that date.

Tools for Sermon Development in Logos Bible Software - Part 1 Explanation
Every good message includes 4 essential tools for Sermon Development. We look at Explanation and using Logos 10 to find out what a passage or topic means so we can explain it to our audience.
Every sermon should include four essential tools of Sermon Development. We looked at these in the last post here on this site as we study how to develop a sermon. Now, let’s look at how to use Logos Bible Software to explain a text. We’ll look at illustration, proof, and application in three other parts of this series on how to develop a sermon outline that we can transform into a great message.
If you read our previous post that defined each of the four essential aspects of Sermon Development, you know that one helps achieve the other three. An influential preacher uses many illustrations to explain his sermon's ideas. Illustrations show what we mean so the hearer can understand the passage.

Jesus Used Illustrations to Explain His Teaching
Read scripture, and you'll see Jesus used illustrations called Natural Analogies in his parables. He explained the concept of faith using the example of the Temple Mount and mustard seeds, two things his listeners would know about. You either have faith, or you don’t.
20- So Jesus said to them, “Because of your unbelief; for assuredly, I say to you, if you have faith as a mustard seed, you will say to this mountain, ‘Move from here to there,’ and it will move; and nothing will be impossible for you. 21- However, this kind does not go out except by prayer and fasting.”
Matthew 17:20-21, NKJV
Jesus explained the concept of faith using the Natural Analogy of a mustard seed. We might want to make this point in a sermon on this passage.
Today, we talk about degrees of faith, from weak to strong. However, Jesus taught that faith is binary. You either have it or you don't. You believe, or you don't. A mustard seed is the smallest seed that people commonly saw in Jesus' day. He might have even had one to show the audience.
A Modern Example of an Illustration Used to Explain Faith in Sermon Development
Since people today don't often plant mustard seeds, we might use a different Natural Analogy that we commonly experience, like a slight switch.

Photo by Mikhail Nilov
The average homeowner controls her overhead lights with a binary light switch with only off and on positions. It’s unlike a dimmer switch, which turns a light on in degrees of light. You can slide the switch up to ten percent for a romantic evening, halfway for average use, or 100 percent when you’re looking for a lost earring.
Jesus didn’t have two kinds of light switches. He didn’t have any light switches. Instead, he used a mustard seed. You either have faith, or you don't. You can't get less than that tiny seed's worth of faith. If you have it, then you can do something extreme, like commanding the Temple Mount to hurl itself into the nearby Dead Sea. That would seem insane to those listening to him and modern audiences if the temple still existed. But he said, if you have as much as a mustard seed of faith, you could command such a thing, and the Temple Mount would obey. This assumes you're acting in God's will; He'd need to want the temple mount thrown into the sea by an ordinary person's command.

The mustard seed illustration explained Jesus’ teaching about the binary nature of faith. He used a real-world or natural analogy to accomplish this.
Exegetical Guide in Logos Bible Software for Sermon Development
When I first discovered Logos in version 3 almost 20 years ago, the Guides sold me on the value of the software. Enter your passage, and Logos finds all the tools or books in your library that refer to a passage or topic. You can do this with the Exegetical Guide and discover many language study tools to help you understand the passage. Then, you’re ready to explain these Biblical ideas to your audience.
To open the Exegetical Guide, use either the right-click menu or the Guides button on the toolbar when selecting your passage. See the screenshot below.

You'll see a list of the different sections in the Exegetical Guide. These include tools for language study.

The WORD BY WORD Section of the Exegetical Outline
I focus on using the WORD BY WORD section. It shows your passage in both Greek or Hebrew on the left and English on the right (see below). Click a word to jump to that word's entry in the section. Each word's section shows the Greek or Hebrew lemma, an icon that, when clicked, will pronounce the word, a transliteration, and a simple translation.

The second line shows the parsing info. On the third line, you get the Sense info, a kind of translation that shows how the text uses the word in context. After the Sense, you get a list of your lexicons, which displays a short translation. Click on any of the blue links to get more information.

For example, in our passage on Matthew 17:20-21, we see the word for seed in the WORD BY WORD section. You can click the blue link to open NTGED if you own it and read more about the word translated seed in The New Testament Greek English Dictionary from Gilbrant, Thoralf. 1991. The New Testament Greek-English Dictionary comes as part of The Complete Biblical Library. There you find under "New Testament Usage" the following:
In all of its New Testament occurrences kokkos is used figuratively. Even with faith the size of a small mustard seed, one can live a miraculous life.
Gilbrant, Thoralf. 1991. “Κόκκος.” In The New Testament Greek-English Dictionary. The Complete Biblical Library. WORDsearch.
The above might help you as you study and try to explain the idea of a mustard seed representing such an infinitesimal amount of faith to explain that you either have faith or don't have faith. If you have it, you can move mountains, like the Temple Mount, which eventually happened in 70 AD after Jesus made the temple sacrifice moot.
If you don't own the NTGED or the Complete Biblical Library, head over to Logos to get it (Affiliate Link).
Passage Guide in Logos Bible Software for Sermon Development
Like the Exegetical Guide, the Passage Guide starts by asking you to enter your passage. The Guide will then show you different kinds of content when compared to the Exegetical Guide. It focuses less on language study and more on references like Commentaries and other tools like Biblical People, Places, and Things or Sermons and Illustrations. Let’s take a look.

Follow the same procedure as opening the Exegetical Guide. Select the passage, right-click it, and choose the Reference on the left list of the popup and the Passage Guide on the right list. The Guide will open and search all of your books in the Passage Guide categories for the selected Reference.
Alternatively, open the Passage Guide from the Guides button on the toolbar of Logos 10 using the same steps above when opening the Exegetical Guide.
Using Search Results to Explain an Idea in Logos 10
Let's use our Matthew 17:20 example from above. With the Passage Guide open as instructed in the previous section, begin opening tools by clicking on them in the Guide. I prioritized the New American Commentary so the Matthew volume sits atop the list of commentaries near the top of the Passage Guide.

When you read the section on verses 19-20 you'll see the author of the commentary writes:
“Nothing will be impossible for you” must thus be interpreted as nothing Jesus has given you the authority to do, such as this exorcism.22 Obviously, many other things are impossible for believers—based on the limitations of their humanity and of God’s will. As v. 22 immediately makes plain, even Jesus’ own miracle-working abilities did not permit him to escape the cross despite repeated temptation to do precisely that.
Blomberg, Craig. 1992. Matthew. Vol. 22. The New American Commentary. Nashville: Broadman & Holman Publishers.
This helps us explain that faith is not like a blank check. We can use the ideas presented in the commentaries and then give an illustration of a blank check to help our listeners understand that godly, Biblical faith is not an unlimited promise to let us do anything we please outside God's plan.

You'll find other excellent lists of resources in the Passage Guide. Look at the Cross References section, which refers to Luke 17:6, the parable of the Mustard Seed, modified by Jesus to refer to the miraculous ability to transplant a mulberry tree. The Passage Guide also includes links to the Factbook. So you could head down to the Biblical Things section of our Passage Guide. There, you'll find links to images from the Factbook.
You will also find these sections in other Guides like the Sermon Starter Guide and Topic Guide.
Power Lookup to Learn What a Passage Means for Explanation in Sermon Development
Users often forget the Power Lookup tool, but it works like a kind of Guide to search for content on a selected text or word. Right-click on the Passage and either choose the Selection or Reference on the left side of the popup. Scroll down to the Lookup section on the right side of the popup. You'll find Power Lookup.

The Power Lookup window opens in a small section along the right side of the Logos screen. It includes links to and short previews of things like...
- Footnotes
- Bible passages
- Commentaries
- Language tools
The Power Lookup panel links to the Bible you have active and moves when you move to a new passage. This helps when studying longer passages.
Note that all links to Logos resources are Logos Affiliate Links. I will receive a small percentage of the price if you purchase them using my links.

How to Use ChatGPT to Make Sermons More Interesting But Not More Biblical
You shouldn't use ChatGPT to study your passage but you can use it to make it more interesting. We look at how AI can help in sermon prep.

Everyone's amazed at the usefulness of ChatGPT while also concerned about it replacing so much in our culture. This includes good sermon preparation. Should pastors and preachers use ChatGPT to prepare their sermons? We will examine how to use ChatGPT to make sermons more interesting but not more Biblical.
Will the artificial intelligence tool make your sermons more interesting? How about more biblical? Can you even trust it?
I started using ChatGPT in my sermon preparation, but not how most people might think.

The Ethical Concerns Over ChatGPT for Sermon Preparation
Ethical preachers do their best to let the hearer know they didn't come up with the content on their own unless they did it on their own.
I once preached a narrative sermon telling a third-person story about a marathon running in the Corinthian games. It was an in-depth story that made my key points based on a passage from 1 Corinthians. I wrote it. It was original to me. So, I never cited anyone.
After the message, a church member told me she loved that story and couldn't remember where she first read it, but was glad I told it. I didn't have the heart to contradict her, so I said, "Thank you!" I left it there. But I wrote it.
At the same time, I heard a preacher quote an entire chapter from a Max Lucado book verbatim while he preached a revival at my church. After that service, I approached him and said, "I enjoyed listening to that. I, too like to read Max Lucado's books." I wanted him to know without being too confrontational that I knew he just passed off non-original work as his own.
Do You Always Cite Sources?

That brings us to the question of citing sources. Do you always cite every source you glean information from? Do you say, "The New American Commentary says..." about a passage? I don't always do that. If the material is unique and especially creative, I will clarify that I found this somewhere else. If it's ordinary and you can find the same content in five different Lexicons or Bible dictionaries, then it's not that revolutionary. You don't need to cite it.
That leads us to ChatGPT. Too much of the content we discover doesn't come with good citations. You can ask for references, but sometimes the information is wrong. So, ethical preachers should carefully use content from ChatGPT.
I don't use the tool for learning about language study, historical information, or other content I can find using something like Logos Bible Software. It's not good for that. Don't do it!
If you ask ChatGPT to write a full outline, you must cite it. It could be interesting, especially if you can find a way to connect that to the message. You might say, "I used ChatGPT to develop this outline." Some won't care, while your "lazy" sermon prep will scandalize others. However, in the end, you could make a point about life that ChatGPT illustrates. I can't imagine such an illustration, but you might.
I say that because...
ChatGPT Won't Replace Good Exposition of Scripture
Use your Bible Software or your seminary language study skills to learn what the author of Hebrews means by "Faith is the substance of things hoped for, the evidence of things unseen."
- You don't know whether you can trust the sources for studying Greek or Hebrew languages.
- You don't know whether you can trust the sources for church history, hermeneutics, or English-based dictionaries.
Fill in the blanks with any source. ChatGPT doesn't provide good sources, so you'll need to cite ChatGPT, and the tool often gets things wrong. A site called Analytics India Magazine posted a list of problems with ChatGPT. This ranged from bias to factually false info to bad math.
Don't use ChatGPT to study your passage. It's not good at it. If you have any experience preaching or training in exposition, then you're better at studying scripture than ChatGPT.
Use ChatGPT to Make Sermons More Interesting by Finding Illustrations
ChatGPT does a decent job of finding good sermon illustrations. Everyone knows a good sermon illustration will help you create interest. So you can use ChatGPT to make sermons more interesting by asking for great sermon illustrations.

Ask for historical or news-based examples of your topic. For example, ask ChatGPT, "What's a good example of a news story that took place since 2010 that shows what it is like to forgive?"
You'll notice a clipboard icon right of the answer when you get your answer. Click it to copy the content and then paste it into your sermon. Here's what the site offered when I wrote the above question.
One notable news story that demonstrates the power of forgiveness is the case of Rachel Denhollander, a former gymnast and lawyer, who in 2018 became the first woman to publicly accuse Larry Nassar, the former USA Gymnastics national team doctor, of sexual abuse. Denhollander's brave decision to come forward eventually led to Nassar being convicted and sentenced to up to 175 years in prison.
During Nassar's sentencing hearing, over 150 women shared their stories of abuse, and some even expressed forgiveness towards their abuser. In her victim impact statement, Denhollander said, "I pray you experience the soul-crushing weight of guilt, so you may someday experience true repentance and true forgiveness from God, which you need far more than forgiveness from me."
Denhollander's statement not only showcases her own strength and resilience, but also highlights the power of forgiveness. The courage and empathy displayed by her and the other survivors in offering forgiveness, despite the immense pain and suffering they endured, is a testament to the healing potential of forgiveness. This case gained widespread attention, opening up conversations about the importance of acknowledging and addressing sexual abuse in sports and other institutions.
ChatGPT
Other examples could include things like...
- What's a good quote from one of our founding fathers on the value of learning?
- Give me a literary example of mercy.
- Are there any movies from the last five years that show the value of family?
Remember that when ChatGPT gives you a result, you can narrow the results. When I typed the third prompt, I asked it not to give me any Disney movies. It included the movies Coco and Onward, both Disney films.
Use ChatGPT to Make Sermons More Interesting by Finding Just the Right Words
I don't make a big deal out of sermon titles. We don't publish them in our bulletin or post them on the church sign. However, I sometimes state them if they're interesting and grab attention. If you want to do that, ChatGPT can reword your sermon title or the Big Idea sentence (main idea of the sermon) in a more memorable way.
I asked ChatGPT, "what's a catchy way to say Approved by Faith" since that's my subject for an upcoming Bible study on Hebrews 11:4-6. Here's the response I received:
A catchy way to say "Approved by Faith" could be "Faith-Certified" or "Blessed by Belief." These phrases maintain the essence of the original statement while adding a touch of flair and memorability.
ChatGPT response.
I like Faith-Certified because it not only sounds interesting but sparked an idea for an opening illustration about getting certified. Some authority says you're qualified in a particular area when you receive certification. You could pick programming, something from a job some congregation members hold, the certification to do CPR and save lives, or maybe to use a powerful tool safely.
7 Best Apps for Writing Sermons Digitally
What are the best apps for writing sermons? We have a bunch of options in 7 categories for sermon writing tools.

What tools do you use to write your sermons digitally? We've got the best apps for writing sermons digitally and we'll explain why each works great and recommend the best single option.
Most of us no longer write out sermons by hand or type them on an old-fashioned typewriter. We write in Bible study software, a word processor, a notepad app, a note program, or some other software.
Microsoft Word or Another Word Processor are Some of the Best Apps for Writing Sermons Digitally
The granddaddy of word processors comes from Microsoft. Most people who use a word processor write with Microsoft Word. Other options include a form of the open-source OpenOffice, like Libre Office Writer. OpenOffice is the foundation for Libre Office. It's a great tool if you use Linus or want a powerful tool that you can get for free.

and then open the notes on an iPad or Android tablet to preach from them.
If you write your sermons with one of these powerful word processors, you will likely come up with your sermon outline, copy and paste text from a Bible program or the Internet, and formate it for preaching.
When I write in Microsoft Word, I format the document with large text for each major sermon division (read points). Each sermon has large green text so I can see it in the pulpit easily as I preach with my sermon notes open. Bible quotes use large bright red text and standard quotes from people or commentaries use large purple text.
The sermon syncs to my iPad using OneDrive and I open it in Word. The iPad sits on my podium so I can look down and check my notes as I preach through the sermon.
This works with an Android tablet or a Windows computer like a Microsoft Surface tablet.

If you're all in using Apple Hardware and software, go with Apple Pages and iCloud sync. It works well even if Pages doesn't come with all the powerful features of Word or one of these open-source word processors.
Android and Chromebook users can take advantage of Google Docs and Drive.
Remember that Microsoft Word costs at least $6.99/month for the basic Microsoft 365 subscription. You can often find deals online on eBay or Amazon, but be careful that you're buying from a reputable buyer.
Bible Study Software Sermon Writing Tools

Open the Sermon Builder to create one sermon.
Logos 9 includes a useful Sermon Manager to create your sermon preaching calendar for weeks to years out in advance. Then, you open a single document with a tool called the Sermon Builder. This was a huge part of the Logos 9 upgrade. They worked to overall the sermon writing and organizing features to make it more usable.
Logos 9 users will love the way the built-in Sermon Builder syncs with their Proclaim worship presentation software. If you use it in your church, then you can create sermons in Logos 9 and it will sync to Presentation for the date the preacher is scheduled to preach that sermon.

Using Logos and Proclaim together lets the preacher publish his sermon online in text mode. Plus the church can record both audio and video to publish podcasts or worship service videos.
Accordance Bible Software also lets users write inside the software. The Papers option works best. The video below shows how to create and edit Papers in Accordance 12 and later.
You could also use things like Notes files and most Bible study apps. But the above two options work best for creating sermons that you can store inside the program and search later to reuse part or all of the sermon.
The cost of Bible software varies wildly depending on which vendor you buy from, what package of tools you purchase, and whether it's on sale.
To get Logos 9 10% off, I'd appreciate you using my affiliate link at www.logos.com/KevinPurcell where you can buy a package and get a few free books too. I get a commission which helps me do my work here on this site and on my YouTube channel.
Tools like Olive Tree and Laridian PocketBible are free to cheap to get the basic app.
Note Apps Built Into Your Operating System are Useful Apps for Writing Sermons Digitally
As I said above, you could just write plant text or simply formatted text in a Note attached to a passage inside your Bible study program. If you use something Like Olive Tree or PocketBible, this might offer the best option.

Writing in a note gives you a simpler option when compared to complex word processors or advanced Bible software with a Sermon Builder or Paper feature like Logos or Accordance mentioned above.
Notability or Other iOS Apps for Writing Sermons by Hand
For users on iOS and Mac, try out the great note-taking apps like Notability on iPad and macOS. You can write using your handwriting, or typing. When you're finished you can export the results as a PDF or image file.
There's a segment of users who enjoy mind mapping their sermons. I'm not one but I've read about them. People like this will organize their sermon notes by putting the major subject in the center of the screen in a circle or box. Then they will draw lines away from the center to another shape for each major sermon division or point. Under each or around each they show their explanation, proof, and application for each main sub idea in the sermon. Add an introduction and conclusion and you've got a visual method of displaying the sermon.

Above you'll see a visual form of those from my friend Antoine Wright who visited my church and did what he called a "Sketch Note" of my sermon that day. You could do something like this for your sermon notes. If you're not artistically inclined like Antoine, then you can use text or print instead of images.
You could use other note-taking apps like Apple Notes, Good Notes, and more.
Samsung Notes or Other Apps for Writing Sermons by Hand on Galaxy Android Devices
Another option for Android and Samsung users is Samsung Notes. It's built into Samsung's version of Android. I like using it because it's simple and easy to learn. However, it has fewer features than Notability. If you could use. Notability on an Android device I would.
Use Samsung Notes to create notes with handwriting or type using a keyboard. The strategy is the same as it is for iOS handwriting apps.
Sermonary for Online Sermon Writing the Best of Online Apps for Writing Sermons Digitally
A final option includes a website that lets you write online called Sermonary. Here's how it works. Create a new sermon and then add your sermon elements. Add sermon divisions or points. Then create subpoints for the explanation, proof, and application.

Sermonary includes Templates for different styles of sermons. You can use...
- 3 Point Sermons
- Andy Stanley's ME-WE-GOD-YOU-ME format
- Running commentary format
- Defender's Outline for an apologetics sermon
- Children's Leader
- Youth Pastor

The service adds resources to help you preach the word including some visuals, sermon series ideas, and more.
Sermonary costs nothing for the basic editor. Add more features and you'll pay $19/month or $69/month for a bundle with Sermonary and Ministry Pass. That adds sermon series ideas, visuals for presentations, holiday sermons, plus sermon illustrations.
In addition to Sermonary, instead, you could use any online writing tools like...
- Google Docs
- Word Online
- Grammarly
Text-based Writing Tools with Markup to Write Sermons in Plain Text

Some people prefer simple text editors. Almost every computer or mobile device includes a text-based writing app like Notepad on Windows, Apple Text Edit on macOS, and Apple Notes on iOS, iPadOS, or macOS.

If you're an Android user, you might find a good text editor, but sometimes you need to download one from the Google Play Store. Consider Writer Plus a great Android text editor available on both iOS and Android. Use it as a basic text editor or add markdown to format your text. The app is free with the option to donate via in-app purchase.
Recommendation for Writing Sermons
If you have access to Microsoft Word, then go with it. It's cross-platform meaning you can move from iOS to Android to Windows to Mac and back. Second, it's not tied to one Bible study program. The death of Bibleworks and Wordsearch recently proves we should move carefully deeper into one platform's ecosystem. I like to keep as much as possible separate from my Bible software.

What Do We Mean by Creative Digital Sermon Preparation?
In our series on Creative Digital Sermon Preparation, what do we mean by "creative" or "creativity"? This post answers that part of the equation.

We started this series on Creative Digital Sermon Preparation with an overview and introduction to the series. Now we take another look at the overall idea after hitting step one, prayerfully choosing a text. What do we mean by "Creative Digital Sermon Prep."
See our series on Creative Digital Sermon Preparation!
I assume readers understand what we mean by sermon preparation...
- Choosing a passage under God's direction.
- Studying the text using Inductive Bible study.
- Planning to present the message of that text.

That's sermon preparation. We add the term digital because we use digital tools instead of analog paper books and Bibles. This series covers the process of digital sermon prep using Logos Bible Software. We'll then take a stab at it with Accordance and Olive Tree and maybe some others. If you don't use Logos, what do you use? Comment below.
How do we prepare creatively? And then how do we present the message creatively? Here's what I mean by Creative Digital Sermon Preparation and Preaching.
Creativity Pictured
Young Kevin sat in the auditorium listening to Pastor Bob Stiles preach. He couldn't wait to get out of there and eat lunch. Maybe mom would let them go to the Italian place with the great spaghetti and garlic sticks with butter sauce.

"Everyone take out the Hershey's Kiss our ushers passed out before the service began," Pastor Stiles directed. Kevin already ate his. Mom looked at him, wondering where Kevin put his. Kevin looked up at her and smiled as innocently as he could.
"Why did that old man want me to eat a Hershey's Kiss? They're pretty good."
He enjoyed his 25 minutes earlier. Now he wished he had another.
"They say 'Big Things Come in Small Packages.' Remember that the next time you eat a Hershey's Kiss or any other small piece of chocolate candy," the pastor said, unwrapping a Kiss. "The tongue is tiny but can deliver a ton of pain when we say unkind words meant to stab at the heart of a loved one."
Just then, a video played on the screen showing a man building a fire while a narrator read the passage from James 3:1-12.
So too, though the tongue is a small part of the body, it boasts great things. Consider how a small fire sets ablaze a large forest.
(James 3:5, CSB)
For the first time, little Kevin paid attention to the sermon, at least during the sermon.

A few days later, Kevin and his Uncle Mike stood in line at the CVS, waiting to pay for some medicine Uncle Mike needed for his bad back. Kevin looked at him, wondering, "Will he say, 'Yes?'" He did, and Kevin grabbed a small bag of 6 Hershey's Kisses from the rack below the checkout counter.

He wanted Hershey's Kisses after the pastor mentioned them in church Sunday. After Uncle Mike paid, Kevin tore into the bag, unwrapped his first Kiss, and gobbled it up like a starving vagrant.
"Get your fat little brat out of the way," a heavyset older woman yelled at Kevin's Uncle. Did she mean him? He never really considered himself fat, but he was plump. The pain of her words pierced his heart.
Creative Digital Sermon Preparation in Biblical Hermeneutics
As we preach, the creative elements of the sermon make them memorable. In the fictitious example above, a sermon on James 3 grabbed little Kevin's mind. Days later, when he experienced what the pastor exemplified by his candy analogy, it meant more to Kevin. He learned thanks to Pastor Stiles's small object lesson on the potency of the tongue. Candy grabs a boy's attention more than eloquent speech.
A motion video of words from a Bible verse with sound instead of accenting the words grab attention more powerfully than reading the text from a paper Bible. A multi-sensory experience where the audience hears the message, sees the message, feels the massage, and even tastes the message, will tattoo itself to the heart more indelibly than a traditional spoken word.
Creativity in sermon preparation and delivery empowers the message as nothing else can. That's why we want to creatively study the word, looking for the multi-sensory aspects of the text, and take note of those examples so we can creatively reproduce them for our audiences.
Examples of Creative Digital Sermon Preparation for Communicating the the Bible
The Bible is rife with creativity and objects lessons. The Eden tree served as an object lesson of boundaries, commitment, and the temptation of Adam and Even. The flood taught Noah a lesson through an experience of all the senses as no sermon could. God used a dove to illustrate a message of waiting on God to act. The rich sensory experience of sacrifice stamped the idea of atonement on the Israelites' hearts as they smelled, heard, felt, saw, and in some cases tasted that atoning sacrifice.

The Lord's Supper and Baptism are two of the most important worship rituals of the church. We experience them a rich multi-sensory experience that we will unlikely never forget. Who can't remember their own baptism as the water poured over the face and then dripped off a robe or t-shirt and shorts? We taste a tiny cup of juice or wine, depending on our traditions.
Baptism and the Lord's Supper were commanded by Christ for many reasons. I believe that he commanded us to do them in part as a means of indelibly stamping the truth on our hearts reinforced by the sense of taste, touch, smell, site, and hearing.
Find the Sensory Signals in Scripture and Communicate Using Senses
Expository preachers argue that we communicate the Scriptures' messages by letting the message of God's word direct our words as we preach. We don't bring our opinions into the Big Idea of the text. We let the words in the passage direct our main points and message.

I usually preach expository sermons. So, I support the idea of letting the text speak. However, I think we miss another way that the text should direct our message. Let the tone, sensory imagery, creativity, and word-picture of the text direct our presentation methods. A convicting message from a text will contain a more prophetic tone as we preach. A lighthearted story filled with humor should also contain humor. When a Psalm uses strong sensory images, the sermons should grab hold of those same or similar sensory images.
Spotting the art in Scripture becomes part of our preparation while we study a passage. Learn the Big Idea of a text and learn how the Bible communicates the Big Ideas by tickling our five senses.

Slide Over on iPad Makes Your Bible Study More Productive
How can Slide Over on iPad make your more efficient and productive as you study and prepare for sermons or Bible studies? We'll show you how.
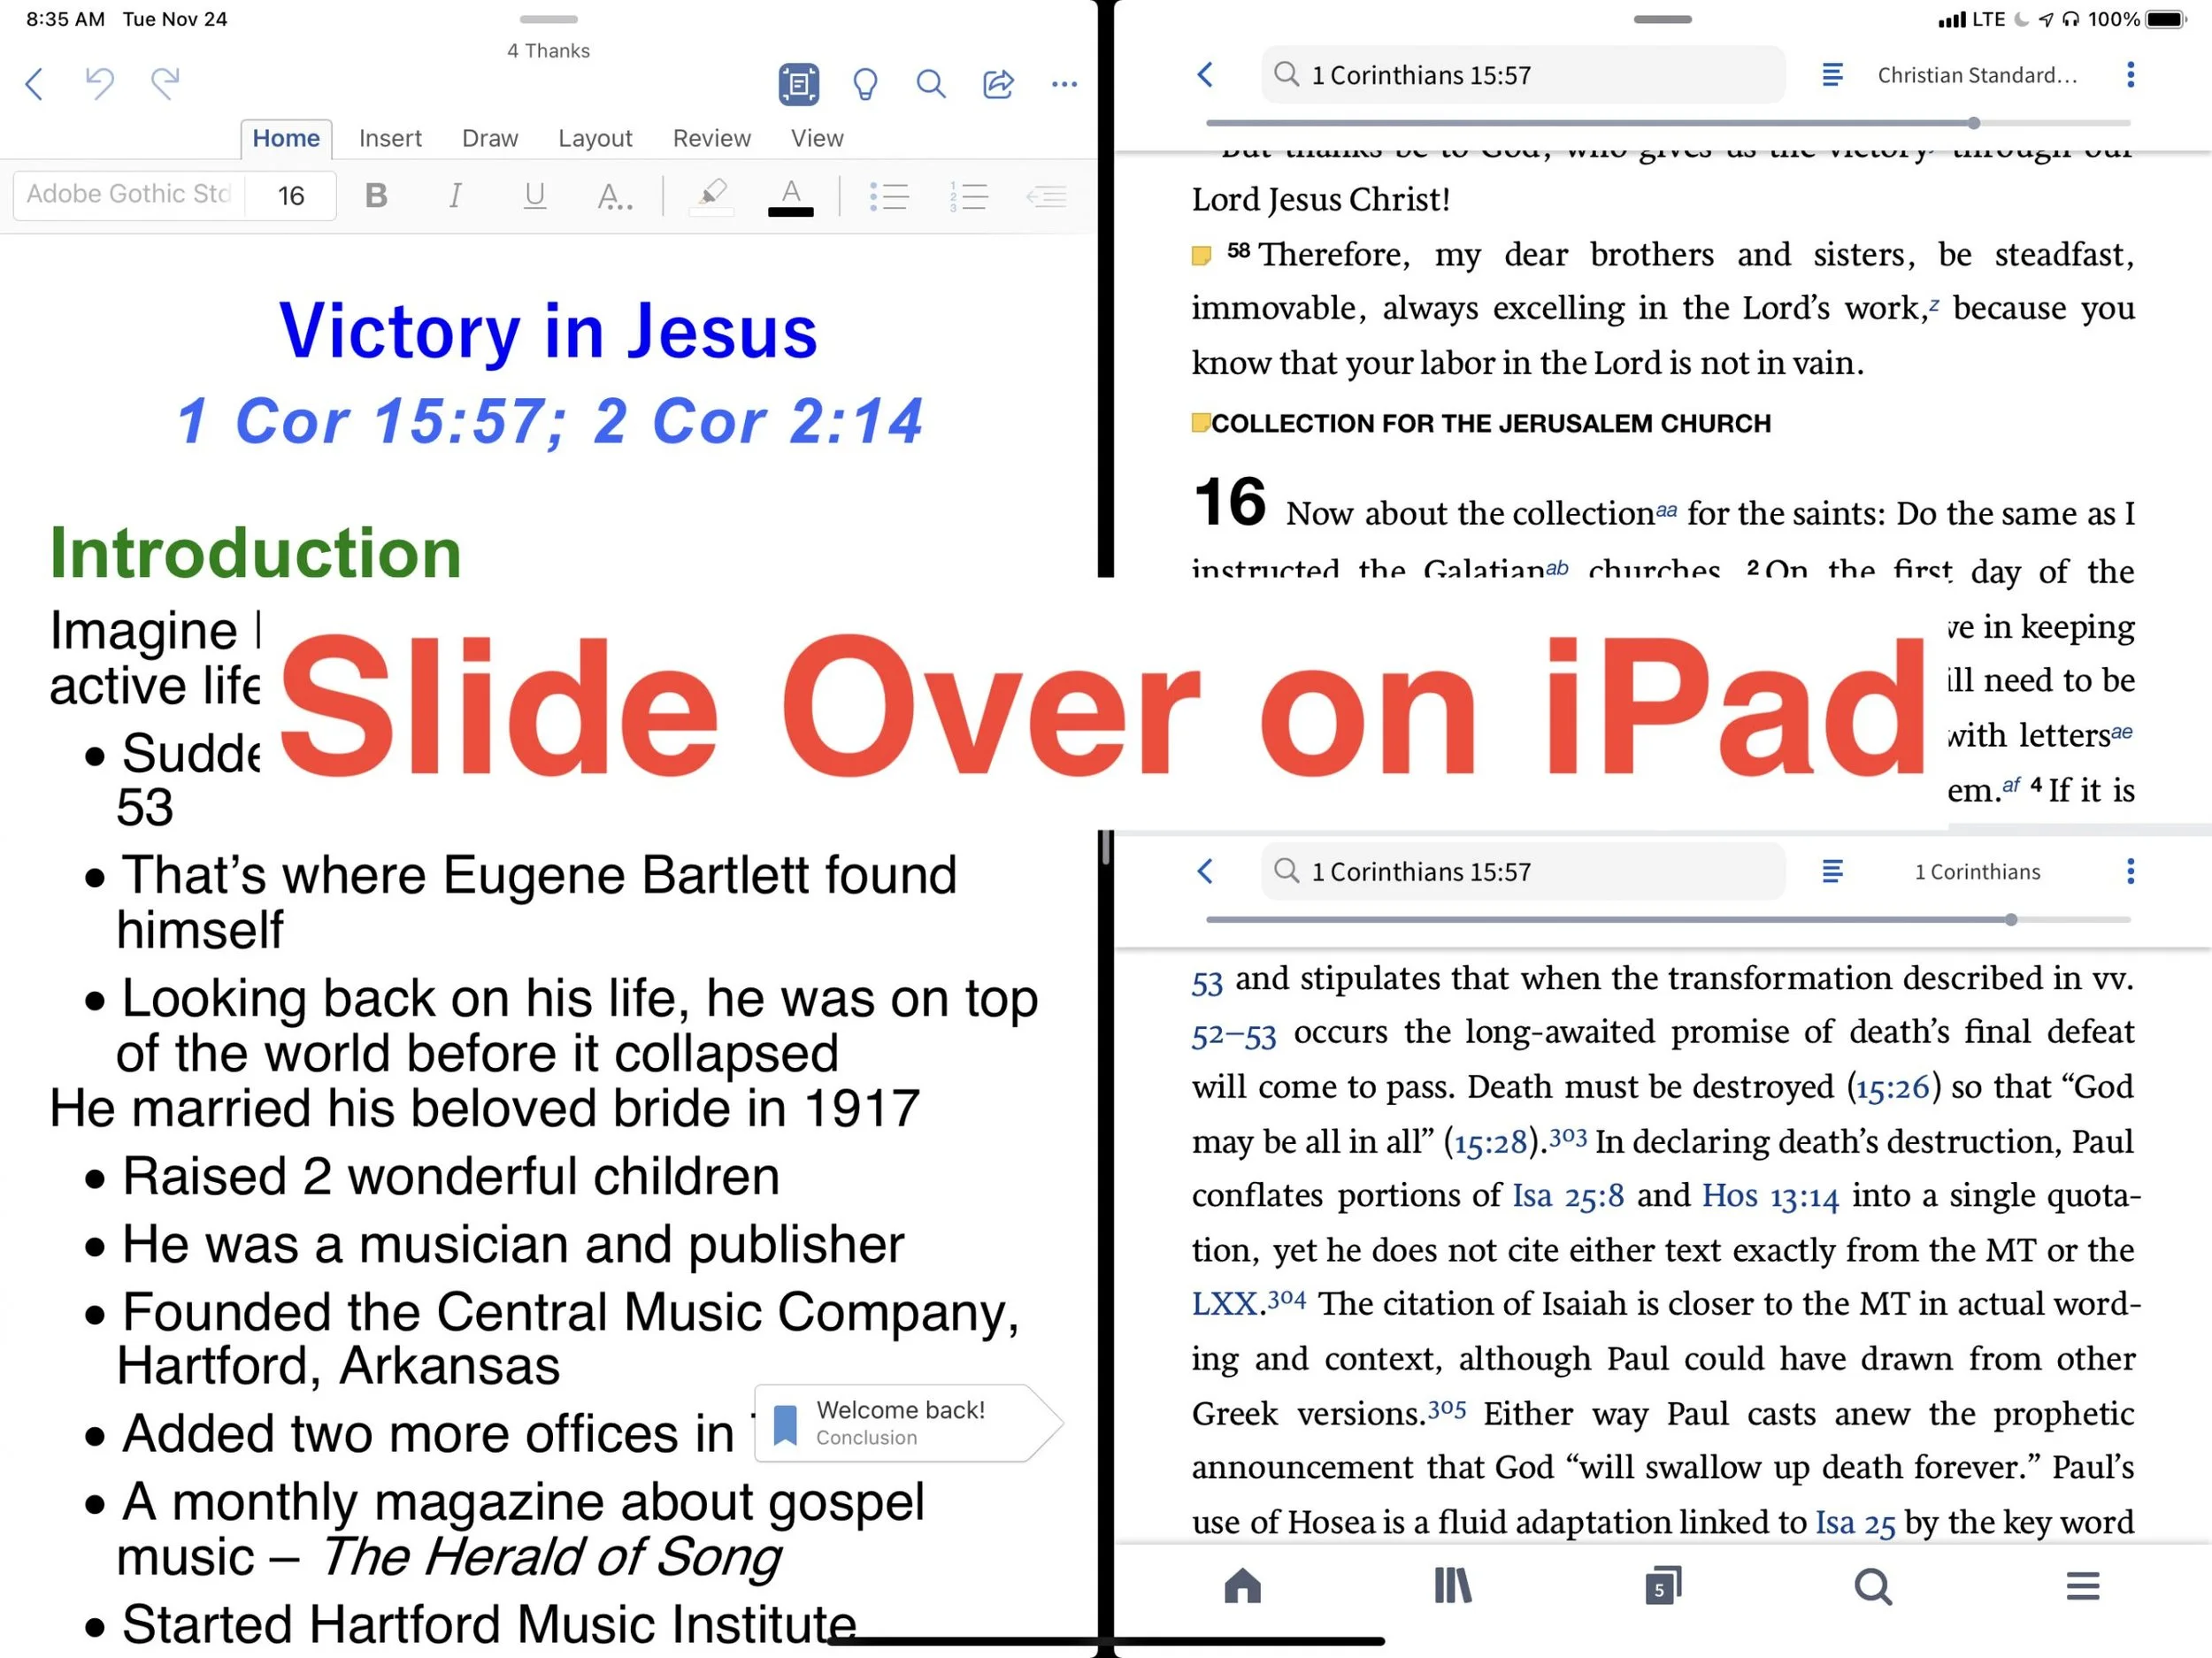
Do you use Slide Over on iPad as you study the Bible? If not, you should because it can increase productivity. Take a look at the following tips for effectively using Slide Over on iPad as you study the Bible or do other tasks on your iPad.

Switching back and forth from your Bible study app to your word processor or other mobile apps, while prepping sermons feels laborious. However, thanks to Slide Over with iPadOS digital Bible students can productively work with two apps at a time on larger iPad screens.
What is Slide Over on iPad?
When Apple released the first version of iPadOS more than a year ago, they perfected a feature called Slide Over. Think of it as two apps on the screen at the same time. Apple didn’t do it first, but iPad users found it cumbersome to use in previous releases.
The iPadOS will show you two apps at once. You can view them with both apps taking up half the screen or you can view them with one covering two thirds and the second app covering another third. The smaller window can sit on the left or the right side of the screen.
How do You Turn On Slide Over?
To open an app in Slide Over the app has to show up in your iPadOS dock. The dock sits at the bottom of the screen and holds all of your favorite or most-used apps plus three of the most recently used apps.

I keep my most-used Bible study app in the dock. But if you want to use another Bible study app that you don’t have in the dock, then open it first. Now slide up from the bottom of the screen slightly. You see a black line just above the bottom edge of the screen start swiping from that line and swipe about half an inch or so until you see the dock. Tap and hold a second app from the dock and drag it up to the right or left side of the screen. If a menu pops up then keep dragging up and over to the side of the screen.

The screen will show your two apps each taking up half the screen. If you want to adjust the size of the apps, drag from the line in the middle of the screen to the right or left to make one app smaller than the other.
When do I Use Slide Over in Bible Study?
I own a few Bible study apps that I regularly use in my sermon and Bible study prep. Sometimes, I want to read books in one app, but keep all my notes attached to the passage I’m studying in the same app. So, I open the app where I want to keep my notes and then I open the other app. That way I can read the second app while writing notes in the first.
During the sermon or Bible study writing phase, I’ll open Microsoft Word and my Bible app where I’ve kept all the study notes. That way I can easily refer to the notes as I write my sermon or Bible study.

Sometimes I want to research some idea on the web in order to come up with an interesting sermon illustration. I keep Word and Safari open at the same time. Sometimes I’ll open a video in YouTube or some other streaming app to quote the video in my sermon. Any app you might use it prep a sermon that supports Slide Over can be opened.
If I’m presenting while preaching or teaching, I’ll open Keynote and my sermon in Word at the same time. Or, I open Keynote and Safari to drag and drop images from the web as I put the presentation together.
Tips for Using Slide Over
You can master Slide Over with the following tips:
- Open apps not in your dock before trying to use Slide Over so they will appear in the recently used section of the dock on the right where your three most-used apps show up.
- If one app doesn’t need half the screen, give more screen inches to the other app by sliding the center adjustment line over a little.
- Set up multiple app combinations for Slide Over and use the switching feature to switch between these multiple app combinations.
- You change one of the two apps into a floating window by dragging from a small dark line at the top of the active app by pulling down slightly and hold it till it pops from the side to a floating window. Grab the line and pull down and to the right to put it back.
- While in the floating view, you can remove the window by swiping up or down to swipe it away.
- Move an app from one side to another by dragging it from the tiny black bar at the top and then slide it over to the other side of the screen until it snaps into place.
- Create multiple pairs of windows and swipe between them the same way you would swipe between apps.

Logos Sermon Prep Part Four: Text Comparison Tool in Inductive Bible Study

The next step on Logos Bible Software Sermon Prep helps us actually learn what the passage we've selected means by reading it repeatedly using the Text Comparison Tool. We're talking about Inductive Bible Study.
What is Inductive Bible Study?
 The phrase Inductive Bible Study refers to studying the Bible hoping to discover the meaning of the text without any prejudices or preconceived notions brought to the task. Seminary students will remember studying the terms eisogesis and exegesis. We call Inductive Bible study exegesis in scholarly circles. It means studying the text and discovering the meaning based on the words, concepts, setting, writer's intent, audience and context. Eisogesis is the opposite. If a student fails to let the word speak for itself, then they might read into the text what's not really there.A lot of heresy comes from eisogesis or reading into the text what's not there. We take verses out of context or don't study them based on the original author's intent, context, setting or the meanings of terms used that we might misunderstand in our time.Inductive Bible Study leads me to discover what God's saying to me and my audience. That's why it's the best approach to Bible study for Logos Bible Software sermon prep.
Theotek Podcast
https://youtu.be/Jx-PYaR_y0o
Steps of Inductive Bible Study in Logos Sermon Prep
You can do Inductive Bible Study using physical books and a notepad or you can use any competent Bible software. Logos Bible Software helps us study the bible inductively thanks to a number of tools. This part focuses on the Text Comparison Tool. The full list of Inductive Bible Study steps include the following:
- Reading the text repeatedly
- Observing what's in the text without any other tools at first
- Ask good interpretive questions
- Diagram the sentence in Greek, Hebrew or English to see the structure of the author's thoughts
- Find answers to questions and check the accuracy of our observations using the tools in Logos Bible Software
- Discover the Big Idea of the text
We started the process with selecting a text covered in three steps (first, second and third steps). Now, it's time to read it repeatedly and we'll show you how using Logos.
Read the Text Repeatedly
We're going to work with Ephesians 1:3-14 as our text. I'm teaching through the passage during my Wednesday night Bible study at church. We already talked about multiple tools and ways to choose the text, so for this step, we'll assume that's a good text to choose, especially since it's one long sentence in Greek.Start by opening your favorite translation and prayerfully read though it in your favorite translation. I say "prayerfully" because you should begin by asking the Holy Spirit to guide your study.You should probably also read the text in context.
- Read the entire chapter.
- Read the whole book if it's not too long - Paul's letters, the Pastoral Epistles, shorter prophetic books.
- Read sections in longer books like the chapters before and after at least.
Use Multiple Translations
 Read the passage itself in a few translations. I always use ...
- Christian Standard Bible - This is my favorite translation. Below I'll explain the value of various translations. I like the CSB because translators targeted a readable translations that's as close to word-for-word without sounding too wooden.
- English Standard Version - A slightly more literal translation that is also very readable.
- King James Version - The standard that most people grew up with in my church and is often the most recognizable translation for popular passages. It's more literal.
- New American Standard Bible - A very literal and highly accurate modern translation. I prefer the 1995 update.
- New International Version - Not a paraphrase, but the translators focused more on readability than literal translation. I prefer the 1984 version.
- New Living Translation - The old Living Bible was a paraphrase, but they updated it in the 1990s and went for more of a translation. However, it is the least literal of these translations with a thought-for-thought approach.
The Range of Translations from Literal to Readable
If you think of translations or paraphrases as sitting on a spectrum, then put the original Greek or Hebrew text to the left of the range. Translation that sit closer to the Greek or Hebrew text show up on the left. We call these "word-for-word" translation. Above, I mentioned that I use the KJV and the NASB in my reading to get this more literal look at the text in English.On the opposite end of the spectrum you find the paraphrases, like the Living Bible, the Good News Bible, The Message or the Amplified Bible. We call these "thought for thought" translations. We use these translations almost like commentaries. They helps us get an idea of what the passage means, even though they don't show us the word-for-word translation of the text.Most modern translations sit closer to the middle of the spectrum between literal and non-literal. Translators like to use the word dynamic or dynamic equivalent. That's a marketing term that makes the ESV, the NIV, and the CSB sound like they're equivalent. They're not as literal as the KJV or NASB, but not as interpretive as a paraphrase like the Living Bible or The Message. See this spectrum for many translations in the image below. The Eccentric Fundamentalist offered this nice graphic, which illustrates where the various translations sit on the spectrum. I don't endorse all that the author says about the translations, but I really like the graphic shown above.
The Text Comparison Tool
How do we read the passage repeatedly using Logos Bible Software tools? You could open the passage in about five or six translations and read them. However, we can do better than that using a tool called the Text Comparison Tool. Before we do, let me suggest setting up a Layout as follows. First, start with a blank layout. Click on the Close all panels button (see above). It looks like a small X inside a circle between the Layouts button and the question mark help button on the right end of the Logos Bible Software toolbar.
 Next, open the Text Comparison Tool from the Tools menu. You now see a screen that shows your top five Bible translations in vertical columns. To change what you see in the columns, click on the hyperlink in that window's toolbar just right of the reference box. A drop down menu appears.
- Type in the text reference in the reference box.
- Click on the hyperlink next to the Text Comparison Tool window. A drop down menu like the one above appears.
- Type in your translation abbreviation.
- Click the box to put a check mark in it when it appears at the bottom of the drop down menu.
- Repeat this until you have all of your chosen translations in the Text Comparison Tool's toolbar above the drop down.
You will see a window with all of your chosen translations in the order you added them. You can now read through each column. However, you might want to see the differences between the various translations. To do that quickly, Logos gives you three options in the Text Comparison Tool.
- Show differences - toggles whether to show or hide differences between the various text compared to the base text (left most translation).
- Show base text - toggles between showing the wording of the base text next to the text of each translation or just show a red circle next to the words that are different from the base text.
- Shows the comparison in either columns or as interlinear. You must certain translations as your base text for this to work. For example, the KJV works fine as seen below, but the Young's Literal doesn't.
 The above shows the Interlinear style Text Comparison Tool. It has the Show differences turned on. Without the Show differences, you'd only see the text without the base text showing up next to the wording that's changed in each row.
 Notice how there's a little red dot next some of the words in the NASB95 column above. This denotes a difference between this translations and the KJV1900 base text.
 In the image above we see the texts in column style. I turned on the Show differences toggle and it puts the words of the base text (KJV1900) next to the words in the NASB95 with a line through them. As an example, in verse 3 we see the word "
hath" with the line through it next to "has" in the NASB95 column.
Save a Layout in Logos
 Now that we have the Text Comparison Tool set up the way we want it, let's add our favorite translations and a Notes document window. Arrange the Text comparison Tool the way you want it. I have it across the bottom half of the screen. Open your favorite Bible. Then open a Notes document. You will use the notes document to record any observations you make you as reread the text repeatedly in your various Bibles.To open a Bible, click the library button and then search for your translation by typing in the abbreviation. Click the title of the translation when it shows up and it will open. If you already have a preferred Notes document, open it from the Documents button on the toolbar. Type the name run the search box. Then click on the title to open it. Now arrange the Bible and the notes document the way you want. You can create a new one for each sermon or for all of your notes in a book of the Bible, the New Testament in general or for the whole Bible. I don't recommend the last one. Your document will get too big.
 We'll save the layout. Click on the Layouts button on the top right of the Logos Bible Software toolbar. In the drop down window, click on Save as named layout. A box opens right there. Type your name and hit Enter.From now on your can open this layout by clicking the Layout button on the toolbar. Then click the Saved Layouts in the column on the left. A list will pop up. Click on the name of the layout you saved in the step above.Now read through the text in each column. If you want, record your thoughts about the differences between the translations by create a note on each verse, for a single word, or for the entire passage. I do this by right-clicking the verse in my favorite Bible. A menu pops up. Select the verse reference in the right column of the pop up menu. Then select Add a note to "your notes document". A new note will show up in the notes document window. Start typing in it.
Next Steps
In our next few parts to this series, we'll look at recording observations in a notes document. You already started this as you reread the text. Then we'll look at questions that the text might present. You'll record those too and start to look for answers in the phase after our inductive study. In the last part of the inductive study, we'll create diagram or outline of the text.
Logos Bible Software Sermon Prep Part Three: Concordance Tool
We've already looked twice at the topic of choosing a text, but let me take a third swing at a tool that you should consider using for Logos Bible Software Sermon Prep. We'll take a look at the Concordance Tool in this third part of the series. I began looking at picking topics and picking passages in parts one and two. Now, how can the Concordance Tool help us in choosing passages to preach or teach.Here's the secret of this powerful tool...
The Concordance Tool Video
My video below shows the basics of the Concordance Tool in Logos 7. https://www.youtube.com/watch?v=asQzvrTeMc4&feature=youtu.be
Benefits of the Concordance Tool in Logos
You may need to put away the old idea of a concordance while still using the principles to figure out what it does. The Concordance Tool, like a traditional Concordance, lists every word in a Bible translation, but here's the cool part of the Logos 7 Concordance Tool. You can change the list based on your own limitations and even use it to create a "concordance" for books other than Bibles. I used to own a hefty NASB Exhaustive Concordance (see above), since that was my favorite translation when I began preaching. I stopped using the huge physical book because Bible software is an exhaustive concordance by itself and its far more convenient than a 5 pound book. So why do we need a tool in Logos or any other program that calls itself a "concordance tool"?First, the Concordance Tool is customizable. I'll show you how to do that below or watch my video demo above.Second, users can create lists of Greek or Hebrew words even in an English Bible if. The tool uses the Strong's tags to do this.Third, you can also index more than just the English words of a Bible translation. It creates lists of other things like lemmas, roots of words, and Biblical entities like people, places and Biblical things. You can even search for references which are tags that link to other books, like a Bible reference in a footnote or in a Concordance or maybe even in a Christian Living book, like something by a popular author.The benefits listed here means the Concordance Tool helps us with picking a passage to preach because we can choose to teach or preach on a particular topic by opening the tool and searching for the most often used words in a book of the Bible. Let's say I want to focus on the idea of redemption, but I don't want to do a topical study of redemption. I want to select a series of passages that focus on the idea or subject of redemption. I could just search for redemption in the Logos search tool. But if I open the Concordance Tool, I can learn one particular author repeatedly discusses redemption.
How to Use the Concordance Tool in Logos
To get started open the Concordance Tool in Logos from the Tools menu. You'll find it in the second column under Reference. Click it to open it. The tool shows the last report generated or runs one if you haven't already used it.
 At the top of the window you'll see the book control drop down that usually shows the cover of the book with a small down arrow to the lower right corner. Click it and you'll see controls like the text size slider, the Find command, print, and the Close command among others.Next to the book control menu you'll see a link that shows the present book or Bible translation (see below). Click that Resource Reference link to change it. The Resource Reference search box shows up with a list of all library resources that you can use to run a Concordance Tool report. You can use a Bible in English or Greek/Hebrew. You can also run a Concordance Tool report on other books like commentaries or books by a single author. This results in an index of all the words in that book, if you do a Word report. More eon that below.
 Let's say you want to work in the NASB 1995 Update. Then, either find the book in the list or type in NASB in the search box and it will show all books with your search string in the title. Click to open the Concordance Tool using the book.
 Next you'll see what to index with the Concordance Tool. Click on the second link over (see above) to create an index. You can create one using one of the following:
- Word - the basic tool that works like a traditional concordance.
- Lemma - finds lemmas instead of words
- Root - finds roots instead of words or lemmas
- Sense - finds senses instead of the above
- Biblical Entity - finds persons, places, things, artifacts or measurements
- Reference - finds reference links
The last link lets the user narrow the search range. For example, in the screen shots here I've run the tool on the NASB 95 Update translation. So, when I click the last link it offers to let me narrow the range from All Passages to just ports of the Bible. You can pick your most recent passage selections or the common ones found in Logos. You can also create a new one by typing in the range at the box below the list labelled New reference range. If you plan to use that range again, give it a name in the Title box below the range box and then click the Save button. It will now show up in the list above the boxes.Along the left there's box that lets the user limit their Concordance Tool index. It's called the REFINE box or section. This changes dynamically based on what you've selected in the three drop down boxes at the top. For example, the index below shows the NASB95 Update with a Word index of All Passages.
 Along the left you can refine the search by omitting things, choosing certain languages only and searching in only parts of the text. So let's do an index of only English by clicking on English. Then only index the Words of Christ and only the Gospels (from the top).
Using Concordance Tool on Commentaries
You can use the Concordance Tool in a commentary on a book to find out what the commentary author seems to think is the most discussed topic. Run an index on a commentary on a particular book of the Bible. Then refine the search using the Refine box on the left. The index Logos creates will show what words the commentary uses most. Look for key theological terms to help you see what that commentary author focused on in that book. This can help you find passage in that book that cover that topic.The index above shows that I ran the tool on a commentary on Matthew. I refined the search to show English only and then limited it also to Heading Text. This shows that there are 6 headings in this commentary that talk about healing. A good sermon or Bible study series might be the healing stories in Matthew. We also see 4 headings with the word Blind in it. Could you do a topical study on Jesus giving sight to the Blind? Those are a couple of ideas.Use this same technique with any book in your library. This will help you find illustrations too. We'll cover that more when we get to the topic of adding illustrations to our sermons and Bible studies.
How This Helps Find Texts to Preach
So why would I use the Concordance Tool for helping find passages to teach or preach?The resulting index (see screen show above) shows the words or word groups (take a look at the second hit, a word group) that show up most in our refined search. If you click on the arrow next to a word, then you'll see a list of the passages that include that word or word group. The image above shows the list under "come comes; coming" which is the fourth most used word/word group in this refined index. So maybe, you'd want to do a sermon series on Jesus is Coming and select passage about why he came, when he might be coming back or what he said about his second coming.Drop down a few and you'll see the word group "go going" which you can also do a similar series but on why we should go or how Jesus wants disciples to go on his behalf.

Using Scrivener to Write Sermons

Preachers use different tools to write their sermons, from Microsoft Word, a simple text editor, word processors built into Bible software or something like Scrivener. Wes Allen, one of the Theotek Podcast contributors and American Baptist Church pastor, uses Scrivener to prepare his sermons. We talked about his workflow and why he uses the program in a recent Theotek Podcast that we recorded live on our Theotek Podcast Facebook page.Scrivener is a word processor. That's the simple way to describe it, but there's more to it than that. Some people think of the program as a tool for writing books or long form documents, like a doctoral dissertation. Wes uses it that way, but also uses it for shorter form documents, like his weekly sermons. That's because the built-in organization and writing tools work better for him that what most preachers probably use - Microsoft Word.https://www.youtube.com/watch?v=SHDYJdkAAic&t=30sPlease watch the video above from our YouTube Channel. In it Wes talks about...
- The way to format text using styles
- Setting up templates for outline forms
- Using the dual pane view to see the text of the sermon next to the other documents
- Organizing the files and folders
- Exporting for use in preaching and writing books from a sermon series
... and more!
Scrivener Organization for Sermon Prep
 He uses one Scrivener file per year. He then creates folders inside Scrivener for each sermon series or season. This lets him organize things easily within Scrivener. Under each series or season, he creates folders for each sermon. Then in those folders he places three documents (see image above).
- Translation of the primary text - he creates his own translation of the Greek or Hebrew text.
- Big Idea - the main idea of his message explained in a single document.
- Sermon Text - this document where he writes the sermon itself.
My Scrivener Organization
I really like this way of organizing each sermon. However, I don't do a full translation of my sermon. So I might organize things in Scrivener similarly, but in a slightly different way that better fits how prepare my sermons.First, I will organize my sermons around sermon series instead of year. That's because I sometimes preach through a book of the Bible and this might take more than one year or I might start it in September, take a break for the holidays, and then go back to it in January. Organizing that series by year would break it into two files. So, instead, I'd create a Scrivener file for First, Second and Third John, the last sermon series I recently finished just before the Easter season in February.Next, in each sermon folder I plan to create one Scrivener document for study notes called Text Notes. I create these notes in my Bible software while I'm studying the text. Then, I'll copy and paste the text of the Bible passage and the notes into the Text Notes document in Scrivener. I usually use one of a few sermon outlines and I will create templates in Scrivener (see the video to see what I mean by templates) for each of these formats.
- Motivated sequence
- One-point inductive
- Negative options indicative outline
Motivated Sequence Outline
A Motivated Sequence outline comes from the book 12 Essential Skills for Great Preaching by Wayne McDill, my seminary professor who taught at Southeastern Seminary. Here's the outline for this kind of sermon:
- Attention Getter - a way to grab the audience's attention with an anecdote, controversial statement or quote, joke or video.
- Need Element - some call this the Fallen Condition Focus; it's a way of showing the way the passage deals with our problems, which draw people into listening to your sermon and show the answer from the passage.
- Solution - the body of the message will offer the solution to the need mentioned above with as many outline points as needed to cover the ideas in the passage.
- Explanation - explain how text solves the problem.
- Illustration - illustrates the meaning of the text's main ideas and illustrate how to put the ideas into action.
- Proof - shows that the ideas are true since people don't just assume that the Bible is true like we believers do.
- Application - clear and concrete ways to apply the ideas presented.
- Visualization - show what the solution looks like with an illustration, story or video that helps people see how to apply the message.
- Appeal - tangible way or ways that the audience can respond to the message with specific and concrete steps.
Inductive Sermon Outlines
The other two outlines I use are inductive outlines. They both offer a single main idea. The one-point inductive approach will follow the outline below:
- Grab attention.
- Share a need that the passage solves.
- explain that need
- illustrate how that need affects the hearers
- Explain how the how the passage deals with the need.
- sharing details first
- then offer the main idea
- Illustrate how that passage solves that need.
- Prove the idea
- Apply the passage's solution in that Big Idea with an appeal to the audience to do something with the idea.
The last outline follows a negative solutions offered by people and then turns to the way the passage shows that God solves this problem. It is also inductive and a single main idea presented after exploring some ways the humans try to solve the fallen condition focus. These come from the passage just as the main idea.
Logos Bible Software Sermon Prep Part Two: Choosing a Text to Preach

Many preachers prefer to preach a topic found in multiple texts that the preacher expounds during a single sermon. I prefer to look for a single Bible text and that one text will dominate the sermon. In this second part of our series on Logos Bible Software Sermon Prep, we'll look at how the program can help the preacher choose a text to preach an expository sermon. The first part focused on using Logos to find a good sermon subject, for Topical Preaching or Topical Textual Preaching.This method of preaching will dominate the rest of our sermon prep series.
UPDATED: I added the Lectionary Tool at the end of this post.
What is Expository Preaching
I don't have the space look at the benefits of expository preaching versus topical preaching. Check out Lifeway's helpful list of 9 Benefits of Expository Preaching by Tony Merida. However, let me quickly define what I mean by this. Expository preaching includes the following:
- One single text dominates sermon's content.
- The main message comes out of the text. Some call this the Big Idea, as Haddon Robinson did in Biblical Preaching.
- The text will also dominate the tone and style of preaching. Poetry should have a poetic feel while narrative should include the story as a primary part of the sermon. Positive tone should not result in a harsh sermon.
- The preacher will explain, illustrate, prove and apply the Big Idea of the text while preaching that text.
What Kind of Text Are You Looking For?
Your expository preaching can include the following:
- A single passage or pericope of scripture, like my sermon this week on John 13:31-35.
- Part of a book like The Sermon on the Mount or Jesus' Farewell Discourse in John.
- A full book of the Bible like John's Epistles.
I've preached through all three taking anywhere from a single message to multiple years. This week I'm preaching on John 13:31-35 but I'm not preaching through John or through one section like the Farewell Discourse of Jesus in John's Gospel. I've preached through the Sermon on the Mount, but not through the book of Matthew ... yet. And last year I preached through John's letters. All of the above sermons or series of sermons were expository sermons and my Logos Bible Software sermon prep benefitted from the tools explained below.https://www.youtube.com/watch?v=MV9Viuw_xgc&feature=youtu.be
Tools for Finding a Text in Logos Bible Software Sermon Prep
Logos Bible Software sermon prep will use a number of tools to help you choose a single text or a longer part of a book or a full book of the Bible. In our earlier post we looked at finding a topic to preach. Topical preaching isn't my favorite way to preach. I don't go so far as some to say it's sinful or evil. However, we should use it sparingly.You can use the same tools used in the earlier post to find a single passage for your expository sermon instead of using them to find proof texts for a topical sermon with multiple texts. So head over to that post and use those steps for finding a single text on a particular topic.To find a text for an expository sermon, you can just start reading the Bible and get inspired by what you've read. Or you can hear someone quote a passage or read a book that refers to one. However, you pick that single passage you'll want to start reading it.
One Bible
 My first step is narrowing the text (choosing where to begin and end my sermon). I start by reading the text in context multiple times. In your Logos Bible Software sermon prep process, open your favorite translation. Go to your library by clicking the library button, second from the left next to the home button on the toolbar. Or click in the command box and type Go to John 13:31-35 or whatever your chosen text might be. Read the text in context as follows:
- Narrative - read the story and read those passages before and after.
- Poetry - find the beginning and end of the poem and if it's in context of another genre then read the parts before and after. Psalms are a single unit of text by themselves so just read the chapter.
- Proverbs - read the chapter and decide if your Proverb is part of a collection of Proverbs about a subject, then pay attention to the other Proverbs about this topic. If it's not part of a section of Proverbs on a single topic, then read your single Proverb (note some Proverbs might include multiple verses).
- Didactic - teaching passages like the epistles require us to find the letter's overall argument and then look for this particular part of the argument to find how your text fits in the overall argument. This overall argument might include the entire book or a large section of the book, like Romans 1-11 or Ephesians 1-3.
- Prophetic - find the overall prophecy, often in poetic genre and other times as part of a narrative. One prophetic message will become one preaching text.
- Legal - read laws in context of their overall application, like laws about the priesthood in Leviticus or the feast days, etc. and choose your text-based on this overall section.
You can do this in any software. Logos doesn't do it better or worse than any other program. You can even do it in a paper Bible (shudder to imagine it).
Passage Analysis Tool
Checking out multiple translations can help you decide what verses to include in your passage. Logos Bible Software Sermon Prep will benefit from the Passage Analysis Tool. Go to Tools and click on Passage Analysis. Type your passage into the command box in the upper left corner. It will visually show the boundaries of the various pericopes in your top translations. Next to the command box you'll see a drop down box that reads "Pericope Sets". Click it to choose your translations by putting a check in the check box of your preferred translations. If you own too many books with pericopes, you may need to scroll to show them all. (What is a pericope?) After you finish choosing your translations, they will show up in columns in order of your rankings. Along the left you'll see links to the text that you can click to open your preferred Bible to that verse.The columns will show boxes that represent a pericope. For example, in the image above, notice that the ESV (dark blue column on left) has more pericopes than the NLT (green column third from the right above). Click on a pericope box and it opens in your top translation, but not that specific translation that you clicked. I'd expect it to open in that translation, but it doesn't for some reason.How does this help in choosing your text? You can see how all the various translation teams chose to break up the pericopes. They often vary wildly as in our chosen passage in John 13 above. The ESV, HCSB, NKJV, NRSV and UBS4 all agree that John 13:31-35 forms a single unit or pericope. However, the NASB, NIV 1984, and NLT all include John 13:31-38. If you scroll up you'll see that all but the NASB 1995 agree that the pericope begins with verse 31 (see below)..
 The two steps above should help you find a single pericope. You can probably preach single sermon on that passage. Or it may take too long to preach in a single message and you decide to break it up into a series covered over a few weeks.
Sermon Starter Guide
If you're still struggling to choose which verse to include in your expository sermon in your Logos Bible Software Sermon Prep work, then consider firing up the Sermon Starter Guide. Thanks to Graham Criddle in the Logos forums for this suggestion. You'll find it under Tools in the menu. Click on Sermon Starter Guide from the list along the left of the box that pops up. This opens the guide to the passage in your open Bible. You can type in your text and run the guide.
 For this step, we'll focus on three sections of the Sermon Starter Guide. Look at the Sermons, Sermon Outlines and Outlines sections. Under each you can see how other preachers or scholars have divided the passage and preached it or handled it in a commentary. You'll have to own books that include these three kinds of information. Open them and read over them to see what these other preachers chose as their text.At this early state, be careful to use these tools only as a guide for picking your sermon text. Don't read too much of the content because it might push you in the wrong direction and keep you from discovering your own Big Idea or sermon thesis.
What's Next
Now that you've looked at the text in multiple translations, checked out the Passage Analysis Tool and looked over the Sermon Starter Guide, it's time to pick the beginning and ending of the text.You'll want to consider another issue. How much can you cove run the time given. I preach in a traditional Baptist Church and the people typically expect about a 25 to 35 minutes sermon. I can stretch that to 45 on occasion. On Wednesday evening we have an hour and prayer requests take up about ten minutes, so I can easily go 50 minutes since it's a discussion time and not just my lecture.Choose the first and last verses and stick with your choice. Prayer will also help throughout the process, before, during and after you preach.
Pick a Book or Longer Passage to Preach
The above steps help preachers pick a passage for a single sermon. How do we find passages or books to preach in our Logos Bible Software sermon prep? Use the topical search steps from part one of this series and look at the context of the passages that you discover. You may find that an entire section will make up a good sermon series through a chapter of the Bible. For example, let's say you searched for a passage on prayer. You opened the Sermon Starter Guide and typed in Prayer. It returned the Lexham Theological Workbook. You opened it and found John 15:7. After reading the passage, you decide that you want to cover the entire topic of John 15 on remaining in Jesus. Or maybe you see a group of Psalms and so you decide to pick a few of them to preach through Psalms on Prayer.
 Maybe you like to preach through books of the Bible. Search for some topics that you're concerned about in your church. Use the following steps to search through your commentaries. If you don't already have a Logos Collection that includes your commentaries, create one using the steps in the company's helpful Logos Pro Training on the topic.Open the Logos Search feature from the search button on the toolbar. Choose a Basic search and then click the link labeled Everything, Type the name of your new Collection the box that pops up. Click it from the list that shows up below the search box. Now click in the Search box and type the topic. You'll find commentaries that include that word. Focus on the Introduction sections of the commentaries. You may find that a book fo the Bible talks a lot about a topic. Consider preaching through one of those books based on this search method.
Logos Lectionary Tools
I neglected to include the Lectionary Tool in the original version of this article because I'm not a lectionary preacher. However, many users will want to use it.Even if you're not someone who follows it regularly, it can offer some suggestions for preaching passages when you're not coming up with any ideas using the above tools or when a topical search (from part one) doesn't help. The lectionary follows the church calendar, so it's a good way to keep in step with the rest of Christendom. Logos includes various lectionaries and you can add them to your Home Page. I've done that and you can see it in the upper left corner. Edit your Home Page by clicking on the tiny gear icon in the upper right corner next to your name.
 This opens a new window that pops up. See it below. Along the left there's a list of things you can include on the left column of the Home Page. The list on the right of the pop up will show items to include I the main section of the Home Page.
 For the purpose of this article, notice the various lectionaries included. I have my mouse over the Revised Common Lectionary, one of the more popular lectionaries used today. I have the Christian Worship Three Year Lectionary selected. You can choose more than one or just your favorite by putting a check mark in the box next to the name.Now that you've selected your favorite lectionary or multiple lectionaries, click outside the pop up box to close it. The Home Page will refresh to update to the new settings. The lectionary will show up in the upper left. Click on the verse to open a new desktop Layout. You can also open this using the Layouts menu item from the toolbar. Click on Layouts. Make sure the Home Page Layouts section is open in the Layouts pop up. Then choose Lectionary.
 The Layout will open your Lectionary on the left to that entry. In the center you'll get two window panes. The top pane has your top 5 Bibles listed in the Library prioritization list in their own tabs. The bottom pane opens your top Commentary that includes that verse in one pane and your top devotional in the other pane showing the date of that lectionary entry.The smaller column on the right shows two panes. The top will do a search to find books in your library that include references to the passage from the lectionary. The bottom pane shows a Bible Explorer Tool window open to that passage. The Explorer gives you things like Biblical People, Places, Events, Thing and Media. You'll also see sections for your content, cross references and commentaries for that passage.If you're a lectionary preacher, then you likely already know that you can preach on one of the passages or include more than one. When I have used the lectionary to pick a passage, I just read them all and choose one that I want to preach.
Logos Bible Software Sermon Prep Part One: Choosing a Topic to Preach
How do you use Logos Bible Software to find a good topic to preach or teach? In this first of two parts, we'll look at how to find a passage or topic to preach and we'll use Logos Bible Software to make that happen. This is the first step in preparing a sermon or Bible study using Logos Bible Software. Over next few weeks we'll cover the major steps to preparing and preaching using Logos. Now, Logos Bible Software has a bunch of built-in tools that will help you use a topic to find a passage or multiple passages to then preach or teach. In this tutorial we'll use the topic of redemption and use things like the Bible Word Study tool, the Sermon Starter Guide, and other tools to get inspiration for your sermon.We've got a couple of ways you can learn this first step. You can read the article below. You can watch this video, or better, do both. Either way, Logos Bible Software gives a number of launch boards for the sermon preparation process.https://www.youtube.com/watch?v=GZTrMB0PnuQBefore we jump in, let's look at the three primary approaches to preaching.
- Topical Preaching - If you're a topical preacher, then you often start by looking saying, "I want top reach on redemption." Usually it's more narrow than such a broad topic. Logos can help you in a few ways to get inspired to preach on a topic and in this first part we'll show users how to start finding inspiration for a sermon a topic.
- Textual Topical Preaching - Textual Topical preachers often begin with the topic in mind, but then use that to search for a specific passage of scripture to preach and then approach the sermon preparation in a textual way letting the text drive the content.
- Expository Preaching - Expository preachers start with the text, often working their way through portions of scriptures, like a book of the Bible or a passage like the Sermon on the Mount or the Psalms of Ascents. We'll approach that in part two.
Here's what's great about using Logos to find your sermon's topic.
How to Use Logos Bible Software to Find a Topic or Passage to Preach or Teach
Logos Bible Software lets preachers jump into their search from many starting places. The easiest sits on top of the Logos Home page. Click the Home button in the upper left corner, if it's not already showing. Then use the Command box that sits about a third of the way to the right from the Home button. Type the topic you're interested in here and it will run a Bible Word Study on that word. We'll use the topic, "Redemption". That link opens the Bible Word Study Guide in Logos on a computer.
Bible Word Study Guide
You can also run the Bible Word Study by clicking on the Guides button on the toolbar. Then choose Bible Word Study from the left hand column in the box the pops up. The Bible Word Study Guide will offer a few categories of searches. First, we see the title section explained above. shows your word and lets you enter a Title and some notes about the guide. Each guide in Logos has a title section. Give our search a title to save it. You might want to come back to this search, especially if you use the Notes feature under each section of the guide to save some of your discoveries or inspiration.Now, we get the Topic section next. It shows links to the topic you searched in various dictionaries, like the Lexham Theological Workbook (link opens Logos if you're on your computer).
 If you have enough dictionaries, you'll see a "more" link below the list. Click it to see the rest of the books with the topic included. Hover over the links to see a preview pop-up of that entry. Click it to open the book.Below the list of books you'll see a link to open the Topic Guide and the Sermon Starter Guide. If you click either of these links, Logos will perform a search using that guide. More on that below.
 Don't just quit after the "Topic" section. There are two sections focused on Hebrew and then Greek word studies. These will help us find the Hebrew and Greek words translated redemption or redeem or something similar. Each section has a graph showing the various words for our topic in Hebrew or Greek. Click on the graph to see the verses or over each section. You can then see a preview pop-up of that verse when you over the verse.If you preach topically or use the textual topical approach, then you might choose to include one of these verses in the sermon. If so, you've already gleaned what you need. However, the rest of the Bible Word Study Guide might still inspire you to preach on that topic. Scroll down to see the last three sections included in the guide.
- Phrases - shows the topic if it's part of a phrase, like "grace of God" if you're searching for grace.
- Lemma in Passage - shows the lemma of a word in commentaries. There's a drop-down list labelled "Settings" that will let you narrow this search to certain collections or books.
- Textual Searches - find the topic in your top Bibles. The list comes from the Bibles prioritized in the Logos library. Logos shows you how to do that.
If you search using a Greek or Hebrew word you'll see a lot of other sections, but for our purpose, we're focusing on finding a topic to preach. Most people will do that by searching in English, so we'll skip Greek or Hebrew words.
Sermon Starter Guide
Another guide will help with topic discovery. The Sermon Starter Guide works like the Bible Word Study Guide, but looks in different parts of your library. It focuses on sermon-related resources. It's probably a better place to start than the Bible Word Study Guide.Run the Sermon Starter Guide from the Guides menu. Type the word in the search box and it returns a list of links. Here's what you'll find in the guide. Again we'll run one for "redemption" which you can open in Logos on your computer by clicking this link. Again we have the title section as explained above.
- Theme - The Theme section that shows a brief definition of the topic and links to open the Logos Factbook and a Topic Guide search. Make sure to open the Factbook and learn more about your topic there. This is a great tool for using the topical approach to sermon or Bible study preparation.
- Passages - we get a sampling of "Key Passages" which cover the topic that you searched for. There are also "Pericopes" listed. Below that you can add these passages to a Passage List or open every one of the passages found.
- Sermons - If your library includes books of sermons, they'll show up here. Read some sermons to get inspired. I personally would avoid this section at this point. Do your own study first before reading what other preachers preached about your topic.
- Preaching Resources - You'll mostly find sermon illustrations in this list or sermons. You'll also find some outlines and hymns.
- Sermon Outlines - If your library includes some sermon outline books, then they'll show up here.
- Thematic Outlines - For topical preachers, this section might offer the most help. More on it below.
- Journals - Find Journal articles on your topic, which can be helpful in learning more about it, often from. scholarly level.
- Collections - Searches your Collections, which include books that you put together, like Romans Commentaries. Find out more about them from the Logos training pages. This section's not as helpful for our purpose.
- Interactives - Interactive tools like the Psalms Explorer.
- Media Resources & Media Collections - Find images related to the topic.
- Soundfaith, Faithlife Music, Bookstore and Lightstock - all sections that take you to resources you can buy related to the topic.
Take a close look at the Thematic Outlines section of the Sermon Starter Guide. If you're preparing a topical outline for a sermon, then this section might do a lot of the work for you. You'll still need to study the passages included in these outlines, but this section alone could give you your outlines. Take our topic redemption. The Thematic Outlines section offers a few subtopics. We get a list of passages about "God as Redeemer" with a synopsis of the topic first. Then a few more subtopics about that subtopic like "God as the sole redeemer of Israel" and "God redeems his people from difficult personal circumstances" to name two. Each has some passages of scripture. Hover over each passage to view a pop up in your top Bible or click to open the top Bible.
Topic Guide
The Topic Guide (click here to run one on Redemption) is another great place to start looking for inspiration to preach a particular topic. Open it from the Guides menu and enter your search in the box. Here's what Logos includes in the Topic Guide. At the top you get the title section where you can save this Guide for future use. Put an explanation of the guide and each section has a Notes section to keep notes.
- Topic - This section lists links to the topic in dictionaries. Click "more" to see the entire list. You also see a link to the Facebook, Sermon Starter Guide, Bible Sense Lexicon and links to search the library for words related tot your topic.
- Related Verses - Finds verses about the topic.
- Sermons, Illustrations, Illustrations, Interactives, Media Collections Sections - like the Sermon Starter Guide finds things in each of those kinds of resources related to our topic.
- Atlas - finds things in atlas for our topic.
- Biblical People, Places, Things and Events Sections - These tools are like a search for each of these kinds of information with visuals and books that tell us about them.
- Soundfaith - online sermon database of audio.
- Topics.Logos.com - opens links to the online Logos resource related to our topic.
- Bookstore and Lightstock - links to buy content related to our topic.
Like the Sermon Starter Guide, the Topic Guide might offer the best options for our purpose. However, since we've covered most of these sections above, we won't rehash them here.
Create Your Own Personal Guide
These guides offer a lot for a user, but you know what you want to search for. So, create your own personal guide for searching Logos for a topic. To do this, click on the Guides menu (#1 below) and choose "Make a new guide template" at the bottom of the list and then click the drop down list on the right (see #2 below). The four options will change the list of sections to include that we see along the left side of the screen (see #3 below). It begins with the list of sections already in the pre-defined guides give to us by Logos. So, if you're searching for a topic, you'll probably want to select Preaching Theme or Topic. The Preaching Theme template has more sections, so click that to get started. Here's what I'd include in my own personal topic search guide.
- Thematic Outlines
- Themes
- Passages
- Preaching Resources
- Sermons
- Faithlife Music
 Don't forget to give your guide a title in the upper left corner. Click the box with the tiny pencil icon (see above). Now it will show up in the Guides menu.
Logos Bible Software Tools for Topical Preaching
By now you probably have a lot to get started with. However, a few other tools will also help. You'll find these in the Logos Bible Software Tools Menu.
- Bible Browser - a few of the tools found in the Bible Browser will help.
- People, Places, Things and Events - great for finding passages about a person in the Bible if you want to preach on Disciples doing character studies or some other person-focused study or sermon. You could also do a study of a place or objects as jumping off points for a series on something like the Temple.
- Miracles or Parables - a great source for a series on either.
- Preaching Themes - we found this in the Sermon Starter Guide and I put it in my Personal Topic Guide.
- Topics - of course perfect if we're looking for topics to preach.
- Sacrifices - study on the various sacrifices in the Old Testament.
- Factbook - we found this mentioned above.
- Interactives - Logos includes a bunch of interactive tools and click this link with Logos on the computer and it will open to them.

Google Pixelbook for Bible Study: A Review

The Pixelbook, Google's latest high-end Chromebook, competes at the upper end of the market against the likes of the Apple iPad Pro and the Microsoft Surface Pro. It's a beautiful machine in all aspects, but if you're reading this site you probably wonder if someone can use the Pixelbook for Bible Study. I'll try to answer that and recommend whether you should pay the premium price.
Chrome OS
You may think of the Chromebook as a "browser" computer that only runs the Google Chrome browser. That's no longer accurate for a few reasons. First, web apps work well in many cases. There's also a number of great Bible study websites if you don't want to install an Android app.![]() Second, in America at least, most people enjoy full-time access to the web at home, work and even on the go with Wi-Fi hotspots on phones or in coffee shops and airports. The popular idea that Chromebooks are just hardware web browsing machines is false. Google dispels the "myths" as they call them about the Chromebook in a video they produced.https://www.youtube.com/watch?v=87-8EqSHodAThe myths Google dispels in this video include:
Second, in America at least, most people enjoy full-time access to the web at home, work and even on the go with Wi-Fi hotspots on phones or in coffee shops and airports. The popular idea that Chromebooks are just hardware web browsing machines is false. Google dispels the "myths" as they call them about the Chromebook in a video they produced.https://www.youtube.com/watch?v=87-8EqSHodAThe myths Google dispels in this video include:
- They're just browsers
- They have no storage
- Chromebooks don't run real software
- They only work online
We get web apps that work off-line and most Chromebooks today come with the Google Play Store out of the box. Others will get it soon in an update to Chrome OS.
Pixelbook Hardware
Every Chromebook includes at least 16GB of local storage and the Pixelbook has at least 128GB. Plus many add extra storage through an SD card reader, although Google didn't include a reader on he Pixelbook, frustrating some buyers. The Pixelbook gives users a high-end experience making it my favorite general use computer over my MacBook Pro, Surface Pro and iPad Pro. I used to own all four, but carry the Pixelbook and choose to use it more than any of the other three. In fact I just sold my MacBook. Here's what you get with a Pixelbook.
- Beautiful high-resolution 12.3-inch screen with 2400x1650 res display.
- Excellent chiclet style keyboard that's easy to type on quickly and accurately.
- Large smooth and accurate clickable touchpad that I use over a mouse 100% of the time
- Thin light and stylish design.
- Two-in-one convertible design that you can use as a laptop, tablet, and in stand mode.
- Incredible 8-10 hours of battery life that charges in about an hour from dead.
- 2 USB-C ports that charge the computer and transfer data.
- Spacious 128GB solid-state drive that's fast.
I usually prefer to connect a Bluetooth mouse for mobile computing with my laptops. I hate trackpads and always pair one with my Surface Pro and MacBook Pro, but I don't on the Pixelbook. That's a high compliment from me. It has a fantastic trackpad. Some people might see 128GB of storage and balk at that. That's not nearly enough for most people on a Windows or Mac laptop. However, on a Chromebook that runs Android apps, it's more than enough. That's because the OS and apps don't take up as much space. The only reason you'll need more is if you store large videos or tons of music, photos or other large files. Even the space-hogging Bible apps that you can download from the Google Play Store will not eat up that much of that 128GB.
 Samsung sells a pair of Chromebooks that comes with a stylus. I owned both the Samsung Chromebook Plus and the Pro, but sold them both. First I upgraded to the Pro and then sold it to get the Pixelbook. I'm glad I did. The Pixelbook is larger than the Samsung stylus which makes it more comfortable to use. I'm testing the built-in screen annotation feature with PowerPoint and may switch from using my iPad if I can make it work well enough. Right now it takes a screenshot to mark it up, but does offer a laser pointer, which might be enough for what I'm doing.
Using the Pixelbook Pen
 There's a great search feature available only on the Pixelbook with their Pen until another manufacturer gets access to the API that makes it work. Select something on-screen and the Google Assistant will search for the context within the selected area. Here's where that helps Bible students. Circle some text on the screen and the Assistant will search for it. For example, I chose to search for "false prophets" from 1 John 4:1 and you can see that the Google Assistant did a search for it for me (see image above).
![]() While doing presentations, the Pen lets you mark up your slides. I'm planning to start using a series of PDF file pages instead of PowerPoint. The Pixelbook Pen works much better in this case than it does on PowerPoint or Google Slides. I hope Google updates their own Slides app for better use in situations where the presenter wants to mark up the screen. If you want to see a similar style of Bible teaching, check out John Piper's A Look at the Book. I've included an example from YouTube below.https://www.youtube.com/watch?v=RU8AceqxttU
While doing presentations, the Pen lets you mark up your slides. I'm planning to start using a series of PDF file pages instead of PowerPoint. The Pixelbook Pen works much better in this case than it does on PowerPoint or Google Slides. I hope Google updates their own Slides app for better use in situations where the presenter wants to mark up the screen. If you want to see a similar style of Bible teaching, check out John Piper's A Look at the Book. I've included an example from YouTube below.https://www.youtube.com/watch?v=RU8AceqxttU
Getting Other Things Done
 Thanks to the Microsoft Office Android apps, I can write in Word and use PowerPoint somewhat. Word's fine, but PowerPoint's weak on Android. The presenter view doesn't do on-screen annotations as easily as the Windows or iPad program. I put my scripture on the screen and mark it up during my Wednesday Night Bible Study at church. I dislike the way PowerPoint handles this in Android because you can see the mark up buttons at the top of screen on the external display. That's distracting. As I said above, I may use the built-in laser pointer, but not yet.
 Thanks to Android apps I can now do some video editing and great photo editing. I use the following apps for these tasks:
- Adobe Lightroom CC for photo organizing and editing
- Snapseed for photo editing
- Action Director for video

The Pixelbook for Bible Study
Now for the reason we're here. Can you use the Pixelbook for Bible study? In a word, yes! However, there are a few trade offs.I usually install the Logos and Olive Tree Android apps on my Android phone and they both work on the Pixelbook. Accordance promises that they will soon ship an Android app that will at first let you read your books primarily. They plan to add more advanced features over time. It's currently in beta, so go learn more about it in their forums, but it's clearly beta and not ready for most users not tolerant of instability and lack of features. It will be great, I'm sure.The Logos Bible study app doesn't include all the advanced features available on the Mac or PC version. Olive Tree's mobile Bible study app and computer apps work similarly. That's because it's not as advanced or as complicated as the other two desktop programs. The WORDsearch Android app is atrocious so just use the MyWSB.com web app. It gives users a better experience. If you use notes to record your study discoveries, then you'll get frustrated using the Logos Android app because the note attached to a verse covers most of the screen. I like to open a notes file and then look at the Bible text and type in my observations. You can do this in Olive Tree easily, but it's hard to do in Logos. Olive Tree puts the notes on the right side of the screen and you can edit them while viewing the Bible window on the left (see above).
 Logos only shows the notes in a pop up window when you first open the editor or tap an existing note (see image above). If you want to attach the note to a verse reference, then it will strangely cover the entire screen (see image below).
 The current version of Logos Android beta app has a bug that only opens a notes file in a separate screen. It won't open in 2-screen view. Hopefully they'll fix that soon. Even when they fix it, the note doesn't automatically sync to the note attached the currently showing Bible passage. If you have a lot of notes you'll have to scroll through the long list of notes till you find it.
![]() Here's my work around. I open the app on my phone and then type into the Logos notes file on my Pixelbook. I'd use Olive Tree more for this, but most of my best commentaries and references are in Logos, not Olive Tree. Since most of us own a smartphone, this is a reasonable workaround. If you use Olive Tree primarily, then you'll enjoy the experience. Open the notes file in the right side. If you're like me and use Logos as your primary app, then you'll hate using notes on a Chromebook.
Here's my work around. I open the app on my phone and then type into the Logos notes file on my Pixelbook. I'd use Olive Tree more for this, but most of my best commentaries and references are in Logos, not Olive Tree. Since most of us own a smartphone, this is a reasonable workaround. If you use Olive Tree primarily, then you'll enjoy the experience. Open the notes file in the right side. If you're like me and use Logos as your primary app, then you'll hate using notes on a Chromebook.![]() Here's another workable option. Open your Bible app and a Word document, Google Docs file or some other text editor and use the keyboard shortcut to switch quickly between the Bible app and the text editor. Use ALT+TAB to switch between open apps.I've used the Pixelbook plus Samsung Galaxy Note 8 for two screen work for a few weeks now almost every day. I really like this workflow. I write my personal observations, then open word study tools and record those findings. Finally, I open other books like dictionaries, atlases, and then commentaries.The great screen, keyboard and trackpad make writing on the Pixelbook a dream. I love the crisp text even in small fonts. They look great and easy to read. The keyboard makes typing a pleasure and the spacious trackpad means no mouse needed. It's accurate but registers accidental palm touches while you're typing, so I turn off tap to click, like I do on my MacBook Pro. That's a product of a large sensitive trackpad.
Here's another workable option. Open your Bible app and a Word document, Google Docs file or some other text editor and use the keyboard shortcut to switch quickly between the Bible app and the text editor. Use ALT+TAB to switch between open apps.I've used the Pixelbook plus Samsung Galaxy Note 8 for two screen work for a few weeks now almost every day. I really like this workflow. I write my personal observations, then open word study tools and record those findings. Finally, I open other books like dictionaries, atlases, and then commentaries.The great screen, keyboard and trackpad make writing on the Pixelbook a dream. I love the crisp text even in small fonts. They look great and easy to read. The keyboard makes typing a pleasure and the spacious trackpad means no mouse needed. It's accurate but registers accidental palm touches while you're typing, so I turn off tap to click, like I do on my MacBook Pro. That's a product of a large sensitive trackpad.![]() I write my sermons in Microsoft Word, which you can download from the Google Play Store. However, I notice that it's not stable on the Pixelbook. It doesn't crash, but typing can get laggy and sometimes the arrow keys on the lower right corner of the keyboard don't work. Sometimes the space and shift keys just don't register. This happens only in Word, so it's an app specific problem. To avoid this, use the online Word web app instead. It's nearly identical to the Android app for most users.
I write my sermons in Microsoft Word, which you can download from the Google Play Store. However, I notice that it's not stable on the Pixelbook. It doesn't crash, but typing can get laggy and sometimes the arrow keys on the lower right corner of the keyboard don't work. Sometimes the space and shift keys just don't register. This happens only in Word, so it's an app specific problem. To avoid this, use the online Word web app instead. It's nearly identical to the Android app for most users. Don't forget the great online Bible study sites. Logos, WORDsearch, Bible Gateway and many others include some nice features. The first two give access to most of your library if you already own books for use in their mobile and desktop apps.
My Recommendation
I love using the Pixelbook as my primary Bible study and sermon prep tool. Here's the list of strengths that make it my favorite laptop:
- Great accurate and crisp screen
- Beautiful and comfortable keyboard
- Large accurate and sensitive trackpad
- It's fast
- Great 8 hour battery life that charges quickly from a dead battery
- Android apps mostly work well on the Pixelbook
- Web apps fill in the gaps of poor web apps
It's not a perfect situation. Here's what I don't like:
- Android Bible apps not as good as Windows and Mac versions
- Word is buggy on the Pixelbook and Android PowerPoint's not as good as iOS or the desktop version
- Video editing is harder on a Chromebook than on a Mac where it is best or Windows where it's nearly as good as Mac
- It's expensive
For the first time, I prefer using a Chromebook nearly 100% of the time. I still prefer my desktop apps for a few Bible Study tasks, like complex word studies and sentence diagramming in Logos. However, I could even do those on my Pixelbook if needed without too much compromise.The Pixelbook's not for everyone. People committed to using Chrome OS won't find a better option, if they don't mind the $1000 for the computer and $100 if they want the Pen.
Sermon Prep Part 5: Theotek Podcast #069
We're in the home stretch in our series on writing your sermons and Bible studies using digital tools like Bible study software or online Bible sites. This episode covers tips and trips for actually writing the sermon outline or manuscript. How can digital BIble study tools help in forming your notes and outline?https://www.youtube.com/watch?v=akZN22Rls6YSome of this can be done on an iPad. The new iPad Pro plus the Microsoft Word iPad app makes it easier than ever. See below.
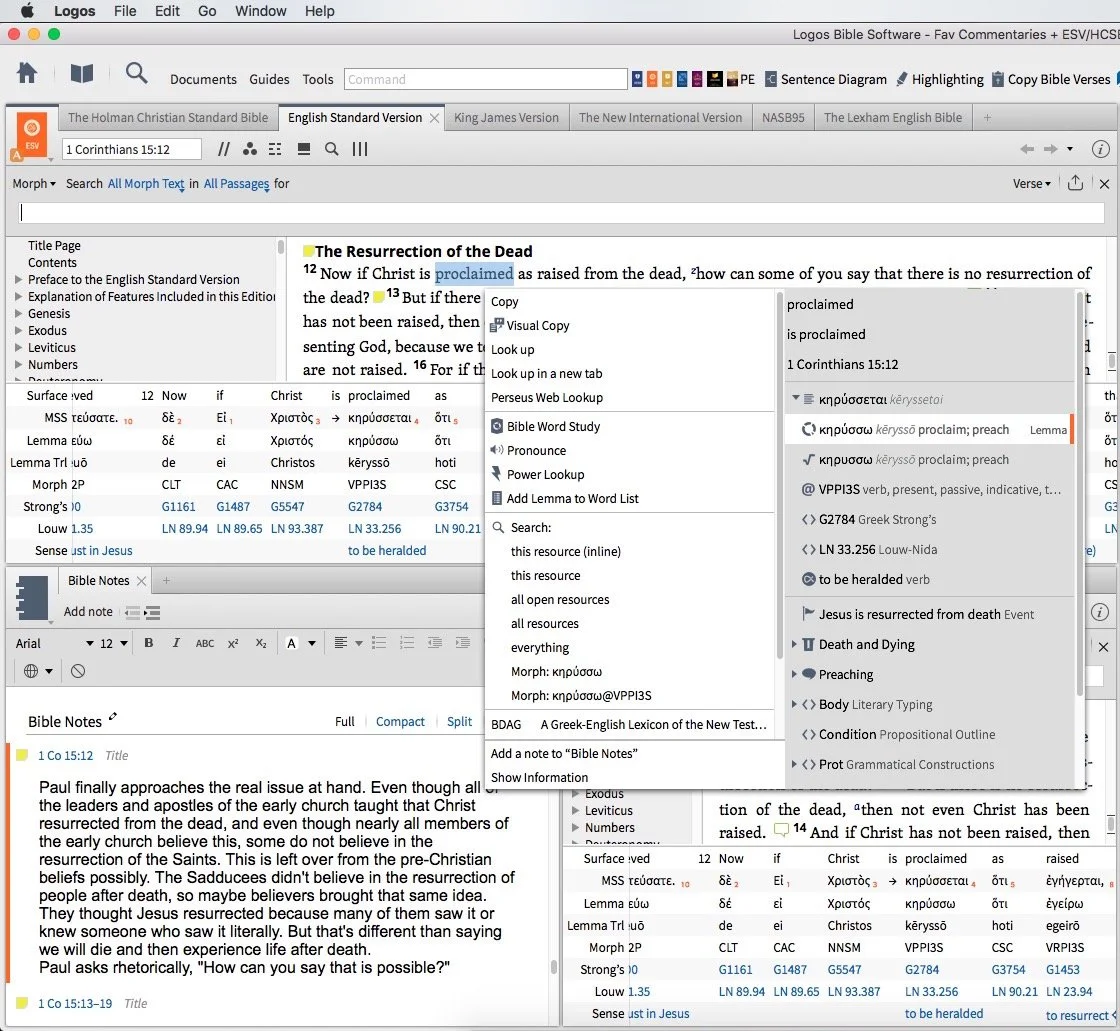
Sermon Prep Part 4: Theotek Podcast #068

We talked about using Digital study tools to do word studies. Specifically we looked at Accordance Bible Software, Logos Bible Software and Bible Reader from Olive Tree.https://www.youtube.com/watch?v=W-v8fk3uhhMWe focused on studying the Bible in English using the tools built into Bible software that help users find the Greek or Hebrew words behind our English translations. Good language study tools focused on Greek and Hebrew tagging using Strong's numbers helps users get at the Biblical meaning of each word and words in context. Regardless of which software you use, start with a text that includes Strong's tagging. Usually they will let you right-click or double-click or even triple-click the word you want to study.Start this process by searching for a word and read it in context in the different places it's used in the Bible. Then use your software's built-in word study tools. For example both Accordance and Logos show you how the author uses words with graphs and charts that show how many times a word gets used in each book of the Bible or how many times the original word gets translated one way versus another. The next step, after searching the word, is to look up the word in Greek or Hebrew Lexicons. Most Bible software tools include some in base packages. Users can buy more advanced tools.Finally, if you still need some help, look up the word in an English Bible dictionary. Start with exegetical dictionaries like the Holman Treasury of Key Words or the AMG Complete Word Study Dictionary of the Greek or Hebrew.
Our Favorite Things
 This week in "Our Favorite Things" we got some interesting recommendations. First, Antoine recommended the 29 Watt Apple USB-C charger to charge your iPad Pro. It charges the iPad in about an hour, but costs $49. It also requires a USB-C to Lightning cable which adds $35. He still loves the speed of the charging and wished Apple included this charger with the iPad Pro.
 Rick recommended a similar device, the PowerCore+ 26800 & PowerPort+ 1 charger. It includes QuickCharge technology and with 2.4amp USB ports. It's got 3 ports and can even charge the MacBook or other USB-C devices that need a lot of power. The 26,800mAh battery handles almost anything you can throw at it.I showed off a new feature in the latest Developer Preview version of Windows 10. Microsoft has what they call the fast ring and slow ring for beta testers of their operating system. The fast ring version added a new feature that shows up in the system tray. The icon for this feature looks like a pen with a drawn line. Tap or click on it and a new pen-focused menu pops up with a few options as follows:
- Sticky notes
- Sketchpad - a white board
- Screen sketch - the ability to do a screenshot that opens into an editor with pen/pencil drawing on the screen shot
- Recently used - a few of the most recently opened Windows 10 Universal apps
- Suggested - pen/stylus focused apps from the Windows store
- Connect your pen - a link to the Settings where you can connect your Bluetooth Surface Pen or other stylus
 Microsoft calls this the Windows Ink Workspace.In the "Least Favorite Things" folder, I talked about Vufine. This was originally a Kickstarter project that I mistakenly backed. They call it an HD wearable display that fastens to your glasses and shows a tiny screen inside the little device that sits just off the front of your glasses. It comes with a cheap, flimsy pair of plastic glasses if you don't wear glasses regularly.The problem is the Vufine is to tiny it's nearly useless for anything. Some use it connected to a GoPro to see what the GoPro sees. But using at an actual display is nearly impossible since text is so small.
Sermon Prep Part 3: Theotek Podcast

In part 3 of the Sermon Prep series on Theotek, we covered digital reference books. Each member of the team recommends our favorite tools like Bible dictionaries, lexicons, and more.https://www.youtube.com/watch?v=6rsSX2N-shQFor review we covered the first steps of sermon prep in part one of our series. Then inWe started out with English Bible dictionaries. Here's a list of what we recommended.
- Anchor Bible Dictionary
- IVP Bible Dictionary
- Holman Illustrated Bible Dictionary
- Biblical Archaeology Review
- Hermeneia
- Bible Illustration from Holman
- Accordance Photo Guide
- Wikipedia
- CCEL
- Harper's Bible Dictionary
- Dictionary of Early Christian Beliefs
Here's a couple of Bible Background sources we prefer. These help you get at the cultural information that tells us more about the world of the Biblical writers.
- Zondervan Illustrated Bible Backgrounds Commentary
- Accordance Atlas - one of the best digital atlas resources in Bible software
Next we look at Bible commentaries. The series that we each picked included...
- Word Biblical Commentary
- Zondervan Illustrated Bible Backgrounds Commentary
- New American Commentary
- Ancient Christian Commentary
- IVP Bible Background Commentary
- JPS Commentary
 To find the best sources, we all agree that just one series isn't the best approach to building a good library of commentaries. Instead check out Best Commentaries on the web. It lists the commentaries by book of the Bible and rates the best options available. They update it when new works come out.
Our Favorite Things
 I recommend Visual Theology, a work that Olive Tree released recently.
 Antoine recommended the Google Cardboard, their inexpensive Virtual Reality tool that the user can put their phone into to get a VR experience. There are other VR options like Samsung Gear VR, which I don't recommend. The children's version comes from Mattel and uses the old View Master idea.Rick went the opposite direction and shared one of his least favorite things. He doesn't like the 12-inch MacBook. The screen's nice but the keyboard doesn't feel very good and performance suffers when doing more than word processing or surfing the web.

Sermon Prep Part Two: Theotek Podcast #066
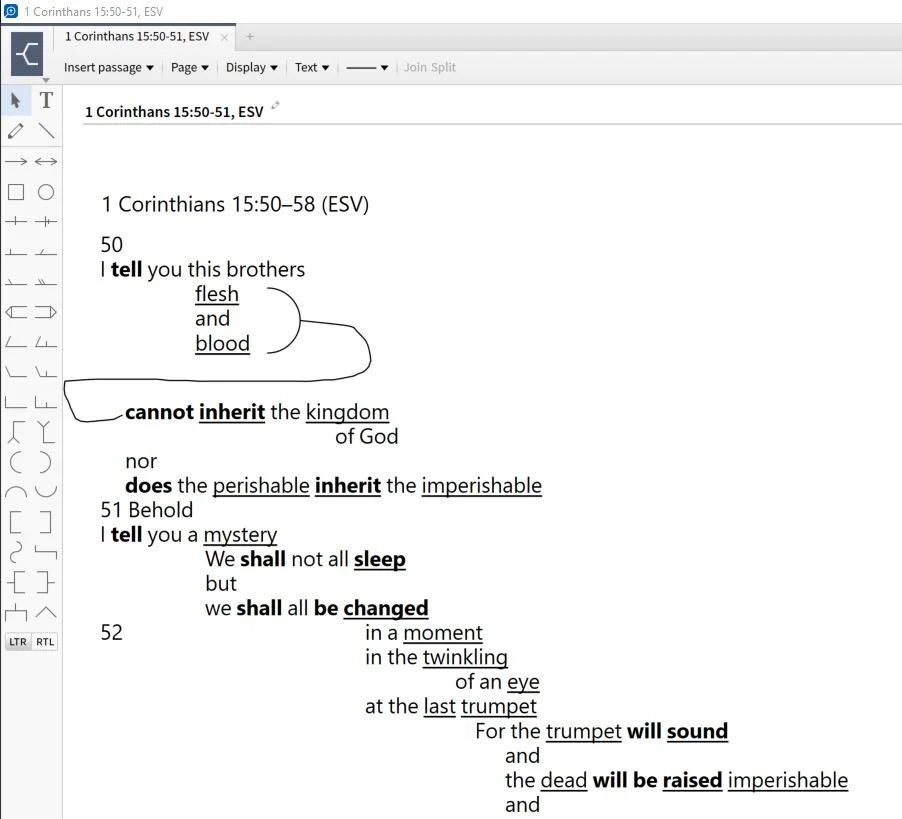
It's part two of our sermon prep series using Bible software to help us write a message. This week just Rick Mansfield and I tackle a little used tool - the passage outline. We show how to do so in a few BIble software packages and talk about doing it in the Notes tool of any program.https://www.youtube.com/watch?v=_1fzw6BndZ4&list=PL1-Xf_HZquDEcTTK8MLMMdmwvB--o1ShY&index=1We looked at the outlining features of both Accordance Bible Software and Logos. You can also do one of these in the notes tool of any Bible software that includes one. Just copy and past the text into the note and use the space or tab keys and the return button to arrange the text on-screen in way that shows the relationship of the ideas. For a good book on how to do good Bible passage outlines in English, see The 12 Essential Skills of Great Preaching by Dr. Wayne McDill, my preaching professor at Southeastern Baptist Theological Seminary.

Digital Sermon Prep Part 1: Theotek Podcast #065
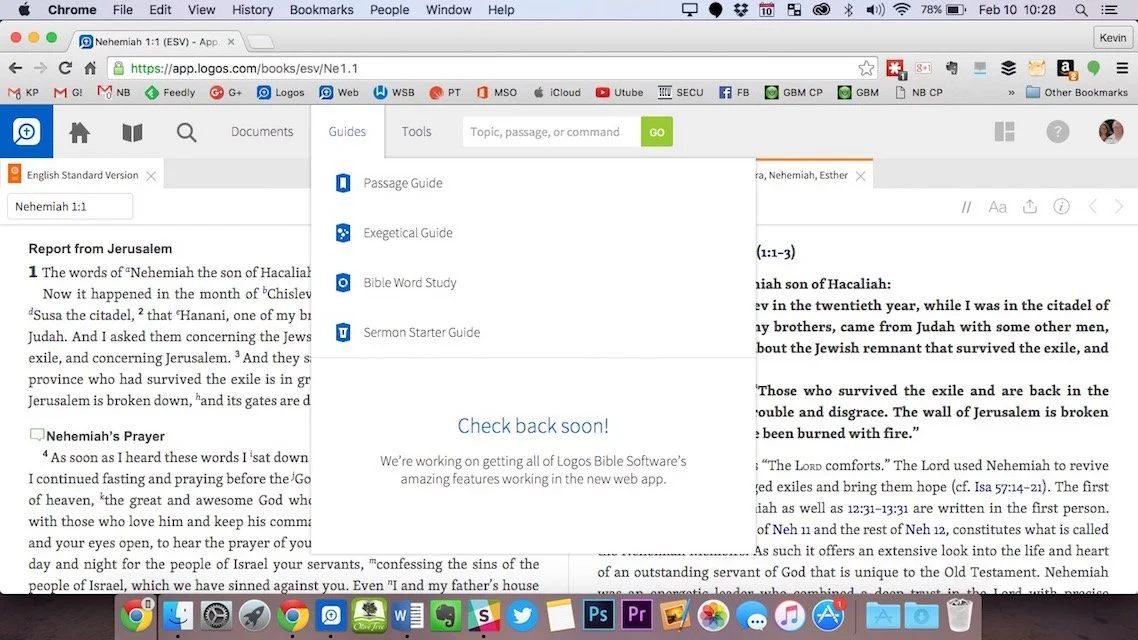
We started a series in this week's Theotek Podcast on doing digital sermon prep. Our team will take you through our steps of sermon prep using Bible software and digital tools.In this first step we focused on choosing a passage. Software packages come with tools to help you figure out what verses to include in your passage, or as the scholars call it, pericope. Then we look at other aspects of sermon prep. Watch the video below or listen to the audio version at the end of this post.https://www.youtube.com/watch?v=nb3ljTSXL3g&list=PL1-Xf_HZquDEcTTK8MLMMdmwvB--o1ShY&index=2We didn't have any recommendations in Our Favorite Things this week.

Online Bible Study: Theotek Podcast #055
Can you prepare your sermons using online Bible study sites? We try to answer that question and give a few recommendations if you choose to give it a try. At the end of the podcast we also give a few recommendations in our new segment, "Our Favorite Things".https://www.youtube.com/watch?v=Nj4ixnyNm9sWe only had three of our team members in this podcast. Rick Mansfield works with Accordance Bible Software and didn't think that online Bible study sites were good enough to do full sermon prep yet. Users often don't have access to the Internet or they don't have a reliable connection. Most of the online sites don't give users enough power to do serious word study. Most them include limited options for commentaries and word study tools. The ones included usually are only public domain works.Antoine Wright from Mobile Ministry Magazine was a little more bullish since he's a mobile-first kind of guy. He recommended a site called Bible Web App. It suffers from the same weaknesses of the other online sites with limited options and mostly public domain. It's fast and clean and does most of what Antoine needs. I like online sites and use a few. Last year I reviewed 6 online Bible sites in a two-part post. You can find part one and part two to see the video demos of the 6 sites (three in each post). Two of the sites I reviewed are no longer my favorites. Instead of My Study Bible from WORDsearch and Lifeway, I now recommend their new site MyWSB.com. Second, Logos has a site for subscribers to either their Logos Now or Logos Cloud services. Learn more about Logos Now in a recent post and Logos Cloud in another post.
 The online sites from WORDsearch and Logos above will cost you a little bit. The best option for those looking for a free site comes from Bible.org. It's called Lumina.
Our Favorite Things
 In "Our Favorite Things" this week we recommended some apps, a utility and an accessory. Rick recommended a USB C dock for the new 12-inch MacBook (not the Air or Pro). It's the HyperDrive USB Type-C 5-in-1 Hub with Pass Through Charging for $50. It connects to the USB C port on the MacBook and adds ports for an SD card, micro-SD card, 2 USB 3.0 ports and a USB Type-C port for charging or hooking up a 4K video adapter.Antoine recommended a list of Lent Apps he put together on his website. They can help Christians who observe Lent.
 My recommendation comes from github. It's a free utility that helps the user switch their MacBook screen resolution. It's called DisableMonitor and runs in the OS X menu bar. A drop down box shows all the resolutions your monitor supports. This gives you far greater control over the screen resolution settings than the built-in Display Settings in System Preferences in OS X. I wrote up a full How To post on it at Notebooks.com.