

Selvy PenScript iOS Keyboard Recognizes Handwrting

Remember the days of the Palm, when you could pull out a stylus and enter text by using a strange handwriting that would let you "type" with your handwriting. The Selvy PenScript iOS Keyboard feels succeeds the Palm Graffitti input method with a modern handwriting recogniztion that doesn't force you to learn a new way to write. You just your own handwriting while entering text on your iPad or even an iPhone.
iOS Replacement Keyboards
If you're not familiar with, them a replacement keyboard installs like an app from the Apple App Store. Download the app from the store and then you have to configure the iPad or iPhone to allow the use of the keyboard.

Go into the Settings app after installing Selvy PenScript keyboard. Tap on General on the list in the left. Then tap on Keyboard from center. Tap on Keyboards on the next screen at the top. Tap on Add New Keyboard. You'll see the Selvy PenScript keyboard listed among others. Tap on it to add the keyboard. Then tap on the keyboard name again and choose Allow Full Access.
To use the keyboard in an app, tap in a text entry box. For example, open the Notes app and create a new note or open an old one. Tap as if you were planning to enter text. The regular iOS keyboard will pop up, unless you have an external keyboard attached. If you don't, the keyboard pops up with a small globe icon in the lower left corner of the keyboard. Press and hold that key and the list of installed keyboards will pop up. Choose the Selvy PenScript keyboard.
Selvy PenScript Handwriting Recognition.

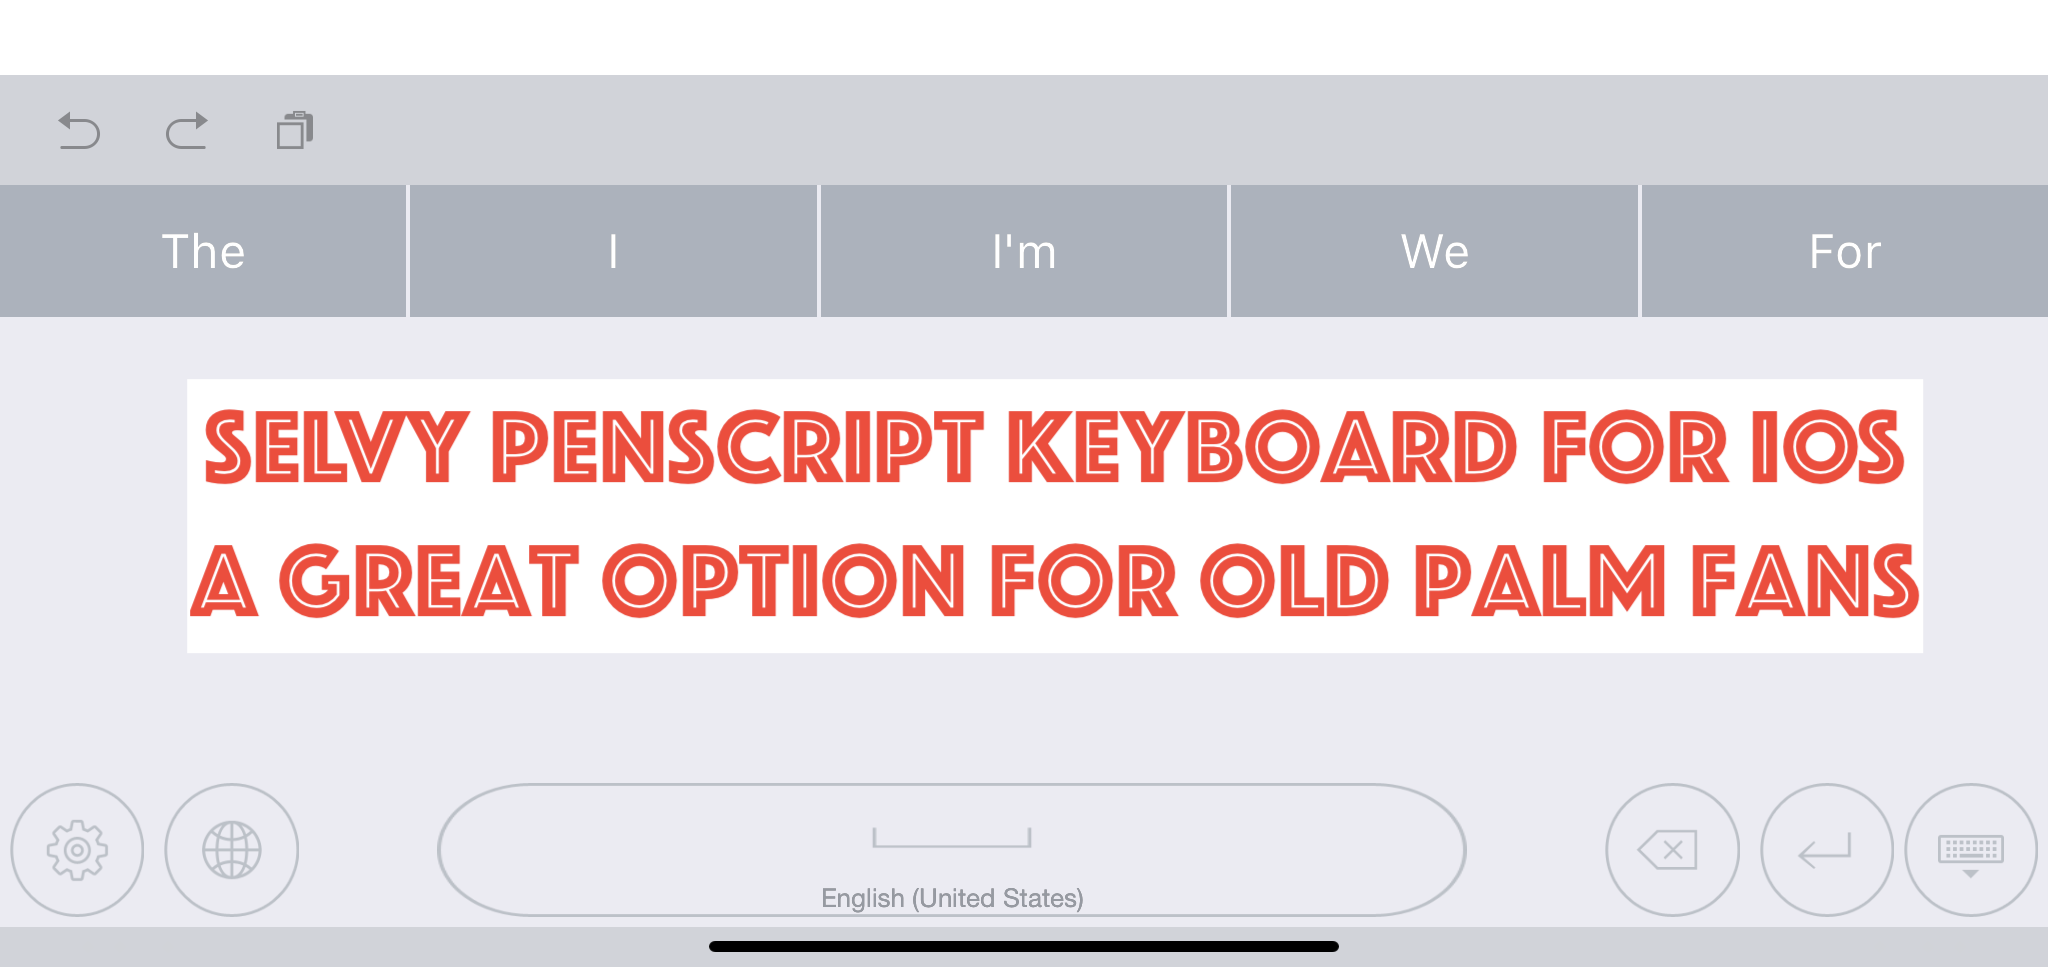
When you enter text the Selvy PenScript will pop up and you can now write. This works okay with your finger on an iPhone or an older iPad. However, people who use the Apple Pencil first or second generation will love this app. Writing with the Pencil in apps is wonderful.
The keyboard entry box looks simple. It has the following buttons across the bottom:
- Settings
- Keyboard chooser
- Space bar - long press to change the language of the handwriting recognition
- Backspace
- Enter
- Hide keyboard
Above the writing recognition box you'll see a row of words. This shows you options for your recognized handwriting.
The row of words usually has the correct word. However, you don't need to tap the word to enter it. Just pause your handwriting for a moment and it enters the text in the text entry area of the app your writing in. Customize the length of the delay in the app settings.
Selvy PenScript App Settings

The Settings icon brings up the app. Tap on the button on the lower left of the keyboard. You'll then see the App Settings. The available entries include:
- Languages - choose your keyboard language.
- Customizations - the real settings are here. See below for more info.
- About - version numbers, etc.
- Feedback - send the developers your feedback and bug reports.
- Installation Guide - teaches how to make the keyboard work in iOS.
- Try It - test out the keyboard.

The top portion lets you choose your Pen Color. We then get an option to customize the thickness of the line. The next two sections show options for putting a space after a word and putting a period at the end of sentences. Finally, there's an option to change how long the keyboard will take to recognize the text and enter it wherever you're entering text.
Conclusions
The Selvy PenScript keyboard does a great job of recognizing your handwriting. If you own an Apple Pencil, then it's a great experience. However, for short text input the regular keyboard works better. I have used it a little for entering text with my finger, but that's not as satisfying.
Go grab the Selvy PenScript. It's free and works great. However, you'll want to remember that any text that you enter using the keyboard will go through their Korean servers. Some might find this worrisome. I don't.
Accordance Bible Software 25-Day Switch Part Two - Notes
During my Accordance Bible Software 25-Day Switch I'm trying to use the Accordance User Notes. How does it compare to my old go-to application, Logos?

Many Bible software users make use of the built-in notes feature in addition to reading Bible passages and commentaries, including me. To make the Accordance Bible Software 25-Day Switch, the notes feature will need to record my observations, questions and findings.
Since I work on both a desktop, laptop and my iPad, it will also need to sync between the three devices easily, I'd rather they synced automatically. Finally, I want some formatting options, including bullet or number lists, automatic hyperlinks to Bible passages and basic text and paragraph formatting.
How well does Accordance work? We'll take a look in part two of the Accordance Bible Software 25-Day Switch from Logos Bible Software and the companion mobile apps from Faithlife.
Accordance Bible Software 25-Day Switch: User Notes

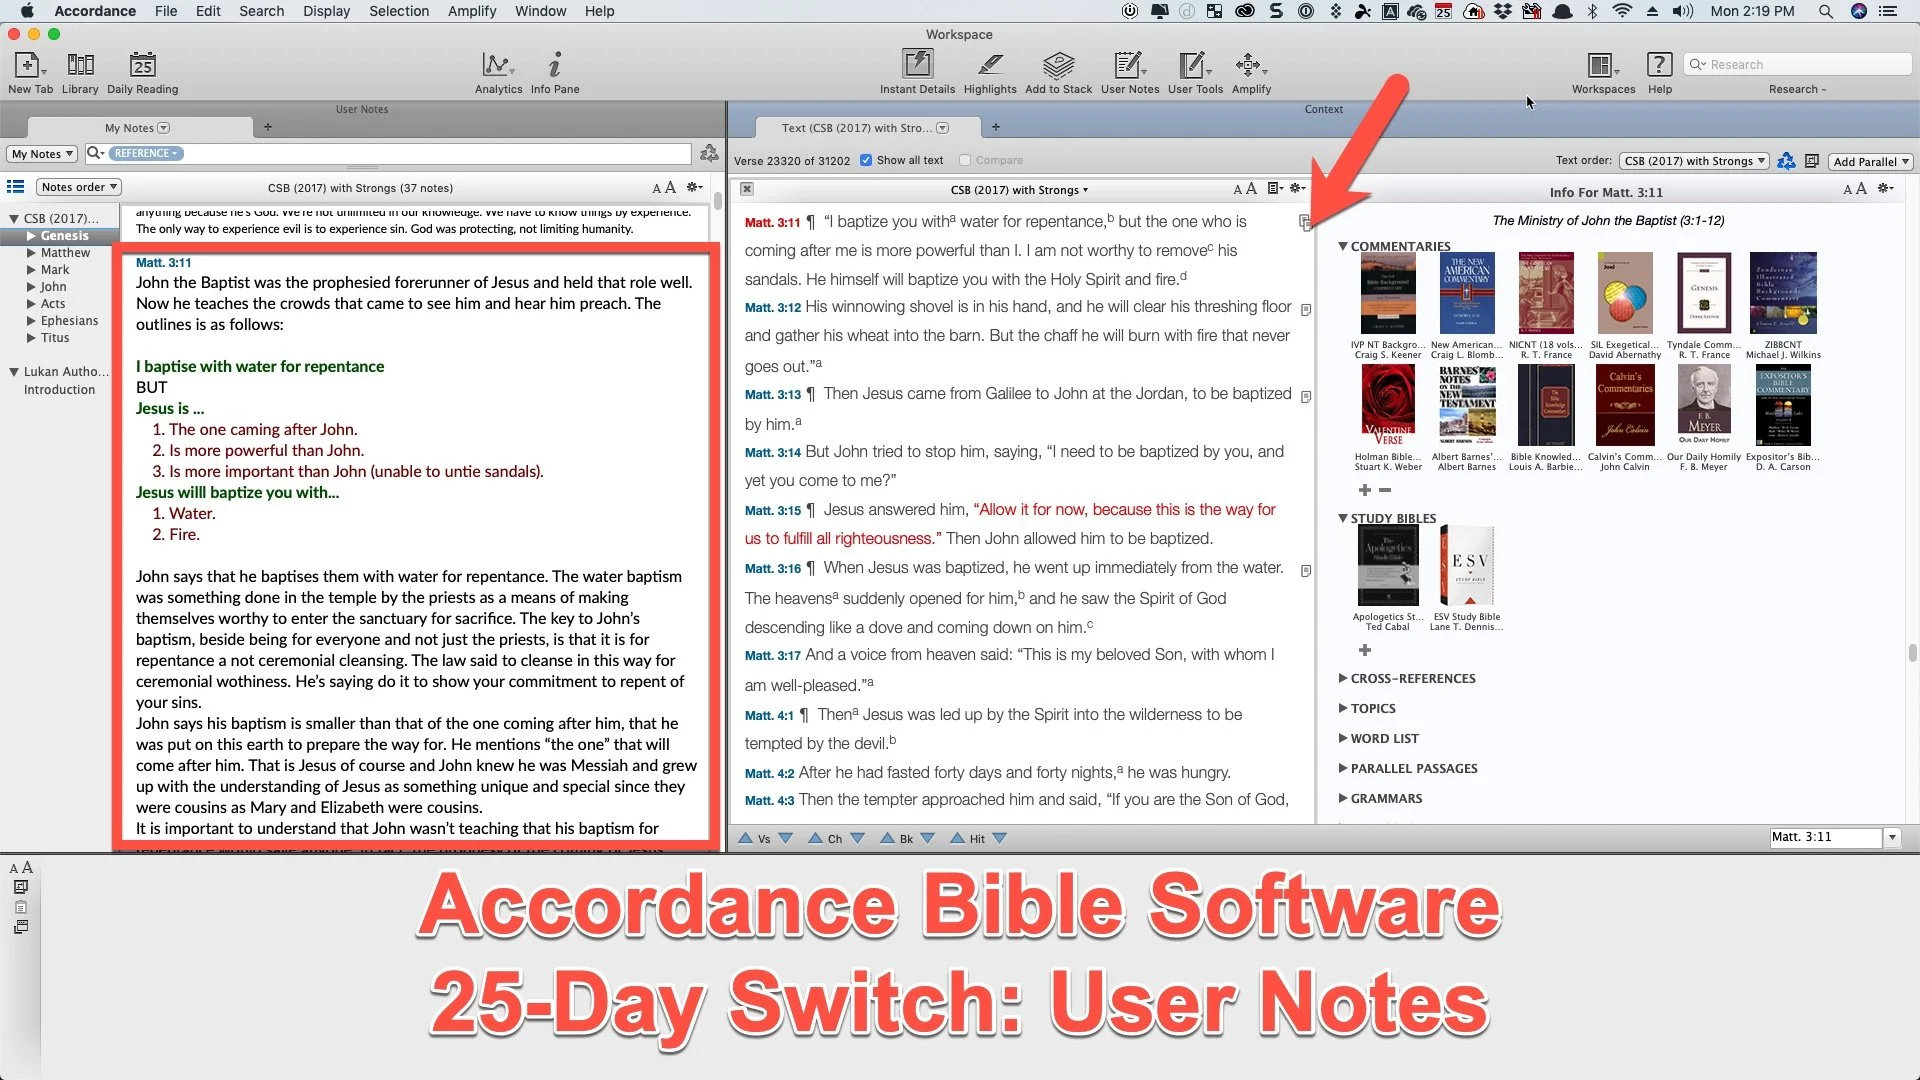
First, let's take a look at the user notes in Accordance. Any verse with a note will show it with an icon in the right margin next to the verse. See the arrow in the image above. It shows the note on Matthew 3:11. The red box shows the content of the note opened in a separate window.

To add a new note, click on the blank spot next to the verse along the right edge of the Bible window. A dialog box will pop up asking which User Note file to add the note to. A window will pop up over the main Accordance screen to edit the User Note. After you create the note you can save it by clicking on the Update button in the lower right corner of the pop up window.
The Update button highlights my first big annoyance with Accordance Bible Software User Notes. You have to click Update! I'm used to Logos which automatically saves your notes while typing them. And it does this seamlessly and quickly for most users. The few people who struggle with this issue includes people with underpowered computers. That's merely an annoyance, however. I can get over it.
However, another significant annoyances comes from the fact that the User Notes tool pops up in a box on top of the Accordance Bible Software program. Why can't I open the note in a window pane and edit it right in that window pane? If you open your User Notes file in a new window pane and click in the note and start typing to edit it, the note opens in a User Note pop up window.

The User Notes window toolbar includes the following functions (from left to right):
- Keyboard chooser - drop down lets you pick...
- Default - COMMAND+OPTION+SHIFT+D
- Greek - COMMAND+OPTION+SHIFT+G
- Hebrew - COMMAND+OPTION+SHIFT+H
- Font face
- Font style (like bold, italics, etc)
- Font size
- Font color
- Bold
- Italics
- Underline
- Superscript
- Subscript
- Link - select text and click here or use link dialog box or select text formatted as a URL and OPTION+Click on this button to quickly add a simple link.
- Auto-link - click to create automatic. links out of Bible passages.
- Insert picture
For the Auto-link button to work, the passage will need to use typical passage formatting like John 3:16. URLs with HTTP:// work but not just www.kevinpurcell.org by itself.
At the bottom of the User Notes editing box we get arrow buttons. Two sets up of UP/DOWN buttons will jump to the previous or next note in your file or will add a new note on the previous or next verse. When you click these buttons they automatically update and save the note file. To delete a note, just clear the box and hit Update. If you close the Note editor, it will ask you to Update. That keeps you from entering a long string of notes and then fail to save the note.
After you save a note, the Notes box will open to show your notes. You can't edit them in this box, but they will be displayed here. That dialog box has a few buttons as well. You can close it using the little X in the upper left. The center to area has a drop down menu that shows all of your User Notes found by the program. The upper right has a font size Up and Down to make the notes look bigger or smaller in the display box. The last button in the upper right looks like a Settings icon. It has the following items...

- Move Up - moves the whole box to the right end of the current window.
- Move Down - moves the note box to the bottom part of the window.
- Show Interlinear - grayed out in a notes box, but there for when you're displaying a Bible.
- Enter Reading Mode - opens window in full screen without any window controls or toolbar (Keyboard shortcut CONTROL+R)
- Auto-scroll - starts to scroll the window automatically.
- Untie Scrolling - breaks the link between the Bible window and this window.
Accordance Notes Pluses
Here's what I really like about using the Notes Tool so far during my Accordance Bible Software 25-Day Switch. First, it's fast! Logos notes can get a little slow. The auto-update and sync feature on Logos probably slows it down since it's phoning home to the Logos servers every time it saves. Accordance doesn't do that until you sync them on exit or manually.
Second, the Notes Tool has all the basic features you need. We can format text and add images. It supports Unicode which means you can enter Greek and Hebrew text. Plus, it adds links to Bible passages and you can also add links to websites.
Third, users can link their notes to Bible passages, websites and even other books in your Accordance library. If you have a file on your computer, you can link to it too.

Select the text you want to add the link to and then click on the link icon (third from the right on the top toolbar of the User Notes Edit window). Choose the kind of note you want. If you are linking to a file on your computer, then choose File and click on the Choose File... button. Pick your file and then click on OK to create the link.
Resource links will let you add them to any book in your downloaded library. A drop down box opens so you can select the book. Play around with it to see all that this powerful linking tool can do.
Finally, Accordance gave us a better way to sync notes between the Mac, Windows, and mobile versions of Accordance. Instead of doing it manually over Wi-Fi as the used to require, users can connect their Dropbox account to Accordance and sync that way.
Syncing with Dropbox
See the video above to learn how to do this and how to use the sync feature. Unfortunately, it forces you to manually sync from the mobile app to Dropbox. You can set the desktop version to sync each time you exit the program. It's a shame the mobile app won't do this automatically. Since they require it, they should put the sync button in the main window of the app instead of nested in the library window, which forces you to tape a few times. I added a button to my toolbar on my Mac version of Accordance even though it syncs automatiaclly upon exit.
The Accordance video tutorial collection includes some great help on using their software. They offer an awesome one on using notes in Accordance Mobile. There’s another one covering the desktop version’s Notes tool.
BibleWorks users can import their notes into Accordance thanks to a recent update from Accordance.
Accordance Mobile Notes
In Accordance Mobile, add notes by long pressing on the Bible verse. A new window pops up with many options. Select User Note to add a note or edit one aloready in place. Now choose Notes file you want to use to add this note. I use the same file for all my tasks.

A verse with a note already attached will show a tiny note icon in the right margin (see the left image above). Tap on it to see a popup displaying the note. Tap on Edit to change the note or Open to read it in the lower half of the app.
Notice the Note editor has font formatting. You can't add links like you can in the Mac or Windows version. UPDATE: To add links to your mobile notes press and hold on text and then choose Link from the pop up menu. The Plus icon on the top toolbar will let you add images from your mobile device. The up/down arrow moves to the previous or next note.
Lessons Learned from Accordance Notes Use
Here's what I've decided after making this switch for the first few days. First, I will see if I can get used to using the Accordance User Notes tool in both mobile and on my Mac. I think I can adapt.
Second, I'm seriously thinking about dumping Bible software notes tools entirely. For years I used PC Study Bible and lost all of those notes because I didn't know how to get them out. e-Sword lets you move your notes out and so did QuickVerse. I used both of those for years. When I used BibleWorks for a few years before jumping to Logos, I loved that they saved their fils as RTF files. Logos makes it really hard to get notes out of the program.
I should probably use a third-party solution to record m notes. I may do that with a simple Word document for each book of the Bible. Some like Evernote, but I've stopped using the service due to the subscription fees. I already pay for Word. We'll see after this 25 days.

Accordance Bible Software 25 Day Switch Part One
To celebrate the 25th anniversary of Accordance, I'm trying to switch from Logos to Accordance. My Accordance Bible Software 25 Day Switch begins.

For the last 13+ years I've used Logos Bible Software plus others as I reviewed them. Today I am going through an Accordance Bible Software 25-day Switch experiment to jump from using Logos first to prioritizing Accordance Bible Software. What inspired this choice? How do I expect this change to affect my Bible study experience? Should you make a similar switch?

This post won't answer all of the question posed above, but it will answer the first and share my early experience. The Accordance Bible Software 25-Day Switch may be temporary. We'll see after it's over. However, it will be complete during that 25 days.
Why am I making this possibly temporary switch? There's a number of reasons.
- Of all the Bible software I use regularly, I'm least familiar with Accordance and want to become more adept with it.
- Logos works great, but it's a hardware resource hog and Accordance runs faster and takes up less space and power to run on both Windows and Mac.
- This experience, I hope, will inform readers what it takes to switch from one major Bible software platform to another.
- I like a challenge.
- The length will honor the history of Accordance, as they celebrate 25 years of publishing a world class Bible software program first on Mac and now on Mac, Windows, iPhone, iPad and Android.
Accordance Bible Software 25-Day Switch Rules
First, I won't use my old go to program or the apps related to the program. In other words, I can't launch Logos on my Mac or on my phone/tablet during the 25 days. There's one exception. If I'm studying a passage and need to open Logos to access a resource that I know will help me produce a better sermon or Bible study, then I will. My preaching and teaching ministry at High Peak Baptist Church matters more than an article written on this site.
Second, like most weeks, I can use other programs or apps. While I launch Logos first, unless I'm reviewing another program or app, I always use more than one Bible program or app to research my sermons. So this "switch" means that Accordance will dominate my study, but I'll continue to occasionally use other programs and app besides Logos when I need to.
Third, I reserve the right to cancel the switch at any time but not for any reason. If this switch means I'm so unproductive that the switch harms the affectiveness as I study the Bible. I'll write about it here.
Fourth, if I need to open Logos to get a screen shot or shoot video to explain differences between Logos and Accordance for articles in this series, I will. But I will only set things up to get the shot and then close it.
Accordance Bible Software 25 Day Switch Copying Passages to Other Programs
Logos helped me finish most of the in depth study for this weeks' sermon already. The first day of the switch came after that on purpose. I didn't want to dive head first into the Accordance deep end. Instead, I'm wading in the shallow end this week.
This week I began to prepare my preaching notes for this week's message. That means I'm copying passages from my Bible software to a Microsoft Word document. I take that Word document into the pulpit with me on my 12.9-inch iPad Pro. It's an extensive outline with the Bible passages copied to the document.
In Logos, copying a passage to Word is simple after some setup. The Logos Copy Bible Verse tool will let you select a passage and then choose the translation, a copy format and whether you want to simply copy the passage to the clipboard or copy it and paste it in one click. If you want to copy it, hit the copy button. Or you can hit the Copy-Paste button and it automatically inserts it into the Word document with the formatting chosen.
With Accordance you insert passages into Word or other programs on macOS by using the built-in macOS Services feature. You can download a Accordance Services Set and install them. To insert the passage, type out the reference in Word and select it. Then right-click it and choose Services and then Insert Verses.

I love the Logos Copy Bible Verses tool, but the Accordance use of services works. Also, you can do a little more. They offer services for ...
- View Verses - shows the reference in Accordance.
- Search with Options - searches the selected text using an options dialog box.
- Search for Words - opens a search in Accordance and looks for the selected text.
- Insert Verses from any Text - lets you choose which Bible translation to paste the passage from.
- Insert Verses - inserts the selected passage from your top Bible.
Users have created other services, which you can find in the Accordance Bible exchange site, which holds files related to Accordance, including this collection of user created services.
This process took some configuration to make the inserted verses look how I want. Go to Preferences and then look in the Citations screen to experiment with the options there to make things look the way you want them too. Here's my screenshot to make things look how I wasn't.

Here's the way the verses look when I paste them into Word. After pasting them into Word, I apply my Bible Quote Style. Logos does this with one click and in Accordance it takes several steps.

Here's how to insert text using Accordance and services.
- Type the reference in Word or another program.
- Right-click (or click on menu for Word, Services, Insert Verses) and choose Services and then Insert Verses (or one of the other services).
- The passage gets pasted using basic formatting so I have to select the passage and click on the Ribbon to apply my Style.
Logos handles this better, but if Accordance handles more of my Bible study process better than Logos, this minor weakness will not keep me from continuing my Accordance Bible Software 25-Day Switch.

MobiScribe Notepad: The E-ink Notepad Android Device Review
The MobiScribre Notepad bring a high quality e-ink screen to note taking. How good is the tablet?
With all the glossy color screen note taking options on an iPad or Android tablet plus 2-in-1 convertible Windows and Chromebook computers, why would anyone want anything like the MobiScribe? Reading comments about it on their ads on Facebook and Instagram makes one wonder if anyone does, but then you talk to the committed core of Indiegogo backers who forked over $200 sight unseen and you get the idea that maybe MobiScribe discovered a niche that can propel them to success.

I recently received my new MobiScribe: The E-ink Notepad Android tablet after backing it on Indiegogo just a few months ago. That's a record. By comparison I backed a little selfy drone called the Selfly Drone and it took almost three years and when it arrived I tested it and wondered if I could find a way to get my money back. The MobiScribe instead came quickly and I'm enjoying it.
MobiScribe Review: Hardware
The MobiScribe E-ink Notepad runs Android 4.4, unfortunately. However, it comes with a bright and sharp e-ink display that's easy to read and responds fairly well to touch. The tablet also comes with a stylus so you can write in the note taking app built into the operating system. More on that below. The stylus also works like your finger as you interact with things on the screen. Add touch capability when not using the stylus.

The processor inside this notepad won't win any benchmarking awards. It's a Freescale i.MX6 Processor and runs at 1GHz. You also get 1GB of RAM and 8GB of storage (only 2GB of that is available to the users) with an expansion slot able to read up to 32GB micro-SD cards.
The MobiScribe Notepad measures about 6 inches wide and 7 inches tall. It's less than half an inch thick and weights only 8 ounces. With the case made by the company attached, it probably doesn't weigh even a pound.

The 3.7V 1500mAH Li-polymer battery gives the e-Ink MobiScribe great battery life. Under heavy usage for about four hours I only drained the battery about 30 percent. I've charged it only twice in over a week of sparing usage.
Kindle users will feel at home on MobiScribe's screen. It has a sharp 265 DPI screen. The front light offers warm/cold glow settings you can adjust in the Settings app. The Settings app also lets you change the font to make books and text easier to read.

On the top edge we find two buttons, one to turn the backlight on and off and the other turns the screen on and off. The bottom edge holds the card reader slot and charging port. It uses a micro-USB port. Some critics couldn't believe that the company didn't use USB-C. I agree. I wish they had, but USB-C still costs more and this thing definitely doesn't need that much charging power or speed, so I understand the choice.
Operating System
The custom version of Android on the MobiScribe Notepad runs on the old Android 4.4 Kitkat first announced on September 3, 2013. We're now seeing people upgrade to Android 9.0 Pie and the next version will come out sometime this year. The old OS hampers what apps run on the device.
Built in apps and the operating system respond adequately to touch and input. The familiar e-Ink flash when the page refreshes can get annoying in some situations, especially while running third-party apps. This slows down the performance significantly.

The company advertises the ability to run other Android apps. In my experience, none of the Bible apps I want to run worked. The Logos Bible app won't even install. It tells you that it's incompatible with the operating system. Logos users can find an old version of the Android apps that installs, but it won't let me log in using my correct email and password. The older apps aren't supported so don't bother to call Logos for help. Just give up.
Neither the Accordance Bible app nor the Olive Tree Bible app will install either. I get a "Parse Error" after I download them and try to run the APK installer.
I also tried to install the Kindle app and one called Kindle Light. Both of those were slow painful to use, both of which other MobiScribe Notepad users report working. Neither worked well for me.
The tablet makers promise that the device runs Android apps. They recommend using APKpure.com to download apps. I got Dropbox working, but it seems easier to download apps on a computer and put them in a Dropbox folder. The APKpure app is clunky and runs slowly on the MobiScribe Notepad.
Don't buy the MobiScribe Notepad to use as an Android tablet. Few of the apps I want to run work on the ancient version of Android included. Others will barely run on the hardware. I gave up at this point since I also own an iPad. I'll use it for mobile apps and the notepad for note taking exclusively.

The Home Screen has a toolbar on the top of the screen with...
- Back button
- Home button
- Task switcher - switches between running apps.
- Refresh button
- Time - doesn't do anything when tapped.
- Wi-Fi - tap to join or disconnect from Wi-Fi networks.
- Display Light - changes the brightness, warmth and contrast.
- Front Light - switch to turn on and off the screen's light.
- Brightness slider - from dark to bright light.
- Temperature slider - from cool to warm color screen.
- Contrst slider - makes contrast less or more extreme with a row of letter As to show the results.
- Settings
- Wi-Fi
- Display
- Storage
- Security Lock settings
- Language & input
- Reset
- Date & time
- About
- Battery - shows batter life but does nothing when tapped.
The Settings are basic compared to other Android devices and that's fine since it's not intended to function as a full Android tablet.
Notes App
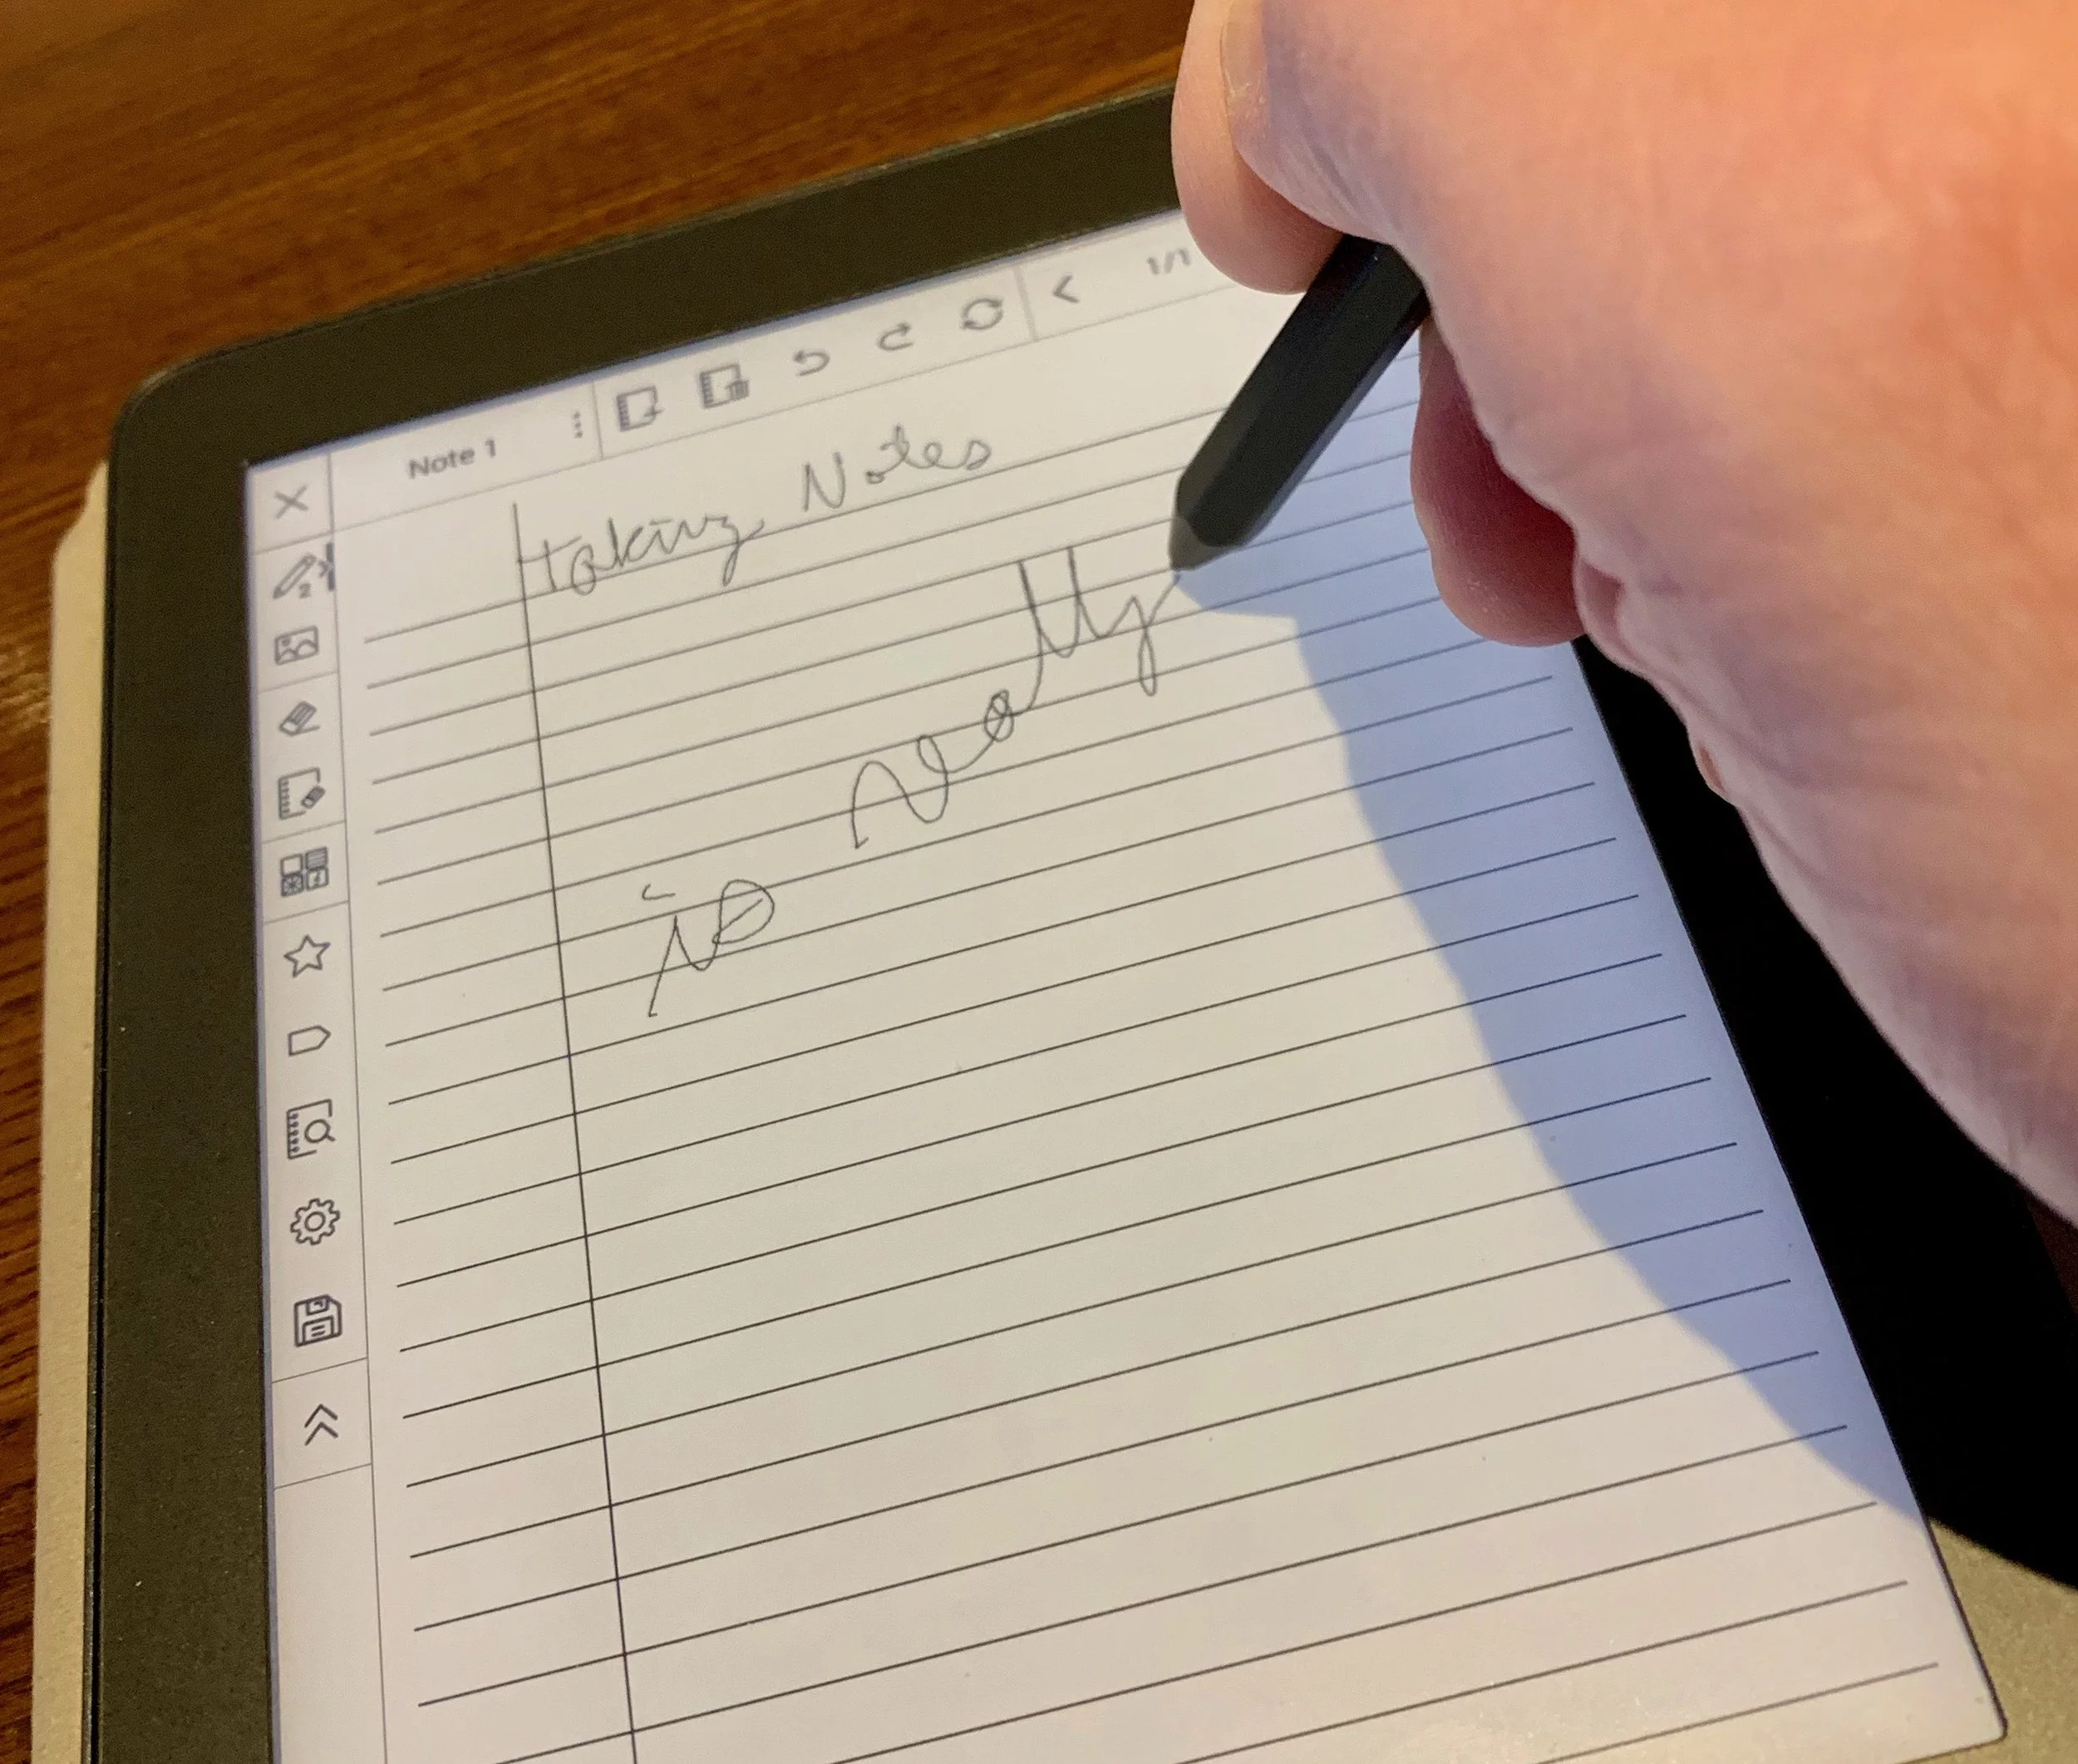
Let's focus on what does work. The built-in Notes app runs smoothly. I bought the MobiScribe primarily to take notes in meetings or as I study. The Notes app is simple and responds quickly.

On the main screen you see two rows, one for Notes and one for Books. There's a "Create Note" button or you see the last few notes you edited. You can either tap on the "All Notes" link to see all of your notes or tap on the "Create Note" button to create a fresh note. If you want to open a recent note tap on it.
The OS lists all notes in one of a two ways - with a generic icon or a preview of the note as a small thumbnail. That view may bog down the system with a lot of notes.

The app has a toolbar along the top and the left. The top toolbar has buttons for...
- Title
- Menu to ...
- Rename
- Copy
- Save
- Convert - to PDF or an Image file.
- Backup - to the internal memory, SD card, or Dropbox.
- Restore - from memory, SD card or Dropbox if you used the Backup feature earlier.
- New page
- Delete page
- Undo
- Redo
- Refresh
- Back a page
- Jump to page number
- Forward a page
- Full-screen mode - to view note without toolbars.

The left side toolbar includes the following buttons:
- Pencil configuration tool to change the style and thickness of the pencil.
- Insert image
- Erase
- Erase page
- Change page background
- Star - to make this a favorite note.
- Tag - add a tag to the note
- Search - shows all notes
- Settings - lets you calibrate the stylus and change toolbar from left to right edge of the screen.
- Save the note
- Hide toolbar
I used the insert image to add a page I scanned using my phone camera. Back up the photo to Dropbox and add it via Dropbox on the MobiScribe Notepad.

Use the Background button to change your screen background. The MobiScribe Notepad offers 11 pre-installed backgrounds. You can also create your own with a custom background option.
The included backgrounds offer ruled pages, some with check boxes and others with meeting notes layout. There's also graph paper and musical notation pages. Two are just geometric shapes.

While writing with the stylus, you can adjust the size using the toolbar to change the input. The basic tool writes with a consistent width. The marker tool has some pressure sensitivity so you get a slightly wider line when you press harder.
Books
The MobiScribe Notepad claims to support the following formats:
- Mobi
- Epub
- AZW
- TXT
- FB2
- PRC
I can't get mine to open Amazon files even with the DRM removed. You get an error message like this...

The Books app works okay, but I'd ranter read on a Kindle. However, you can use it for the above formats. You'll need to find the right formula to make the book readable. I struggled to read PDF books, because most were laid out for 8.5x11 paper size. These don't display well on the smaller screen.
The EPUB format seems to work well. I used a program on my Mac called Epubor to convert Kindle books to EPUB. It's not an easy process, but works better than anything I tried. Epubor isn't free. It starts at $25/year for Windows and $30/year for Mac. You can get a lifetime subscription for $50 and $55 respectively.

When you put your converted books into a Dropbox folder on the computer, then open Dropbox on the MobiScribe Notepad, download the book files by tapping on them. You will get an error message saying that the Dropbox app can't open the file. You will have to choose the OPEN WITH... button and it offers to open the book with the HomeReader3 app or other apps installed on your Notepad.

At this point the book behaves a lot like it will on a Kindle Paperwhite. You get the ability to increase or decrease font size (tap the center of the screen and a font size slider shows up at the bottom) and you can bookmark spots in the book, but that's it. I couldn't find a way to highlight books and inexplicably there's no way to annotate the book with the stylus. That's an unconscionable omission for this device advertised as a great note take tablet.
Sometimes opening a book in the Book app takes a long time. That's going to happen with large books.
Tap on the left or right edge to go back or forward in the book. Tap on the top edge to bring up the toolbar. There's a progress bar at the bottom edge. Tap on it to quickly jump to a new place in the book.
MobiScribe Review: Accessories
The stylus feels light and some might call it flimsy. However, it's not bad while writing. The hexagonal shape runs up two-thirds of the stylus. The top third starts to become more round toward the top end. There's a fine tip on one end and button on the other. The other ends behaves like an eraser. That's something you don't get with the Apple Pencil that alone costs more than 50% of the price of the MobiScribe Notepad, which includes two styli.

The box comes with three extra tips and a tool to replace the tip. We'll see how long the tips last, but it feels sturdy and writes smoothly on the screen.

I got the branded case. The tablet attaches to the MobiScribe Notepad case with a small rectangular sticky adhesive. Pull off the protective plastic and press the table onto the case. It seems to stay put. Again, time will tell if it holds up or comes lose. Plenty of users complained about this design.

The case feels okay in the hand with a textured cloth they call "rugged fabric." It feels like it will wear out over time. Inside you get a felt fabric. On the right side of the internal part of the case next to where the MobiScribe sits, there's a recessed section and and elastic loop. That's where you put your stylus. On the top edges you get two tabs with magnets. They come together when you close the case and the magnets hold it closed to protect the screen while not in use. The case allows the user to easily plug in the charger without opening the case. However, the screen doesn't turn off automatically, so be sure to hit the button to turn it off manually or set the Sleep time under Display in the Settings.

Any micro-USB charging cable will power the tablet, but they do include a simple USB cable. You'll need to supply your own AC adapter or plug it into a computer to charge. The tablet arrived with about 65% charge and didn't take along to top off. I didn't time it, but it seemed like about an hour.
Conclusion and Recommendation
People who take a lot of notes and don't want to use paper and pen/pencil, can get a lot of functionality out of the MobiScribe Notepad. It works well as a note taking device. It's light and quick, as a note taking solution.

The MobiScribe team of developers respond quickly to users' wishes. People didn't like that you had to convert notes to PDF or PNG file before backing them up. So they changed the backup screen (above) to include a "Save file via" drop down box that includes Dropbox as an option. Now you can export and backup notes files in one step.
The book reader is subpar and I won't use mine for that reason. People who want a good e-Ink book reader should buy a Kindle. No other book reading tablet can compete.
Do NOT buy this device to run Android apps. The inability to open some favorite Bible apps disappointed me. I hoped I could use this device to read books on an excelllent e-Ink screen. It's not a good experience, even with the apps that do work.
Tips for Using the MobiScribe
- Turn on the ability to side load apps. You almost have to have Dropbox to use the MobiScribe Notepad. Without it, the experienced will be drastically limiting.
- Don't download the APK Pure app store as the recommend. Instead, just use it from your computer's browser.
- Find a way to convert your eBooks to a form that the MobiScribe can read, if you insist on using the device to read books. I like Epubor.
- Change background of paper in Notes and even create your own as transparent PNG files. Use drawing program to make a 3.75-inches x 5.0625-inches file with a transparent background. Then put it in your Dropbox folder to sync to the MobiScribe Notepad. Click the background button in the left or right toolbar, depending on where you put it. Choose Customized and select the file in your Dropbox folder.
- Join the MobiScribe Notepad Facebook users group. It's a closed group, so you'll need request membershi.
5 Best Kindle Fire Bible Apps
Would you like to find a great Kindle Fire Bible app? We've got the five best Kindle Fire Bible apps for you plus one app you should avoid for awhile.

The Amazon Kindle Fire appeals to people who like the idea of a tablet to read books, watch movies and do some simple things like surfing the web and checking their email. You can also play games. But how good does the Kindle Fire do for Bible Study apps. We've got the 5 best Kindle Bible Study apps that run on the Kindle Fire.
A Kindle runs a heavily skinned version of Android. The Fire OS runs Android 7.1 Nougat, which lags a few generations behind. Google released Android Pi in 2018 and will release unnamed Android O this year.
The fact that Fire OS uses Android means many Android Bible apps will run just fine on the Kindle Fire. However, the app creator must choose to send their app to the Amazon Kindle App Store, which has some of the most stringent evaluation processes of any App Store. This leads many app developers to ignore Amazon.
The following apps come in no particular order. I chose them based on…
- Price of the app plus add-on books
- Size of library
- Quality of the app and its features
- Stability and speed of the app
- Olive Tree Bible Reader
- Accordance Mobile
Bible by Olive Tree
The best Kindle Fire Bible app comes from Olive Tree. Bible by Olive Tree includes a simple user interface but also includes powerful enough features to let Bible students study the original languages and use most of the best commentaries available on mobile devices today.

The modern translations and better commentaries or other reference books will cost extra. They offer free books and even some language study tools for nothing extra. However, the Olive Tree library carries more resources than the other apps here.
Open your favorite Bible and then look at the Resource Guide, available along the right or bottom (depending on whether you hold the Fire in landscape or portrait mode). The resource guide will find all of the books in your library that include info about that passage.

The user can do the basics, like highlighting, searching, take notes, sharing verses and bookmarking. Add to that the excellent user of the tap and hold to work with the text and the resource guide, and you get an awesome Bible reading and study experience on the Amazong Kindle Fire.
Accordance Mobile

The Accordance Mobile Bible app gives users access to their Accordance books for free. Even Kindle owners who don't own any books on Accordance can download it for free and get some free books. Sign up for an account for free, also, and you'll get a few more books. However, it works best if users invest in the Accordance ecosystem on Mac or Windows.
When you see all it can do, you'll likely agree it's the best app for advanced Bible students while remaining simple enough for the average Bible reader. I prever the user interface of Bible by Olive Tree above, but Accordance comes in at a close second. The app's description lists the free resources. I quote it here:
The following free resources are included in your initial download of Accordance Mobile for Android:
• ESV Bible with Strong’s numbers (ESVi)
• World English Bible (WEB)
• Samples of the Greek New Testament and Hebrew Bible
• Easton’s Bible Dictionary
• Outlines of each book of the Bible
• Margin notes and cross-references
• Bible Lands PhotoGuide Sampler
• Kohlenberger/Mounce Concise Hebrew–Aramaic Dictionary
• Mounce Concise Greek-English Dictionary
• BiblicalTraining.org
If you register an Accordance account, you will also be able to download a free Android Starter collection including:
• The 1901 American Standard Version (ASV)
• French: Louis Segond Bible
• German Elberfelder 1905
• German Lutherbibel 1912
• Greek and Hebrew Strong's Dictionaries
• Hitchcock's Dictionary of Bible Names
• Nave's Topical Bible
• Portuguese Bible: João Ferreira De Almeida Atualizada (ALMEIDA)
• Spanish 1909 Reina Valera with Strong's numbers
• Dr. J's Bible Study Methods
• Maps Sampler
• Timeline Sampler
• Chronological Readings
• Devotional Readings
• Classic Passages
• Parables & MiraclesFrom Accordance Mobile page in Amazon App Store
You can read the Bible and search for words, topics and even more powerfully search for tags, lemmas and more.
The app lets you open two books at a single time and set it up so the app will scroll the two books together as you move through a passage. The Bible will cause the other book, like a second text, a commentary or study Bible, showing the information about the same verses displayed in the Bible.
Tap and hold on the word and you'll get a toolbar open up. Tagged English Bibles will let you look up the word based on the Strong's number. Greek and Hebrew words will let you see morphological details.
There's also a simple way to share text outside the app.
YouVersion from Life Church
The YouVersion Bible app from Life Church is the most popular Bible app available. It's not a powerful Bible study app, but it does a great job for people with simple needs.

The app is totally free and lets you download modern translations like the NIV, ESV, CSB, NKJV or NLT. You can also get the public domain books like the KJV. They don't offer Greek or Hebrew texts for original language research.
Life Church's apps excels at giving users a good Bible reading experience with a plethora of devotional reading plans. It also will share the app in beautiful mean-style images with text.
People who like to highlight and take notes in their Bible can do so with the Bible app. These will sync with the ministry's Bible website.
Do you want to keep up with another person's Bible reading? This helps with keeping one another accountable and YouVersion makes this simple. Follow one another and share your reading progress.
Because the Bible app's totally free, it also doesn't include things like language study, commentaries or other books to help you study beyond basic reading. You can listen to the Bible in the app.
Tecarta Bible
I use this app the least, but it always shows up as one of the most popular apps. It's a step above the Bible app from YouVersion, but below Accordance Mobile, Olive Tree and other more advanced Bible study apps.

Tecarta Bible costs nothing to download the basic app on the Kindle Fire. However, the more modern translations will cost the user. If you want to read the NIV, ESV, NLT, CSB or other modern translations you'll pay through either in-app purchases or on their website.
The user interace looks attractive and simple enough to learn quickly. Users can read, search, bookmar, take notes, highlight and study using commentaries and Strong's tagged Bibles (KJV and NASB).
Tecarta offers a subscription service that costs $5/month or $40/year. The first month is free. That's an interesting deal, but might get costly if you don't need a lot of books. Head over to their store to judge for yourself whether buying a few books or subscribing the premium offering works best for you.
Bible Gateway
Like Tecarta, Bible Gateway offers a subscription model for accessing books other than the ones that come free with the app.

The app focuses on Bible reading with a verse of the day feature on the main screen. Listen to the Bible or read following one of their many reading plans. You can also share verses through the app to social media.
When you subscribe you'll get access to more modern translations and some nice commentaries.
Like all the other apps, users can read, search, notate and highlight the Bible. Run the app with two books open on screen at a time. They will follow one another as you scroll through the book. Share verses with socila networks or family using your phone's sharing feature.
Where's Logos Bible?
A lot of people who read this site will ask, "Where's Logos?" I put it on my list best apps in more than one place. On iOS and more traditional Android phones and tablets, it runs well and would easily make this list. The app does not work well on a Kindle Fire.
I own the latest version of the Kindle Fire - the 2018 Kindle Fire 8. I bought it because I no longer own a Chromebook or Android phone. Instead of paying $150 for a cheap Android tablet or $550 for the Samsung Galaxy S4, the best Android Tablet for sale now, I chose to get a cheap Kindle Fire.
The Fire showed up in my mailbox so I opened it up and loaded the Logos Bible app on the tablet and fired it up. It takes a few minutes to set up in the background. So, I put down the table and let it do its thing. Then I downloaded a few books and opened up my favorite Bibles and Study Bibles the way I like.
Later, I came back to my newly setup Kindle Fire 8 and fired up the Logos Bible app and it took forever to load. Then it immediately crashed. A few attempts at restarting the app failed so I restarted the Kindle Fire and it loaded this time. But the app takes forever to do anything.
Some will tell you that the Logos Bible app needs to "phone home" meaning it connects to the Logos servers to a lot of what you want to do with the app. I downloaded books to the tablet and tried to run using only those books. The app still chugged along like a school bus loaded with 8 year-olds who are my size climbing the Appalachian Mountains along I-40 near my house. It can get there, but it won't be fast. It also seems to just stop for long periods of time.
You may not have any of these problems. I'd like to see a video of the Bible app from Logos running fine on your Kindle Fire. Post a link in the comments below and if I get a few I re-evaluate my situation and my chose to leave it off this list.

How to Add an SSD to a Mac Without Opening the Computer
We'll show you how to add an SSD to a Mac without opening the computer. This uses an external drive to boot and run the OS.
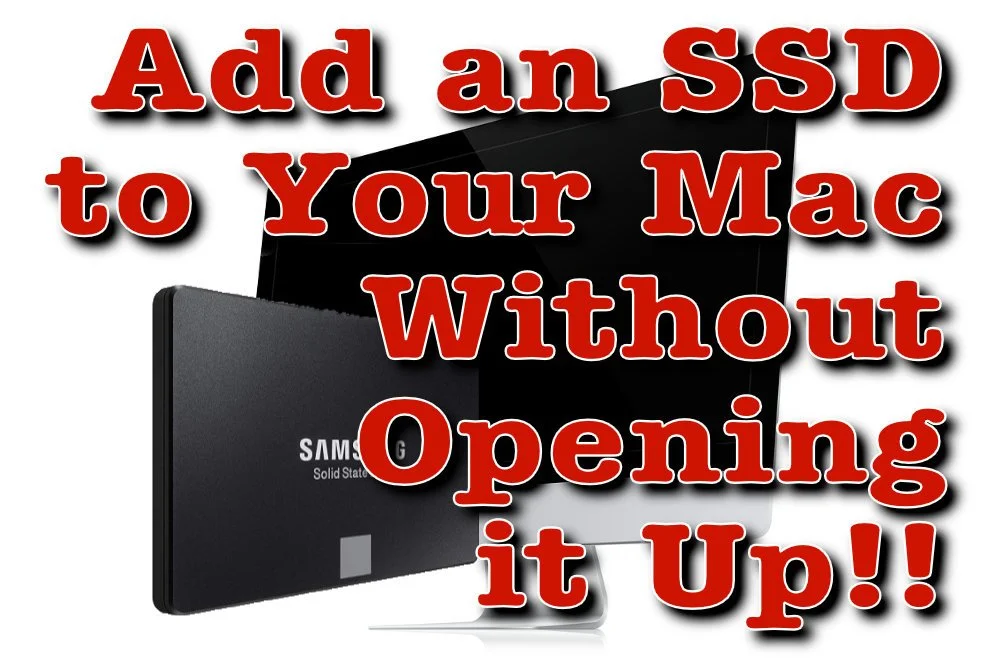
Apple charges ridiculous amounts for larger capacity solid state drives as an upgrade to a Mac. Here's how to keep from paying hundreds. We'll show you how to add an SSD to a Mac without opening up the case. The external SSD runs faster than an internal spinning hard drive. Today, Apple computer owners can't upgrade their internal drive. If you can, it 8takes some real skill to crack open the case and replace the internal drive.

Why Add an SSD to a Mac?
Let's say you bought a computer with a 128GB drive. Now that you've installed your large Bible study library all of your movies and the 10 years of digital photos you shot, the computer says it won't even let you install that tiny app from the Mac App store or download a new commentary series to your Bible software. The computer's running out of space.
The solve the problem of a full hard drive you have to add storage or replace the hard drive. In the old days we took off the bottom of the MacBook, unplugged the old drive and put in a new one. Replacing the drive in a Mac mini or iMac got a little more complicated, but the owner could still do it or take it to any computer shop. Today, you'll have to run through a complicated set of steps if you can even do the upgrade. A lot of Macs won't let users upgrade their storage without replacing the whole motherboard. Apple likes that because they want you to buy a new $2,000 computer or pay stupidly high prices at the time of purchase.

At the time of purchase, the upgrade to a 1 TB SSD on a Mac mini or MacBook Pro will cost $800. They charge $700 on an iMac. Compare that to buying an internal SSD from Amazon, which costs as low as $125-$175 for a base level 1TB internal SSD. You can get a really great high-end drive like a Samsung EVO drive for about $300. Add an enclosure for $20-$50 and you're saving a lot of money.
Can I use an external drive as my main startup drive to run macOS and all my programs? Yes. I did this on a Mac mini for years before I learned how to crack the thing open to upgrade the drive with an internal SSD. The process of using an external SSD worked great.
An external SSD won't run as fast as an internal SSD from Apple. That's not the comparison that matters. Look at the speed of the slow internal traditional spinning hard drives Apple uses and you'll notice a big speed increase by booting from an external SSD connected to the computer's mini-DVI port or a USB-C Thunderbolt port.
What You Need to Add an SSD to a Mac
Here's what you'll need to add an external SSD to your Mac, copy the internal drive over to the external and then tell the computer to boot from the external drive instead of the internal drive.
- An SSD (internal or external)
- A 2.5-inch hard drive enclosure, unless you choose an external solid state drive (more on that below)
- Software to copy the contents of your old internal hard drive to the new external drive
- A way to attach the new external drive to your laptop
Choose Your SSD
You have to decide if you want to save some money by getting an internal SSD and a hard drive enclosure or do you want to get a simpler external solid state drive that usually costs more.
Consider the SanDisk 1TB Extreme Portable External SSD. It connects via USB-C and costs under $200 on Amazon. Or you could get the Crucial MX500 1TB 3D NAND SATA 2.5 Inch Internal SSD for about $135 also on Amazon.

If you go with the second option, you'll need to put it in an enclosure. That's a little box that you install the drive in. It comes with the cable to hook it up to your USB-C port on your Mac. Take a look at the $15 enclosure from Aukey (see above). Some older Macs don't have USB-C so get an enclosure that plugs into a USB 3.0 port, which won't run as fast, but will still run faster than an internal spinning hard drive. You'll find a bunch of them on Amazon.
If you go with the internal SSD and drive enclosure, then install the new drive in the enclosure. Follow the instructions that came with the enclosure.
Copy the Old Drive to the New External Drive
To copy the old internal drive contents to the new external drive, plug the external drive into the USB C or USB 3.0 port. Make sure it's ready and working. You may want to open Disk Utility on your Mac. It's in the Utilities folder of your Applications folder. You can also use the keyboard shortcut COMMAND+Space Bar to open Spotlight Search. Type Disk Utility and make sure it's selected and hit enter or click on it with your mouse or trackpad.
The video above from the folks iFixit at shows exactly how to format the drive and then use the utility below to clone your Mac hard drive to the new SSD.

Select the drive in the list on the right. Be careful to select the external drive and not your internal drive. Then click on Erase on the toolbar.

Give the new drive a title, choose Mac OS Extended (Journaled) in the Format: section and GUID Partition Map in the Scheme: section. Click on the Erase button in the lower right corner of the dialog box that pops up. Let it finish erasing the drive.
Next, head over to the SuperDuper! website and get the file by clicking Download in the upper right corner o the webpage (as of January 2019 - location of the link may change). The downloads a DMG image file.
Install SuperDuper! on your computer. You'll have to give it special permission since a box pops up that says:
macOS will not allow SuperDuper! to copy your drive until you authorize us to do so.
This is done by adding the SuperDuper! application to the "Full Disk Access" section of the Security & Privacy preference pane in System Preferences.
Quit SuperDuper! and we'll open the proper preference pane for you. Once you've added us, re-open SuperDuper! and you should be good to go.

Follow those instructions to make SuperDuper! work. This happens by hitting Quit and it opens the Security Settings screen. Click the little Lock icon in the lower left (see above image) and enter your computer password. Then under the list box click the plus icon and choose SuperDuper! from your list of Applications.
Now you can run SuperDuper! to copy the internal drive to the external drive. The first time you run the utility it will open a comprehensive help file in the Preview program or whatever you use to read PDF files by default.

In the first Copy drop down box (upper left) choose the Macintosh HD. In the second drop down box choose the new drive you just erased. Look for the name you gave it in Disk Utility. I didn't enter one so mine says Untitled. You don't need to change an Options. You can schedule the operation for a later date if you prefer. If not, just hit Copy Now and let it copy. Don't do anything because you might add files while it's copying and that could mess things up.
Boot with New External Drive
It's time to test out the new external drive. Close everything and restart the computer by clicking on the Apple icon in the menu bar's left end. Choose Restart. Let the Mac restart. When it begins to start back up hold down the OPTION key on the keyboard. The computer will show the drives available to boot from. If SuperDuper! worked properly, then you'll see at least two drives. Choose the new drive (the internal will sit on the left and the new drive on the right).

After you select the new drive let the computer start. It should work fine and start up like it did before.
If the new drive makes things faster than the internal spinning hard drive, then everything worked properly. If not, something's wrong. Let everything that runs at startup. Give it a minute and start launching programs.
Run this way for a few days to weeks just to make sure it continues to work. Then if you want you can erase the internal drive and use it as a second drive to store things like media (videos, music, photos) and documents.
Attach the Drive to Your MacBook
You might now want an external drive hanging off your laptop computer. This is the biggest argument against doing what we're suggesting in this how to. However, if you don't mind the external drive the you're done. However, you could attach the drive to your computer so it stays put while carrying the computer around.
Get a case or cover so you're not putting stickers directly on the computer. Find one online that looks the way you prefer. Then find some velcro that you can attach one side to the case and one side to the external drive. Plug in the cables and make sure there's enough cable to let you open the computer's lit while it's plugged in.
People who own a Mac mini or iMac can put the drive on their desk. You don't have to worry about affixing it the computer itself, unless you just want to clear up desk clutter.

Using Scrivener to Write Sermons

Preachers use different tools to write their sermons, from Microsoft Word, a simple text editor, word processors built into Bible software or something like Scrivener. Wes Allen, one of the Theotek Podcast contributors and American Baptist Church pastor, uses Scrivener to prepare his sermons. We talked about his workflow and why he uses the program in a recent Theotek Podcast that we recorded live on our Theotek Podcast Facebook page.Scrivener is a word processor. That's the simple way to describe it, but there's more to it than that. Some people think of the program as a tool for writing books or long form documents, like a doctoral dissertation. Wes uses it that way, but also uses it for shorter form documents, like his weekly sermons. That's because the built-in organization and writing tools work better for him that what most preachers probably use - Microsoft Word.https://www.youtube.com/watch?v=SHDYJdkAAic&t=30sPlease watch the video above from our YouTube Channel. In it Wes talks about...
- The way to format text using styles
- Setting up templates for outline forms
- Using the dual pane view to see the text of the sermon next to the other documents
- Organizing the files and folders
- Exporting for use in preaching and writing books from a sermon series
... and more!
Scrivener Organization for Sermon Prep
 He uses one Scrivener file per year. He then creates folders inside Scrivener for each sermon series or season. This lets him organize things easily within Scrivener. Under each series or season, he creates folders for each sermon. Then in those folders he places three documents (see image above).
- Translation of the primary text - he creates his own translation of the Greek or Hebrew text.
- Big Idea - the main idea of his message explained in a single document.
- Sermon Text - this document where he writes the sermon itself.
My Scrivener Organization
I really like this way of organizing each sermon. However, I don't do a full translation of my sermon. So I might organize things in Scrivener similarly, but in a slightly different way that better fits how prepare my sermons.First, I will organize my sermons around sermon series instead of year. That's because I sometimes preach through a book of the Bible and this might take more than one year or I might start it in September, take a break for the holidays, and then go back to it in January. Organizing that series by year would break it into two files. So, instead, I'd create a Scrivener file for First, Second and Third John, the last sermon series I recently finished just before the Easter season in February.Next, in each sermon folder I plan to create one Scrivener document for study notes called Text Notes. I create these notes in my Bible software while I'm studying the text. Then, I'll copy and paste the text of the Bible passage and the notes into the Text Notes document in Scrivener. I usually use one of a few sermon outlines and I will create templates in Scrivener (see the video to see what I mean by templates) for each of these formats.
- Motivated sequence
- One-point inductive
- Negative options indicative outline
Motivated Sequence Outline
A Motivated Sequence outline comes from the book 12 Essential Skills for Great Preaching by Wayne McDill, my seminary professor who taught at Southeastern Seminary. Here's the outline for this kind of sermon:
- Attention Getter - a way to grab the audience's attention with an anecdote, controversial statement or quote, joke or video.
- Need Element - some call this the Fallen Condition Focus; it's a way of showing the way the passage deals with our problems, which draw people into listening to your sermon and show the answer from the passage.
- Solution - the body of the message will offer the solution to the need mentioned above with as many outline points as needed to cover the ideas in the passage.
- Explanation - explain how text solves the problem.
- Illustration - illustrates the meaning of the text's main ideas and illustrate how to put the ideas into action.
- Proof - shows that the ideas are true since people don't just assume that the Bible is true like we believers do.
- Application - clear and concrete ways to apply the ideas presented.
- Visualization - show what the solution looks like with an illustration, story or video that helps people see how to apply the message.
- Appeal - tangible way or ways that the audience can respond to the message with specific and concrete steps.
Inductive Sermon Outlines
The other two outlines I use are inductive outlines. They both offer a single main idea. The one-point inductive approach will follow the outline below:
- Grab attention.
- Share a need that the passage solves.
- explain that need
- illustrate how that need affects the hearers
- Explain how the how the passage deals with the need.
- sharing details first
- then offer the main idea
- Illustrate how that passage solves that need.
- Prove the idea
- Apply the passage's solution in that Big Idea with an appeal to the audience to do something with the idea.
The last outline follows a negative solutions offered by people and then turns to the way the passage shows that God solves this problem. It is also inductive and a single main idea presented after exploring some ways the humans try to solve the fallen condition focus. These come from the passage just as the main idea.

Logos Hears Outcry & Reneges on Shelving Logos Now, Mostly
And a great outcry was heard from the Logos forums as the masses wailed and moaned the loss of Logos Now and Faithlife Connect replacing it. Then, their outcry was heard from Bellingham and grace was issued to all.A biblical writer might write the account of Logos Now that way, if we lived in those times. We don't and this doesn't rise to the level of biblical disaster, but the decision to do away with Logos Now hurt a lot of the Logos faithful and the outcry was great.
What Was Logos Now
 If you're not a Logos Bible Software user, then you may not understand what I'm talking about. The software produced by the company formerly known as Logos Bible Software and now called Faithlife, led by former Microsoft employee Bob Pritchett, began a subscription service awhile back called Logos Now. Some who disliked the idea joking called the service, "paying to beta test new features" while others liked getting the new features before a major .0 update, like the upcoming Logos 8.0, which I'd expect sometime this summer or fall.Logos Now included a bunch of things. the customers mostly like the getting new features NOW. Hence the name, Logos Now. About every 6 weeks the developers of Logos on both Mac and Windows released new tools or features in their desktop computer software.https://www.youtube.com/watch?v=aSBkxOZ1LeQPeople like me who love getting the latest greatest enjoyed the updates. It was fun to fire up your favorite Bible program and see that it was downloading something new. I'd rush over to the forums and find out what the new update included.A lof the new features that came out were a bit obscure and not something I really used. Occasionally they'd hit on something that people really liked.Included in these new features were the latest greatest version of Logos. So when version 7 came out, we didn't have to necessarily pay to get all the new tools rolled into the program. We already had some of them, but others came along for the ride in our subscription that costs about $10/month at first and then later became $99/year.To sweeten the deal, Faithlife threw in a few extras. At least that's the way we saw it. Here's what we enjoyed as subscribers:
- The new features about every 6 weeks.
- Access to a Mobile Ed course (video course on subjects; kind of like seminary inside Logos Bible Software).
- Discounts on new books.
- Access to a different resource to try each month and a discount if you wanted to keep it after the month.
- Discount when a new version of Logos comes out.
That's not a comprehensive list, but it includes the highlights. All that comes for under $100/year. I was happy.
Faithlife's Disconnect with Faithlife Connect
Then it all came crashing down. Faithlife employee Chris duMond took to the forums to announce the end of Logos Now and then introduction of Faithlife Connect. Here's what he wrote about the change from Logos Now to Faithlife Connect.
How Faithlife Connect affects Logos Now and Logos Cloud customersBecause this product includes many of the same features and benefits of both Logos Now and Logos Cloud, we’re migrating everyone who has a subscription to Logos Now and Logos Cloud to a subscription to Faithlife Connect. We’ll transition Logos Cloud and Logos Now customers into Faithlife Connect over the next day or so as we configure things on the back end. All active subscribers will retain their Logos Now/Cloud benefits through their subscription period.
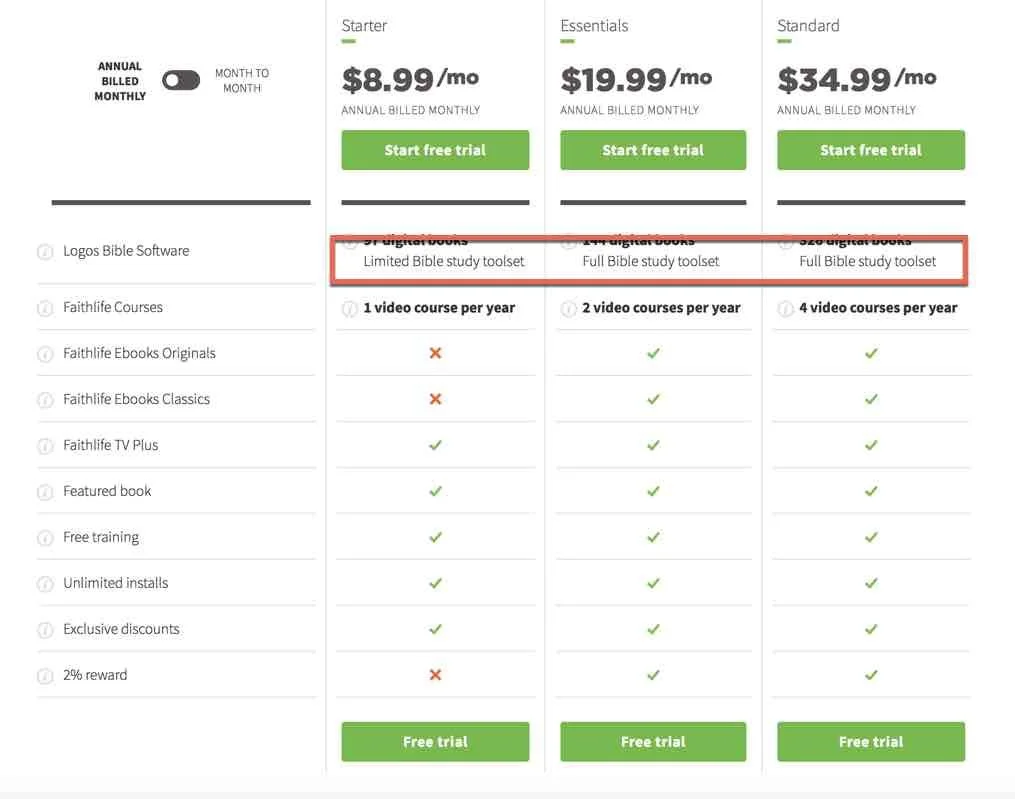
 The change shocked many people, like me, who liked Logos Now. Why was this a problem? to get everything we enjoyed in Logos Now we'd have to subscribe to Faithlife Connect Essentials, a $19.99 subscription charged annually at about $240/year. So our subscription went from about $100/year to $240, a 140% price increase. They claimed it was better because it included services like...
- Faithlife TV - a kind of Netflix for Christian movies and documentaries.
- 2 video courses (Mobile Ed) per year.
- Discounts.
- Free eBooks.
- Rewards of 2% - kind of like cash back or airlines miles.
Many of us didn't see these things as a big benefit. Not enough to more than double the price. We just wanted to the new features NOW. The outcry was great, indeed. Just read the huge thread that followed the announcement.Faithlife automatically migrated Logos Now subscribers to the new Faithlife Connect. This also angered many users who made that clear in another forum thread. Another thread stated that "Faithlife Connect punishes Logos' best customers!". People got angry, probably overreacted and many of us immediately went to our subscription page and turned off our auto-renew, which Faithlife automatically turned on for all customers they migrated from Logos Now to Faithlife Connect.In defense of Faithlife, they said that all Logos Now customers would get to keep their Logos Now features until their current subscription ran out or until early November 2018 whichever lasted the longest. I saw that some had paid up through 2019, so they would get to keep Logos Now for a long time still before having to decide what to do about the new service.
Happy Ending, For Now
 Faithlife CEO Bob Pritchett took to the forums and made a new announcement on Friday, March 2 entitled "Logos Now to continue at same price (with new name)". He wrote:
I am sorry for how we communicated the Logos Now / Faithlife Connect change. This was my fault, not the team's.We have been listening to your feedback and you have caused us to change our plan.The bottom line: We are reversing this change, and you do not have to do anything. You will be automatically returned to the situation as of two weeks ago, before our announcement.We are effectively restoring Logos Now at the same price, only with more value. This configuration will be called Faithlife Connect Essentials (No Library), and will come with everything in Faithlife Connect Essentials (https://connect.faithlife.com/) except the subscription-based access to the library.This is everything Logos Now was and a bit more, and will include other (non-library) improvements/benefits to Faithlife Connect Essentials as they are released.If you were happy with Logos Now, this is the same, with no change in price. As a Logos Now subscriber, you are grandfathered into this package and price point.
The ensuing thread filled up quickly with people thanking Bob for the change.
What Should You Do?
If you were a Logos Now subscriber, you have to decide what to do next. Here's a list of possible responses to the situation.
- Nothing - just enjoy the new feature and stick with what you have enjoying the features of Logos Now in a newly named service called Faithlife Connect Essentials (No library). That's what I think most people will do. That's what I'll probably do. I went to reinstate my auto-renew status. I have until November before I have to decide since my current subscription does not run out till then.
- Migrate to Faithlife Connect - for the few people who's saw the change and loved it, take the leap and get the new Faithlife Connect at one of several levels ranging in price from the Starter package at $9/moth with no new tools unless you buy them and own them to $200/month for Faithlife Connect Ultimate which gives you everything you can get in the service.
- Stop Subscribing and Buy - some users feel the pain of subscription which can change on the whim of the software publisher. So, they decided to stop subscribing, but they won't leave their Logos library behind. Instead, they'll just buy the new features when the company releases them, usually every two years.
- Move to Another Bible Program - a few users, even though Faithlife chose to renege on killing Logos Now, sort of, feel frustrated and whipped about emotionally. They plan to switch on principle to another program, like Accordance, WORDsearch, Bibleworks or Olive Tree. Those are the best solutions and probably Accordance offers the most since it has large library options and advanced study features. If a library matters most, then consider WORDsearch or Olive Tree. People who use mobile more should definitely pick Olive Tree, the best mobile Bible app that's not made by Faithlife. Only consider WORDsearch if you really love a large library, don't use mobile much, and will run the program on Windows only.
- Stop Buying Digital Libraries - my friend and Theotek contributor LaRosa Johnson has a great blog about Bible Study in general. He recommends not building a huge digital Bible study library.
For now, I'm doing two things. First, I've decided to take the next 8 months and consider whether the new Faithlife Connect Essentials (No library) will best meet my Bible study software needs. Before all of this, I was a fairly committed Logosian. Now I'm not as sure and feel a little uneasy about the company. I was planning to jump ship entirely before they reversed their decision, so they did at least temporarily keep me as a user.Second, I plan to get more proficient with Accordance Bible Software. They seem to offer the best solution for my needs.
- Fast - starting up Accordance 12 compared to starting up Logos 7 is like racing a station wagon against a Corvette.
- Full-featured - I can do most of the things I could do in Logos 7, albeit in different ways, using the features of Accordance.
- Library - Accordance includes a huge library of Bible study tools that offer competitive prices and their tagging is often superior to Logos.
- Mac-like/Windows-like user-interface - the Accordance user-interface looks more like a native Mac or a native Windows program while Logos wants to make their user-interface look the same on both platforms. This means they have used technology that creates an overlay on top of native window drawing tools in OS X and in Windows. This is why Logos runs slower than other programs. It was a mistake made in version 4 and they've never recovered from it. It's better, but still not as native as other programs. Many Logos users see this as a strength, however, I'm not one of them.
- Trustworthy - I know many of the people who work for Accordance and know I can trust that they will not make drastic changes to their policies without considering the needs of the user first, plus they work hard to respond to user's requests, needs and concerns. Please don't see this as a slam against any other company. I'm just endorsing Accordance Bible Software as trustworthy because of my past experience.
I still struggle with a few things. Logos syncs with other platforms except their web app exceptionally well. Accordance relies on Dropbox and on mobile you have to do this manually and their Android app's too new to even include sync of notes, highlights and other user-created tools. The notes features in Logos are better than Accordance. They offer better text formatting and will automatically create Bible verse links when they're typed. I don't have to manually add the link to turn a Bible verse into a pop-up or hyperlink. The diagramming tool in Logos is great and Accordance doesn't offer an analog.

Billy Graham, Technology and the Church

Billy Graham died today at the age of 99 after years of faithful ministry.One thing that surprised me to learn when I toured the Billy Graham library was his forward thinking use of technology to spread the Gospel. I'm not sure why it surprised me, but I'd never thought of him and tech together. In the library in Charlotte, NC there's an entire room dedicated to things like his use of film, radio, TV, and now the Internet to spread the message of God's grace. He used any means to share what "... the Bible says."Billy Graham even spoke at TED. It was back in 1999 and he talked about the use of technology in his ministry.If you're not family with TED talks, these short speeches cover areas of interest to a mostly technology enthusiast crowd in various places around the world. You can get their apps on your phone or streaming boxes and online.Here's his TED Talk in California back in 1999 in California.https://www.youtube.com/watch?v=90mj79GqWhc

Bible Updates and Facebook Live: Theotek Podcast #104
Learn about Bible updates and the future of the Theotek Podcast in this week's show.In my previous post, I shared that we're changing our official home of the Theotek Podcast to Facebook Live. This is the first episode that we recorded using Ecamm Live over Facebook Live instead of using Google Hangouts and YouTube Live. Give it a watch below and go on over to our new Facebook Page where you can find all of our podcasts going forward. In this episode Rick Mansfield showed up of the updates that came in Accordance Bible software 12.2.2, bringing a build-in web browser. I love this new feature because it mean I can use Accordance and access my Logos books and WORDsearch books all from one program.https://www.youtube.com/watch?v=yQpNkluS04c&feature=youtu.beAfter that I shared updates to Laridian's PocketBible app for iOS and Logos Bible mobile app updates. I'm working on a full review. Go follow me on Twitter to get notice when that review goes live over at Church Tech Today.Here's the list of "Our Favorite Things" - the things recommend because we love them.
- DJI Spark Drone - a small 1080P drone that's compact and takes awesome photos and videos.
- LG UltraFine 5K Display - high-end display that's NOT 4K but 5K resolution.
- History of QuickVerse/Parsons Technology - history of QuickVerse Bible software and Parson's Technology from Craig Rairdin, the founder.
- SizzlingKeys - an app for controlling iTunes in a compact form.
- Ecamm Live and Call Recorder - software we used to record our Skype conversation directly to Facebook Live.